Translations:KOffice/Tutorials/Artistic Text Shape/9/da and Karbon/Tutorials/Artistic Text Shape/da: Difference between pages
Importing a new version from external source |
Importing a new version from external source |
||
| Line 1: | Line 1: | ||
<languages /> | |||
Denne vejledning vil vise dig, hvad du kan gøre med <menuchoice>Form til en enkelt tekstlinje</menuchoice>. Denne vejledning foregår i '''Karbon''', men formen er tilgængelig i andre af '''KOffices''' programmer og fungerer på tilsvarende måde i dem alle. | |||
I denne vejledning skal du | |||
* lave en tekstform | |||
* associere tekstformen med en sti | |||
{{Tip|Hvis en dokker ikke er synlig, så kan du enten vælge den i menuen <menuchoice>Indstillinger -> Dokkere</menuchoice> eller højreklikke på dokkerens titel og derved gøre dokkeren synlig.}} | |||
== Første skridt med en tekstform == | |||
{|class="tablecenter vertical-centered" | |||
|[[Image:Add-artistic-text-shape.png]] || For at tilføje en tekstform griber du <menuchoice>Form til en enkelt tekstlinje</menuchoice> i dokkeren <menuchoice>Tilføj form</menuchoice> og trækker den ud på lærredet. | |||
|} | |||
Efter at have tilføjet formen vil du nok redigere teksten til noget mere interessant. For at kunne dette, skal du aktivere <menuchoice>Redigeringsværktøj til kunstnerisk tekst</menuchoice> enten ved at dobbeltklikke på den nytilføjede form eller ved at klikke på ikonet [[Image:Artistictext-tool.png]] i <menuchoice>Værktøjer</menuchoice>. Så kan du ændre teksten til noget i retning af dette. | |||
[[Image:Boring-artistic-text-shape.png|center]] | |||
{|class="tablecenter vertical-centered" | |||
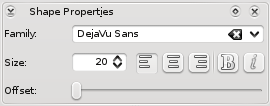
| Eftersom du ønsker en smart tekst, så må du ændre skrifttypen. Det gør du ved at ændre egenskaber i dokkeren <menuchoice>Tekstegenskaber</menuchoice>, hvor du kan ændre skrifttype, størrelse, stil og ''Forskydning'', som vil blive brugt til at kontrollere tekstens position på en stiform. || [[Image:Shape-properties-artistic-text-shape.png]] | |||
|} | |||
Efter at have ændret <menuchoice>Familie</menuchoice> til "Steve", <menuchoice>Størrelse</menuchoice> til 30 og valgt <menuchoice>Fed tekst</menuchoice> har du følgende form på dit lærred: | Efter at have ændret <menuchoice>Familie</menuchoice> til "Steve", <menuchoice>Størrelse</menuchoice> til 30 og valgt <menuchoice>Fed tekst</menuchoice> har du følgende form på dit lærred: | ||
[[Image:Cool-artistic-text-shape.png|center]] | [[Image:Cool-artistic-text-shape.png|center]] | ||
== Path follower == | |||
This is still a very straight, flat text. Now we want a curvy text. To do this, we will need to create a path, for instance, using the <menuchoice>Freehand Path Drawing Tool</menuchoice> [[Image:Draw-freehand.png]]. | |||
You should have something like this: | |||
[[Image:Cool-artistic-text-shape-and-curve.png|center]] | |||
To associate the text with the curve, you need to activate the <menuchoice>artistic text tool</menuchoice> by double clicking on the text, or selecting [[Image:Artistictext-tool.png]]. | |||
Then, if you move the mouse on top of the curve you will see the cursor changing to a hand, you will need to click on the curve. In the | |||
<menuchoice>Tool options</menuchoice> docker, the <menuchoice>Attach path</menuchoice> icon [[Image:Artistictext-attach-path.png]] is now enabled, and you need to click on it to attach the path. Using the offset in the <menuchoice>Shape properties</menuchoice> docker, you can adjust the text to get the following result: | |||
[[Image:Cool-curvy-artistic-text-shape.png|center]] | |||
You can detach the path by clicking on [[Image:Artistictext-detach-path.png]]. You can <menuchoice>translate</menuchoice>, <menuchoice>rotate</menuchoice> and <menuchoice>edit</menuchoice> the text. If you change the curve, then the text will be updated. | |||
[[Category:Office]] | |||
[[Category:Tutorials]] | |||
[[Category:Graphics]] | |||
Revision as of 10:41, 16 October 2010
Denne vejledning vil vise dig, hvad du kan gøre med . Denne vejledning foregår i Karbon, men formen er tilgængelig i andre af KOffices programmer og fungerer på tilsvarende måde i dem alle.
I denne vejledning skal du
- lave en tekstform
- associere tekstformen med en sti
Første skridt med en tekstform
 |
For at tilføje en tekstform griber du i dokkeren og trækker den ud på lærredet. |
Efter at have tilføjet formen vil du nok redigere teksten til noget mere interessant. For at kunne dette, skal du aktivere enten ved at dobbeltklikke på den nytilføjede form eller ved at klikke på ikonet  i . Så kan du ændre teksten til noget i retning af dette.

Efter at have ændret til "Steve", til 30 og valgt har du følgende form på dit lærred:

Path follower
This is still a very straight, flat text. Now we want a curvy text. To do this, we will need to create a path, for instance, using the ![]() .
.
You should have something like this:

To associate the text with the curve, you need to activate the by double clicking on the text, or selecting  .
.
Then, if you move the mouse on top of the curve you will see the cursor changing to a hand, you will need to click on the curve. In the
docker, the icon ![]() is now enabled, and you need to click on it to attach the path. Using the offset in the docker, you can adjust the text to get the following result:
is now enabled, and you need to click on it to attach the path. Using the offset in the docker, you can adjust the text to get the following result:

You can detach the path by clicking on ![]() . You can , and the text. If you change the curve, then the text will be updated.
. You can , and the text. If you change the curve, then the text will be updated.


