Kopete/Jabber/Adding friends: Difference between revisions
No edit summary |
Removed emphasis from link |
||
| (4 intermediate revisions by 2 users not shown) | |||
| Line 1: | Line 1: | ||
<languages /> | |||
<translate> | |||
<!--T:1--> | |||
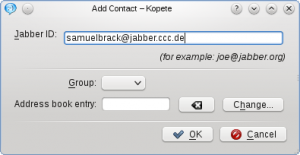
After your first login, your '''Kopete''' window is quite empty. There might be a default contact added by your server which perhaps sends you a welcome message, but there are no real contacts in your roster (this is by the way the word for "contact list" in the Jabber world). The first step for adding friends in Jabber is, of course, asking them for their Jabber ID. When you got one, you can immediately add it to '''Kopete'''. You can either click <menuchoice>Add -> [email protected]</menuchoice> or <menuchoice>File -> Add Contact -> [email protected]</menuchoice>. A new window appears asking for the <menuchoice>Jabber ID</menuchoice> we want to add to our roster. Just type it in and click <menuchoice>OK</menuchoice>. The <menuchoice>Group</menuchoice> option is used, when you specified groups of contacts (e.g. "family" and "work"). A connection to your [[Special:myLanguage/KAddressBook|KAddressBook]] can be established with <menuchoice>Address book entry</menuchoice>, so that you can exchange information like profile pictures between the two applications. | |||
<!--T:2--> | |||
[[File:Kopetetutorial_snap009_addfriend.png|thumb|center|300px|Adding a friend]] | [[File:Kopetetutorial_snap009_addfriend.png|thumb|center|300px|Adding a friend]] | ||
<!--T:3--> | |||
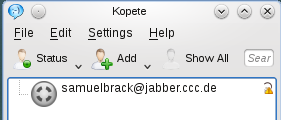
Now you've added your first friend to your roster. But before you can start writing messages to him or her, your contact has to authorize your request. Until this happens, the contact appears with a small yellow exclamation mark on the right side of his contact field. | Now you've added your first friend to your roster. But before you can start writing messages to him or her, your contact has to authorize your request. Until this happens, the contact appears with a small yellow exclamation mark on the right side of his contact field. | ||
<!--T:4--> | |||
[[File:Kopetetutorial_snap010_exlamationmarkfriend.png|thumb|center|300px|Your contact]] | [[File:Kopetetutorial_snap010_exlamationmarkfriend.png|thumb|center|300px|Your contact]] | ||
When your friend authorized your request or added you to his or her roster, its icon will appear colored when online. The exact meanings of the different icons (Online, Away etc.) can be seen at <menuchoice>Status</menuchoice> where you can set them yourself, too. You | <!--T:5--> | ||
When your friend authorized your request or added you to his or her roster, its icon will appear colored when online. The exact meanings of the different icons (Online, Away etc.) can be seen at <menuchoice>Status</menuchoice> where you can set them yourself, too. You receive a notification when you are authorized. | |||
Normally, your friend will put you also to his or her contact list, so you have to authorize this request by yourself, too. Kopete | <!--T:6--> | ||
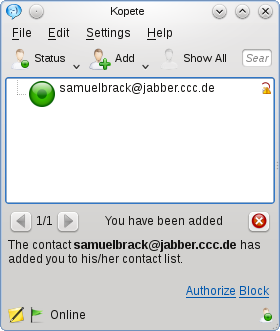
Normally, your friend will put you also to his or her contact list, so you have to authorize this request by yourself, too. '''Kopete''' notifies about that at the bottom with a green flag and the description of the request. Click on <menuchoice>Authorize</menuchoice> to accept. The notification area can be closed by clicking on the cross on the upper-right side of the area. | |||
<!--T:7--> | |||
[[File:Kopetetutorial_snap011_addedbyfriend.png|thumb|center|300px|You're now added by your contact]] | [[File:Kopetetutorial_snap011_addedbyfriend.png|thumb|center|300px|You're now added by your contact]] | ||
<!--T:8--> | |||
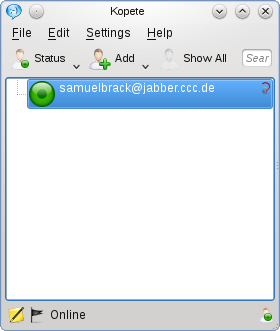
After that procedure you should see a contact list like in the next image. | After that procedure you should see a contact list like in the next image. | ||
<!--T:9--> | |||
[[File:Kopetetutorial_snap012_fullauthorized.png|thumb|center|300px|Your contact is fully authorized]] | [[File:Kopetetutorial_snap012_fullauthorized.png|thumb|center|300px|Your contact is fully authorized]] | ||
<!--T:10--> | |||
You successfully added your first contact to your roster now. | You successfully added your first contact to your roster now. | ||
<hr> | |||
<!--T:11--> | |||
<hr /> | |||
{{Prevnext|Special:myLanguage/Kopete/Jabber|Special:myLanguage/Kopete/Jabber/Messaging_and_sending_files|Return to index|Page 6 - Messaging and sending files}} | {{Prevnext|Special:myLanguage/Kopete/Jabber|Special:myLanguage/Kopete/Jabber/Messaging_and_sending_files|Return to index|Page 6 - Messaging and sending files}} | ||
<!--T:12--> | |||
[[Category:Internet]] | |||
</translate> | |||
Latest revision as of 06:07, 15 December 2010
After your first login, your Kopete window is quite empty. There might be a default contact added by your server which perhaps sends you a welcome message, but there are no real contacts in your roster (this is by the way the word for "contact list" in the Jabber world). The first step for adding friends in Jabber is, of course, asking them for their Jabber ID. When you got one, you can immediately add it to Kopete. You can either click or . A new window appears asking for the we want to add to our roster. Just type it in and click . The option is used, when you specified groups of contacts (e.g. "family" and "work"). A connection to your KAddressBook can be established with , so that you can exchange information like profile pictures between the two applications.

Now you've added your first friend to your roster. But before you can start writing messages to him or her, your contact has to authorize your request. Until this happens, the contact appears with a small yellow exclamation mark on the right side of his contact field.

When your friend authorized your request or added you to his or her roster, its icon will appear colored when online. The exact meanings of the different icons (Online, Away etc.) can be seen at where you can set them yourself, too. You receive a notification when you are authorized.
Normally, your friend will put you also to his or her contact list, so you have to authorize this request by yourself, too. Kopete notifies about that at the bottom with a green flag and the description of the request. Click on to accept. The notification area can be closed by clicking on the cross on the upper-right side of the area.

After that procedure you should see a contact list like in the next image.

You successfully added your first contact to your roster now.
- ← Return to index
- Kopete/Jabber/Adding friends
- Page 6 - Messaging and sending files →
