Plasma/Panels/pl: Difference between revisions
Created page with "Panel jest zasobnikiem dla widgetów, który może być umieszczony po każdej stronie pulpitu. Można także umieszczać kilka paneli po tej samej stronie. W domyślnym ukła..." |
Updating to match new version of source page |
||
| (15 intermediate revisions by 2 users not shown) | |||
| Line 1: | Line 1: | ||
<languages/> | <languages/> | ||
== | == Panele w Plasma Desktop == | ||
<div class="mw-translate-fuzzy"> | |||
[[Image:Panel_Settings.png|thumb|512px|center|Panel in configuration mode with <menuchoice>More settings</menuchoice>-submenu open.]] | [[Image:Panel_Settings.png|thumb|512px|center|Panel in configuration mode with <menuchoice>More settings</menuchoice>-submenu open.]] | ||
</div> | |||
<div class="mw-translate-fuzzy"> | |||
Panel jest zasobnikiem dla widgetów, który może być umieszczony po każdej stronie pulpitu. Można także umieszczać kilka paneli po tej samej stronie. W domyślnym układzie jest jeden panel, który rozciąga się po całej dolnej krawędzi pulpitu, z następującymi widgetami: [[Special:myLanguage/Plasma/Kickoff|menu aktywatorów aplikacji]], [[Special:myLanguage/Plasma/Pager|pager pulpitowy]], [[Special:myLanguage/Plasma/Tasks|menedżer zadań]] (lista otwartych okien), [[Special:myLanguage/Plasma/SystemTray|tacka systemowa]], [[Special:myLanguage/Plasma/DeviceNotifier|menedżer urządzeń]] oraz [[Special:myLanguage/Plasma/Clocks|zegar]]. Jeśli używasz laptopa, netbooka, albo innego komputera, który używa baterii pojawi się także widget [[Special:mylanguage/Plasma/Plasmoids#PowerDevil|monitora baterii]] na panelu. Na końcu panela znajduje się przycisk skrzynki narzędziowej, który może być uruchomiony, aby uzyskać dostęp do opcji konfiguracyjnych. | Panel jest zasobnikiem dla widgetów, który może być umieszczony po każdej stronie pulpitu. Można także umieszczać kilka paneli po tej samej stronie. W domyślnym układzie jest jeden panel, który rozciąga się po całej dolnej krawędzi pulpitu, z następującymi widgetami: [[Special:myLanguage/Plasma/Kickoff|menu aktywatorów aplikacji]], [[Special:myLanguage/Plasma/Pager|pager pulpitowy]], [[Special:myLanguage/Plasma/Tasks|menedżer zadań]] (lista otwartych okien), [[Special:myLanguage/Plasma/SystemTray|tacka systemowa]], [[Special:myLanguage/Plasma/DeviceNotifier|menedżer urządzeń]] oraz [[Special:myLanguage/Plasma/Clocks|zegar]]. Jeśli używasz laptopa, netbooka, albo innego komputera, który używa baterii pojawi się także widget [[Special:mylanguage/Plasma/Plasmoids#PowerDevil|monitora baterii]] na panelu. Na końcu panela znajduje się przycisk skrzynki narzędziowej, który może być uruchomiony, aby uzyskać dostęp do opcji konfiguracyjnych. | ||
</div> | |||
== | == Konfiguracja == | ||
<div class="mw-translate-fuzzy"> | |||
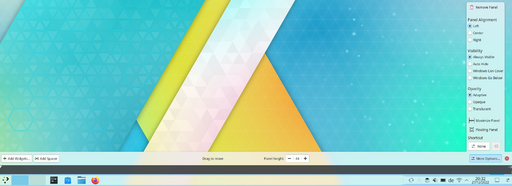
Panel może być konfigurowany poprzez kliknięcie na skrzynce narzędziowej, która znajduje się na dole po prawej stronie na panelu poziomym lub pionowym. Na ten czas panel będzie w trybie konfiguracji. Konfiguracja panela może się również odbywać poprzez menu kontekstowe, po kliknięciu prawym przyciskiem myszy na panelu. | |||
</div> | |||
[[Image: | [[Image:Panel edit mode v5-26.png|thumb|512px|center|Panel in configuration mode with <menuchoice>More settings</menuchoice>-submenu open]] | ||
<div class="mw-translate-fuzzy"> | |||
Widgety w panelu mogą być sortowane, poprzez przeciąganie ich w trybie konfiguracji. Widgety wyrównywane są do lewej w poziomie i do góry w pionowej pozycji panela. | |||
</div> | |||
<span id="The Panel Toolbox"></span> | <span id="The Panel Toolbox"></span> | ||
=== | === Skrzynka narzędziowa Panela === | ||
* | * Size arrows: The arrows on the bar in the middle allow the panel size to be adjusted. | ||
** Arrows pointing left change the minimum panel size. | |||
** Arrows pointing right change the maximum panel size. | |||
** The arrow pointing up is the center of the panel. | |||
** To adjust the height of a horizontal panel or the width of a vertical panel, use the spin box in the toolbox. | |||
** After resizing a panel, you can reset it to maximized in the <menuchoice>More Options</menuchoice> menu. | |||
*<menuchoice> | <div class="mw-translate-fuzzy"> | ||
*<menuchoice>Dodaj elementy...</menuchoice>: Umożliwia dodawanie widgetów do panela. | |||
</div> | |||
*<menuchoice> | *<menuchoice>Add Spacer</menuchoice>: Allows you to add a spacer into the panel giving space between the items in it. | ||
**The standard behavior of a spacer is that it uses as much space as possible (flexible size), but you can also set it to a <menuchoice>fixed size:</menuchoice>. Enter the context (right click) menu and deactivate <menuchoice>Set Flexible Size</menuchoice>. | |||
<div class="mw-translate-fuzzy"> | |||
*<menuchoice>Skraj ekranu</menuchoice>: Pozwala przeciągnąć panel do każdej z czterech krawędzi ekranu. | |||
</div> | |||
*<menuchoice>Remove this panel</menuchoice>: Removes the current panel and all widgets in it. | |||
*<menuchoice> | <div class="mw-translate-fuzzy"> | ||
*<menuchoice>Wysokość</menuchoice> (dla poziomych paneli): Pozwala na regulację wysokości panela. | |||
</div> | |||
*<menuchoice> | *<menuchoice>More Options</menuchoice>: Opens additional settings for the panel (see next section). | ||
=== The "More Settings" Menu === | === The "More Settings" Menu === | ||
| Line 41: | Line 64: | ||
**<menuchoice>Windows go below</menuchoice>: This allows windows to go below the panel, even when maximised. | **<menuchoice>Windows go below</menuchoice>: This allows windows to go below the panel, even when maximised. | ||
*<menuchoice>Opacity</menuchoice> | |||
**<menuchoice>Adaptive</menuchoice>: Makes the panel opaque when any windows are touching it, and translucent otherwise. | |||
**<menuchoice>Opaque</menuchoice>: Makes the panel always opaque, | |||
**<menuchoice>Translucent</menuchoice>: Makes the panel always translucent. | |||
*<menuchoice>Maximize Panel</menuchoice>: Makes the panel fit to the screen edges, if it has been resized. | *<menuchoice>Maximize Panel</menuchoice>: Makes the panel fit to the screen edges, if it has been resized. | ||
*<menuchoice> | *<menuchoice>Floating Panel</menuchoice>: Adds some margin around the panel when no windows are touching it. | ||
*<menuchoice>Remove Panel</menuchoice>: Deletes the panel. | |||
*<menuchoice>Shortcut</menuchoice>: Allows you to set a shortcut to focus the panel when it is not currently visible. | |||
== | == Adding Panels == | ||
It is also possible to have more than one panel on your desktop. This proves useful if you want to have a more flexible layout: | It is also possible to have more than one panel on your desktop. This proves useful if you want to have a more flexible layout: | ||
[[ | [[File:Panel multi.png|thumb||768px|center|Screenshot showing a desktop with multiple panels: a floating centered vertical panel with an application launcher and icons-only task manager, and a second panel placed horizontally at the top of the screen with global application menu, system tray, and clock.]] | ||
To add a new panel either click on the desktop toolbox button and select <menuchoice>Add Panel</menuchoice> or open the context (right click) menu on the desktop and select <menuchoice>Add Panel</menuchoice> from the menu. | |||
If more than one kind of Panel is installed, you will be able to select between them to choose what sort of Panel you would prefer. By default, two Panel types are available: <menuchoice>Default Panel</menuchoice>, which creates a Panel containing all of the default widgets (launcher, pager, tasks, system tray, clock, etc.), and <menuchoice>Empty Panel</menuchoice>, which adds a blank Panel without any pre-configured widgets in it. | |||
=== Under the Hood === | |||
Should anything "untoward" happen to your panel have a look at <tt>~/.config/plasma-org.kde.plasma.desktop-appletsrc</tt> - the panel itself is classed as a containment (there are at least two, the desktop and the panel) which is home to all the different widgets you put there. | |||
{{Remember|2=Info needed|1=Here the relevant section of <tt>plasma-desktop-appletsrc</tt> for a default panel containment should go. Please help us provide the info if you know anything about this.}} | |||
[[Category:Desktop]] | [[Category:Desktop]] | ||
[[Category:Plasma]] | [[Category:Plasma]] | ||
Latest revision as of 21:34, 7 January 2023
Panele w Plasma Desktop
Panel jest zasobnikiem dla widgetów, który może być umieszczony po każdej stronie pulpitu. Można także umieszczać kilka paneli po tej samej stronie. W domyślnym układzie jest jeden panel, który rozciąga się po całej dolnej krawędzi pulpitu, z następującymi widgetami: menu aktywatorów aplikacji, pager pulpitowy, menedżer zadań (lista otwartych okien), tacka systemowa, menedżer urządzeń oraz zegar. Jeśli używasz laptopa, netbooka, albo innego komputera, który używa baterii pojawi się także widget monitora baterii na panelu. Na końcu panela znajduje się przycisk skrzynki narzędziowej, który może być uruchomiony, aby uzyskać dostęp do opcji konfiguracyjnych.
Konfiguracja
Panel może być konfigurowany poprzez kliknięcie na skrzynce narzędziowej, która znajduje się na dole po prawej stronie na panelu poziomym lub pionowym. Na ten czas panel będzie w trybie konfiguracji. Konfiguracja panela może się również odbywać poprzez menu kontekstowe, po kliknięciu prawym przyciskiem myszy na panelu.

Widgety w panelu mogą być sortowane, poprzez przeciąganie ich w trybie konfiguracji. Widgety wyrównywane są do lewej w poziomie i do góry w pionowej pozycji panela.
Skrzynka narzędziowa Panela
- Size arrows: The arrows on the bar in the middle allow the panel size to be adjusted.
- Arrows pointing left change the minimum panel size.
- Arrows pointing right change the maximum panel size.
- The arrow pointing up is the center of the panel.
- To adjust the height of a horizontal panel or the width of a vertical panel, use the spin box in the toolbox.
- After resizing a panel, you can reset it to maximized in the menu.
- : Umożliwia dodawanie widgetów do panela.
- : Allows you to add a spacer into the panel giving space between the items in it.
- The standard behavior of a spacer is that it uses as much space as possible (flexible size), but you can also set it to a . Enter the context (right click) menu and deactivate .
- : Pozwala przeciągnąć panel do każdej z czterech krawędzi ekranu.
- : Removes the current panel and all widgets in it.
- (dla poziomych paneli): Pozwala na regulację wysokości panela.
- : Opens additional settings for the panel (see next section).
The "More Settings" Menu
- : Allows the alignment of the panel to be set in three pre-set positions.
-
- : Keeps the panel visible at all times, even when windows are maximised.
- : Hides the panel off screen until the mouse is placed near the screen edge.
- : This allows windows to cover the panel and if maximised, will cover the panel.
- : This allows windows to go below the panel, even when maximised.
-
- : Makes the panel opaque when any windows are touching it, and translucent otherwise.
- : Makes the panel always opaque,
- : Makes the panel always translucent.
- : Makes the panel fit to the screen edges, if it has been resized.
- : Adds some margin around the panel when no windows are touching it.
- : Deletes the panel.
- : Allows you to set a shortcut to focus the panel when it is not currently visible.
Adding Panels
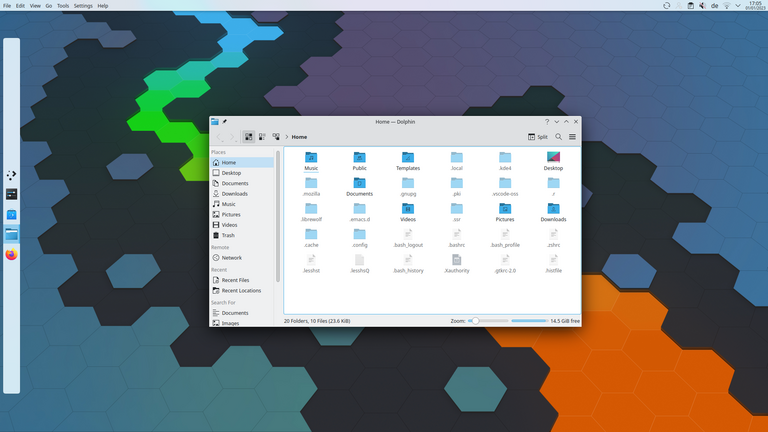
It is also possible to have more than one panel on your desktop. This proves useful if you want to have a more flexible layout:

To add a new panel either click on the desktop toolbox button and select or open the context (right click) menu on the desktop and select from the menu.
If more than one kind of Panel is installed, you will be able to select between them to choose what sort of Panel you would prefer. By default, two Panel types are available: , which creates a Panel containing all of the default widgets (launcher, pager, tasks, system tray, clock, etc.), and , which adds a blank Panel without any pre-configured widgets in it.
Under the Hood
Should anything "untoward" happen to your panel have a look at ~/.config/plasma-org.kde.plasma.desktop-appletsrc - the panel itself is classed as a containment (there are at least two, the desktop and the panel) which is home to all the different widgets you put there.


