Plasma/Panels: Difference between revisions
→Settings: spacer flexibe/fixed size |
m Fix minor typos |
||
| (53 intermediate revisions by 12 users not shown) | |||
| Line 1: | Line 1: | ||
<languages/> | |||
<translate> | |||
== Panels in Plasma Desktop == <!--T:1--> | == Panels in Plasma Desktop == <!--T:1--> | ||
<!--T: | <!--T:2--> | ||
[[Image: | [[File:Panel v5.26.png|thumb|512px|center|The default panel]] | ||
<!--T:3--> | |||
A Panel is a widget container which can be located on any side of the screen. There can be multiple panels on the screen or even on the same side. The default layout is one panel that stretches across the entire bottom of the desktop with the following widgets: [[Special:myLanguage/Plasma/Kickoff|application menu]], [[Special:myLanguage/Plasma/Pager|desktop pager]], [[Special:myLanguage/Plasma/Tasks|task manager]] (list of open windows), [[Special:myLanguage/Plasma/SystemTray|system tray]] (including things like [[Special:mylanguage/Plasma/Plasmoids#PowerDevil|power management]] if you are on a laptop), [[Special:myLanguage/Plasma/Clocks|digital clock]], and peek at desktop. | |||
== Configuration == <!--T:4--> | |||
<!--T:5--> | |||
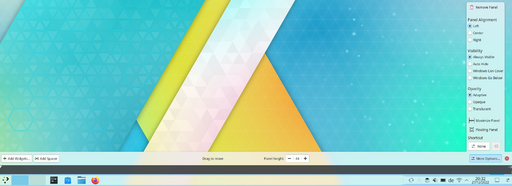
Panel configuration can be accessed via the context (right click) menu in the panel. At that point, the panel will be in edit mode. | |||
<!--T:32--> | |||
[[Image:Panel edit mode v5-26.png|thumb|512px|center|Panel in configuration mode with <menuchoice>More settings</menuchoice>-submenu open]] | |||
=== Arranging Widgets === <!--T:7--> | |||
Widgets in the panel can be sorted by dragging them when in configuration mode. Widgets align left in the horizontal and top in the vertical panel. You can center widgets in the panel by adding flexible sized spacers on both sides (see the section on the panel toolbox). | |||
= | </translate><span id="The Panel Toolbox"></span><translate> | ||
The | |||
<!--T: | === The Panel Toolbox === <!--T:8--> | ||
<!--T:33--> | |||
* Size arrows: The arrows on the bar in the middle allow the panel size to be adjusted. | |||
** Arrows pointing left change the minimum panel size. | |||
** Arrows pointing right change the maximum panel size. | |||
** The arrow pointing up is the center of the panel. | |||
** To adjust the height of a horizontal panel or the width of a vertical panel, use the spin box in the toolbox. | |||
** After resizing a panel, you can reset it to maximized in the <menuchoice>More Options</menuchoice> menu. | |||
<!--T:12--> | |||
*<menuchoice>Add Widgets</menuchoice>: Allows widgets to be added to the panel. This will open a sidebar from which you can drag widgets into the panel. | |||
<!--T:13--> | <!--T:13--> | ||
* | *<menuchoice>Add Spacer</menuchoice>: Allows you to add a spacer into the panel giving space between the items in it. | ||
**The standard behavior of a spacer is that it uses as much space as possible (flexible size), but you can also set it to a <menuchoice>fixed size:</menuchoice>. Enter the context (right click) menu and deactivate <menuchoice>Set Flexible Size</menuchoice>. | |||
< | <!--T:9--> | ||
*<menuchoice>Drag to move</menuchoice>: You can click into the empty space and drag the panel to any of the four edges of the screen. | |||
< | |||
<!--T:19--> | |||
**The standard behavior of a spacer is that it uses as much as possible | *<menuchoice>Remove this panel</menuchoice>: Removes the current panel and all widgets in it. | ||
<!--T:10--> | <!--T:10--> | ||
* | *<menuchoice>Height</menuchoice> (for horizontal panel)/<menuchoice>Width</menuchoice> (for vertical panel): Allows the panel height or width to be adjusted. To change the width of a horizontal panel or the height of a vertical panel, use the arrows. | ||
<!--T:34--> | |||
*<menuchoice>More Options</menuchoice>: Opens additional settings for the panel (see next section). | |||
=== The "More Settings" Menu === <!--T:15--> | |||
<!--T:16--> | |||
*<menuchoice>Panel Alignment</menuchoice>: Allows the alignment of the panel to be set in three pre-set positions. | |||
**<menuchoice>Left/Top</menuchoice> | |||
**<menuchoice>Center</menuchoice> | |||
**<menuchoice>Right/Bottom</menuchoice> | |||
<!--T:17--> | |||
*<menuchoice>Visibility</menuchoice> | |||
**<menuchoice>Always Visible</menuchoice>: Keeps the panel visible at all times, even when windows are maximised. | |||
**<menuchoice>Auto Hide</menuchoice>: Hides the panel off screen until the mouse is placed near the screen edge. | |||
**<menuchoice>Windows can cover</menuchoice>: This allows windows to cover the panel and if maximised, will cover the panel. | |||
**<menuchoice>Windows go below</menuchoice>: This allows windows to go below the panel, even when maximised. | |||
<!--T:18--> | |||
*<menuchoice>Opacity</menuchoice> | |||
**<menuchoice>Adaptive</menuchoice>: Makes the panel opaque when any windows are touching it, and translucent otherwise. | |||
**<menuchoice>Opaque</menuchoice>: Makes the panel always opaque, | |||
**<menuchoice>Translucent</menuchoice>: Makes the panel always translucent. | |||
*<menuchoice>Maximize Panel</menuchoice>: Makes the panel fit to the screen edges, if it has been resized. | |||
<!--T:35--> | |||
*<menuchoice>Floating Panel</menuchoice>: Adds some margin around the panel when no windows are touching it. | |||
<!--T:36--> | |||
*<menuchoice>Remove Panel</menuchoice>: Deletes the panel. | |||
<!--T:37--> | |||
*<menuchoice>Shortcut</menuchoice>: Allows you to set a shortcut to focus the panel when it is not currently visible. | |||
== Adding Panels == <!--T:20--> | |||
<!--T:21--> | |||
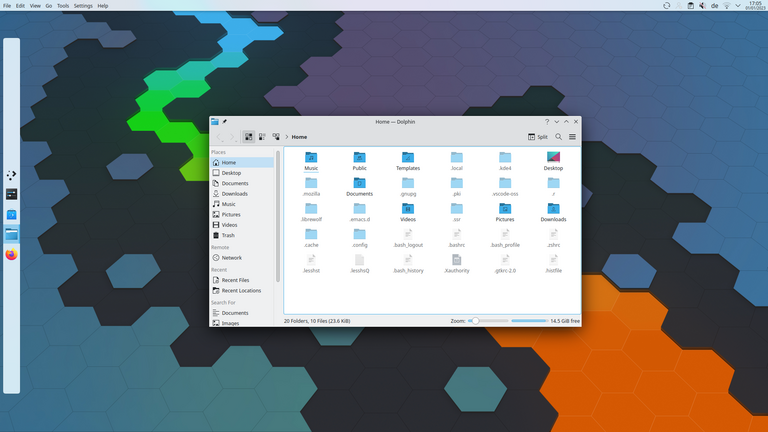
It is also possible to have more than one panel on your desktop. This proves useful if you want to have a more flexible layout: | |||
[[File:Panel multi.png|thumb||768px|center|Screenshot showing a desktop with multiple panels: a floating centered vertical panel with an application launcher and icons-only task manager, and a second panel placed horizontally at the top of the screen with global application menu, system tray, and clock.]] | |||
<!--T:23--> | |||
To add a new panel either click on the desktop toolbox button and select <menuchoice>Add Panel</menuchoice> or open the context (right click) menu on the desktop and select <menuchoice>Add Panel</menuchoice> from the menu. | |||
<!--T: | <!--T:24--> | ||
If more than one kind of Panel is installed, you will be able to select between them to choose what sort of Panel you would prefer. By default, two Panel types are available: <menuchoice>Default Panel</menuchoice>, which creates a Panel containing all of the default widgets (launcher, pager, tasks, system tray, clock, etc.), and <menuchoice>Empty Panel</menuchoice>, which adds a blank Panel without any pre-configured widgets in it. | |||
=== Under the Hood === <!--T:29--> | |||
< | |||
< | |||
< | |||
< | |||
<!--T: | |||
<!--T:30--> | |||
Should anything "untoward" happen to your panel have a look at <tt>~/.config/plasma-org.kde.plasma.desktop-appletsrc</tt> - the panel itself is classed as a containment (there are at least two, the desktop and the panel) which is home to all the different widgets you put there. | |||
<!--T: | <!--T:31--> | ||
{{Remember|2=Info needed|1=Here the relevant section of <tt>plasma-desktop-appletsrc</tt> for a default panel containment should go. Please help us provide the info if you know anything about this.}} | |||
<!--T:28--> | |||
[[Category:Desktop]] | |||
[[Category:Plasma]] | |||
</translate> | |||
Latest revision as of 21:33, 7 January 2023
Panels in Plasma Desktop

A Panel is a widget container which can be located on any side of the screen. There can be multiple panels on the screen or even on the same side. The default layout is one panel that stretches across the entire bottom of the desktop with the following widgets: application menu, desktop pager, task manager (list of open windows), system tray (including things like power management if you are on a laptop), digital clock, and peek at desktop.
Configuration
Panel configuration can be accessed via the context (right click) menu in the panel. At that point, the panel will be in edit mode.

Arranging Widgets
Widgets in the panel can be sorted by dragging them when in configuration mode. Widgets align left in the horizontal and top in the vertical panel. You can center widgets in the panel by adding flexible sized spacers on both sides (see the section on the panel toolbox).
The Panel Toolbox
- Size arrows: The arrows on the bar in the middle allow the panel size to be adjusted.
- Arrows pointing left change the minimum panel size.
- Arrows pointing right change the maximum panel size.
- The arrow pointing up is the center of the panel.
- To adjust the height of a horizontal panel or the width of a vertical panel, use the spin box in the toolbox.
- After resizing a panel, you can reset it to maximized in the menu.
- : Allows widgets to be added to the panel. This will open a sidebar from which you can drag widgets into the panel.
- : Allows you to add a spacer into the panel giving space between the items in it.
- The standard behavior of a spacer is that it uses as much space as possible (flexible size), but you can also set it to a . Enter the context (right click) menu and deactivate .
- : You can click into the empty space and drag the panel to any of the four edges of the screen.
- : Removes the current panel and all widgets in it.
- (for horizontal panel)/ (for vertical panel): Allows the panel height or width to be adjusted. To change the width of a horizontal panel or the height of a vertical panel, use the arrows.
- : Opens additional settings for the panel (see next section).
The "More Settings" Menu
- : Allows the alignment of the panel to be set in three pre-set positions.
-
- : Keeps the panel visible at all times, even when windows are maximised.
- : Hides the panel off screen until the mouse is placed near the screen edge.
- : This allows windows to cover the panel and if maximised, will cover the panel.
- : This allows windows to go below the panel, even when maximised.
-
- : Makes the panel opaque when any windows are touching it, and translucent otherwise.
- : Makes the panel always opaque,
- : Makes the panel always translucent.
- : Makes the panel fit to the screen edges, if it has been resized.
- : Adds some margin around the panel when no windows are touching it.
- : Deletes the panel.
- : Allows you to set a shortcut to focus the panel when it is not currently visible.
Adding Panels
It is also possible to have more than one panel on your desktop. This proves useful if you want to have a more flexible layout:

To add a new panel either click on the desktop toolbox button and select or open the context (right click) menu on the desktop and select from the menu.
If more than one kind of Panel is installed, you will be able to select between them to choose what sort of Panel you would prefer. By default, two Panel types are available: , which creates a Panel containing all of the default widgets (launcher, pager, tasks, system tray, clock, etc.), and , which adds a blank Panel without any pre-configured widgets in it.
Under the Hood
Should anything "untoward" happen to your panel have a look at ~/.config/plasma-org.kde.plasma.desktop-appletsrc - the panel itself is classed as a containment (there are at least two, the desktop and the panel) which is home to all the different widgets you put there.

