Digikam/AspectRatios/da: Difference between revisions
Importing a new version from external source |
Importing a new version from external source |
||
| Line 23: | Line 23: | ||
:10:7 & 5:8 | :10:7 & 5:8 | ||
<span class="mw-translate-fuzzy"> | |||
Det har også en valgmulighed ved navn <menuchoice>Gyldent forhold</menuchoice> )(det gyldne snit)... Læs mere om dette i [http://docs.kde.org/development/en/extragear-graphics/digikam/photographic-editing.html digiKams manual]. <ref name="Golden Ratio">En forklaring af det gyldne snit kan findes på webstedet [http://www.mathsisfun.com/numbers/golden-ratio.html Maths is Fun]</ref> | |||
</span> | |||
It also gives the option of custom aspect ratio. Therefore you can choose any ratio that you may prefer. | It also gives the option of custom aspect ratio. Therefore you can choose any ratio that you may prefer. | ||
Revision as of 09:16, 23 February 2011
Beskæring med aspektforhold i digiKam
Fra Maliks blog of 21. februar 2011
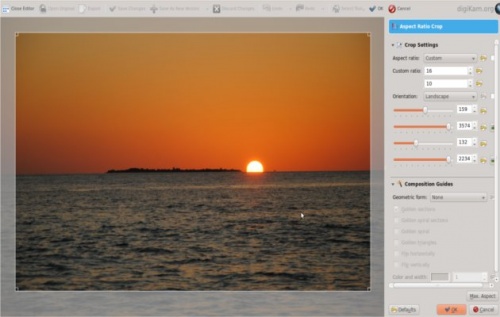
Enhver monitor har et aspektforhold, som er forholdet mellem bredden og højden. digiKam kan let beskære billeder i disse forhold. Dette er meget nyttigt, hvis du laver baggrundsbilleder og andre billeder, som skal passe til et bestemt forhold. Jeg bruger denne funktion, når jeg uploader mine beggrundsbilleder til kde-look.
Sådan her laves de.
Vælg billedet og tast F4 eller højreklik på billedet og vælg . I editoren vælger du menuen ; så dukker dette vindue op.

Værktøjet har følgende forhåndsdefinerede forhold:
- 1:1
- 3:2
- 4:3
- 5:4
- 7:5
- 10:7 & 5:8
Det har også en valgmulighed ved navn )(det gyldne snit)... Læs mere om dette i digiKams manual. [1]
It also gives the option of custom aspect ratio. Therefore you can choose any ratio that you may prefer.
After choosing an aspect ratio hold the tiny square that you see on the edges of the highlighted area and move to the area of the image that you want to crop, any area you select will have the aspect that you specified.
References
- ↑ En forklaring af det gyldne snit kan findes på webstedet Maths is Fun
