Digikam/Versioning: Difference between revisions
Created page with "<languages /> <translate> == Versioning in digiKam 2 == Transcribed from Dmitri Popov's blog, 28 March 2011 When tweaking photos in '''digiKam''', you probably would want to kee..." |
→Versioning in digiKam 2: add space around image |
||
| Line 9: | Line 9: | ||
By default, each version is automatically saved in the same album as the original, so you can end up with multiple thumbnails of the same photo in the album. But '''digiKam''' provides an elegant solution to the problem: you can combine the original and all its versions into a single group. To do this, select the original and its versions, right-click on the selection and choose the <menuchoice>Group Selected Here</menuchoice> command. This combines all the selected photos as one neat bundle, and an icon in the lower-right corner of the thumbnail displays the number of images in the group. Alternatively, you can save the version in a separate album: click on the triangle next to the <menuchoice>Save As New Version</menuchoice> button, select the <menuchoice>Save New Version as</menuchoice> command, and pick the destination folder. | By default, each version is automatically saved in the same album as the original, so you can end up with multiple thumbnails of the same photo in the album. But '''digiKam''' provides an elegant solution to the problem: you can combine the original and all its versions into a single group. To do this, select the original and its versions, right-click on the selection and choose the <menuchoice>Group Selected Here</menuchoice> command. This combines all the selected photos as one neat bundle, and an icon in the lower-right corner of the thumbnail displays the number of images in the group. Alternatively, you can save the version in a separate album: click on the triangle next to the <menuchoice>Save As New Version</menuchoice> button, select the <menuchoice>Save New Version as</menuchoice> command, and pick the destination folder. | ||
[[Image:Digikam_versioning.png|center|500px|thumb]] | [[Image:Digikam_versioning.png|center|500px|thumb]] | ||
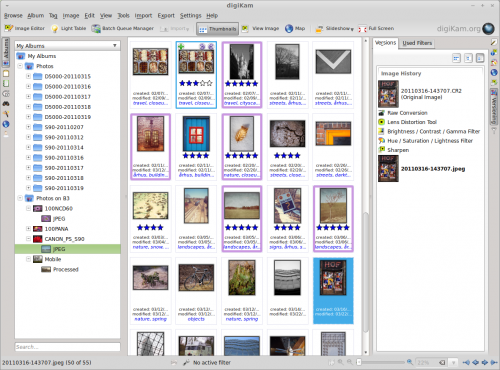
To view all versions of a photo, select the original in its album, and expand the right <menuchoice>Versioning sidebar</menuchoice>. You should then see all versions of the selected photo with a complete list of editing actions. | To view all versions of a photo, select the original in its album, and expand the right <menuchoice>Versioning sidebar</menuchoice>. You should then see all versions of the selected photo with a complete list of editing actions. | ||
Revision as of 16:21, 29 March 2011
Versioning in digiKam 2
Transcribed from Dmitri Popov's blog, 28 March 2011
When tweaking photos in digiKam, you probably would want to keep the originals intact. And this is where the Versioning feature can come in rather handy. It allows you to save each edited version of an original photo as a separate image complete with a list of all applied actions.
The way versioning works is pretty straightforward. When you are ready to save a modified version of a photo, press the button. This saves the edited version as a separate image. Keep in mind that if you are working with a RAW file, all versions will be automatically converted to one of the supported graphics formats. By default, it’s JPEG, but you can switch to another supported format. To do this, choose , switch to the section, and select the desired format from the drop-down list. To bypass the global settings, you can save a single version in a different format by clicking on the triangle and choosing the desired format from the menu.
By default, each version is automatically saved in the same album as the original, so you can end up with multiple thumbnails of the same photo in the album. But digiKam provides an elegant solution to the problem: you can combine the original and all its versions into a single group. To do this, select the original and its versions, right-click on the selection and choose the command. This combines all the selected photos as one neat bundle, and an icon in the lower-right corner of the thumbnail displays the number of images in the group. Alternatively, you can save the version in a separate album: click on the triangle next to the button, select the command, and pick the destination folder.

To view all versions of a photo, select the original in its album, and expand the right . You should then see all versions of the selected photo with a complete list of editing actions.
