Digikam/Black and White/es: Difference between revisions
Created page with "Si te gusta la fotografía en blanco y negro, te encantará saber que '''digiKam''' cuenta con una herramienta bastante potente para convertir fotografías a blanco y negro. La c..." |
Created page with "La sección <menuchoice>Película</menuchoice> ofrece un puñado de filtros que emulan distintos tipos de película como Agfa Pan, Kodak Tmax, Kodak TriX, e Ilford SPX. Estos fil..." |
||
| Line 9: | Line 9: | ||
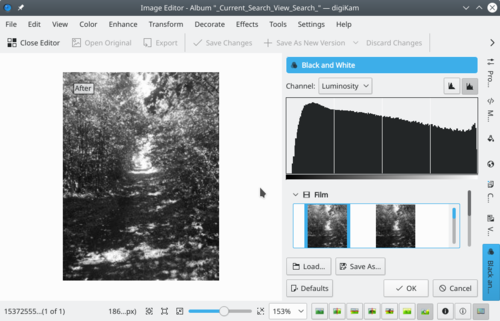
[[Image:Digikam_bw.png|center|thumb|500px|Copyright Dmitri Popov]] | [[Image:Digikam_bw.png|center|thumb|500px|Copyright Dmitri Popov]] | ||
La sección <menuchoice>Película</menuchoice> ofrece un puñado de filtros que emulan distintos tipos de película como Agfa Pan, Kodak Tmax, Kodak TriX, e Ilford SPX. Estos filtros son una forma rápida y sencilla para retocar la fotografía en blanco y negro. El filtro que mejor funciona depende de la fotografía en cuestión, así que puede que quieras probar varios filtros para conseguir el mejor resultado. Selecciona el filtro que más te guste y podrás ver inmediatamente el resultado en el panel de vista previa. | |||
As the name suggests, the <menuchoice>Lens Filters</menuchoice> section contains several color filters, including orange, green, yellow, and red. While you can experiment by applying different filters to the photo, the easiest way to find out which filter is best suited for the specific photo is to use the context help. Press <keycap>Shift + F1</keycap> and click on any filter to get a brief description of it. Once you’ve applied the desired filter, you can specify its intensity by using the <menuchoice>Strength</menuchoice> slider. | As the name suggests, the <menuchoice>Lens Filters</menuchoice> section contains several color filters, including orange, green, yellow, and red. While you can experiment by applying different filters to the photo, the easiest way to find out which filter is best suited for the specific photo is to use the context help. Press <keycap>Shift + F1</keycap> and click on any filter to get a brief description of it. Once you’ve applied the desired filter, you can specify its intensity by using the <menuchoice>Strength</menuchoice> slider. | ||
Revision as of 13:58, 13 June 2011
Convertir fotografías a blanco y negro con digiKam
Transcripción del blog de Dmitri Popov, 11 Febrero 2011.
Si te gusta la fotografía en blanco y negro, te encantará saber que digiKam cuenta con una herramienta bastante potente para convertir fotografías a blanco y negro. La conversión de una fotografía que esté siendo editada a blanco y negro en digiKam se hace en , pero en la mayoría de los casos será necesario un ajuste adicional, y la aplicación ofrece unas herramientas ingeniosas para hacer justamente esto.

La sección ofrece un puñado de filtros que emulan distintos tipos de película como Agfa Pan, Kodak Tmax, Kodak TriX, e Ilford SPX. Estos filtros son una forma rápida y sencilla para retocar la fotografía en blanco y negro. El filtro que mejor funciona depende de la fotografía en cuestión, así que puede que quieras probar varios filtros para conseguir el mejor resultado. Selecciona el filtro que más te guste y podrás ver inmediatamente el resultado en el panel de vista previa.
As the name suggests, the section contains several color filters, including orange, green, yellow, and red. While you can experiment by applying different filters to the photo, the easiest way to find out which filter is best suited for the specific photo is to use the context help. Press Shift + F1 and click on any filter to get a brief description of it. Once you’ve applied the desired filter, you can specify its intensity by using the slider.
Besides the straight black and white conversion, digiKam lets you turn your photos into duotone images. And the section offers several tone filters such as sepia, platinum, and green.
Finally, the section lets you manually adjust the curve and the contrast. This feature can come in handy if you want to fix under- or overexposed areas and improve the overall contrast of the photo.
