Digikam/BleachBypassEffect/ca: Difference between revisions
Appearance
Created page with "Category:Gràfics/ca Category:Fotografia/ca Category:Guies d'aprenentatge/ca" |
Created page with "== Crear un efecte de tractament sense blanquejar en digiKam == Transcrit des de l'article d'en Dmitri Popov, el 29 de gener de 2013" |
||
| Line 1: | Line 1: | ||
<languages /> | <languages /> | ||
== | == Crear un efecte de tractament sense blanquejar en digiKam == | ||
Transcrit des de l'article d'en [[User:Dmitri Popov|Dmitri Popov]], el 29 de gener de 2013 | |||
Using tools available in '''digiKam''', you can simulate a number of effects, including bleach bypass. This effect produces a desaturated high-contrast image. Creating the bleach bypass effect in '''digiKam''' is done in two simple steps. Open a photo for editing and choose <menuchoice>Color -> Hue/Saturation/Lightness</menuchoice>. Specify the desired saturation value somewhere between -35 and -59, then press <menuchoice>OK</menuchoice> to desaturate the photo. | Using tools available in '''digiKam''', you can simulate a number of effects, including bleach bypass. This effect produces a desaturated high-contrast image. Creating the bleach bypass effect in '''digiKam''' is done in two simple steps. Open a photo for editing and choose <menuchoice>Color -> Hue/Saturation/Lightness</menuchoice>. Specify the desired saturation value somewhere between -35 and -59, then press <menuchoice>OK</menuchoice> to desaturate the photo. | ||
Revision as of 10:30, 11 April 2013
Crear un efecte de tractament sense blanquejar en digiKam
Transcrit des de l'article d'en Dmitri Popov, el 29 de gener de 2013
Using tools available in digiKam, you can simulate a number of effects, including bleach bypass. This effect produces a desaturated high-contrast image. Creating the bleach bypass effect in digiKam is done in two simple steps. Open a photo for editing and choose . Specify the desired saturation value somewhere between -35 and -59, then press to desaturate the photo.

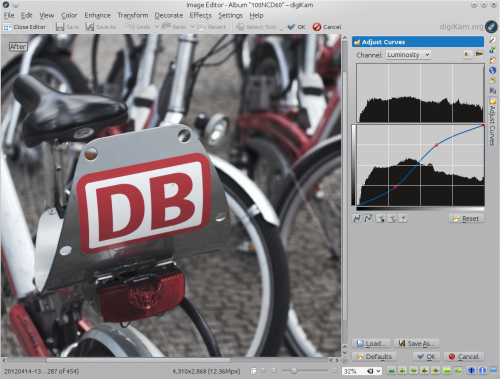
Choose then , select from the Channel drop-down list, and adjust the curve so it’s shaped as S. Feel free to experiment with the steepness of the curve to achieve the best result. As a starting point, you can download a ready-made S curve and import it into digiKam using the button.
