KMail/Account Wizard/de: Difference between revisions
Appearance
Created page with "{{Note/de|Sie können den Postfach-Assistenten jederzeit neu starten, wenn Sie ihn brauchen. Sie finden ihn unter {{Menu|Einstellungen|Postfach hinzufügen}}.}}" |
Created page with "Der Assistent führt Sie durch den Prozess der Erstellung eines neuen E-Mail-Postfachs. Die folgenden Schritte hängen stark davon ab wie viel der Assistent automatisch ermitt..." |
||
| Line 10: | Line 10: | ||
{{Note/de|Sie können den Postfach-Assistenten jederzeit neu starten, wenn Sie ihn brauchen. Sie finden ihn unter {{Menu|Einstellungen|Postfach hinzufügen}}.}} | {{Note/de|Sie können den Postfach-Assistenten jederzeit neu starten, wenn Sie ihn brauchen. Sie finden ihn unter {{Menu|Einstellungen|Postfach hinzufügen}}.}} | ||
Der Assistent führt Sie durch den Prozess der Erstellung eines neuen E-Mail-Postfachs. Die folgenden Schritte hängen stark davon ab wie viel der Assistent automatisch ermitteln kann. Unten folgt ein Überblick über die Schritte, die ihnen bei der Verwendung des Postfach-Assistenten begegnen können. | |||
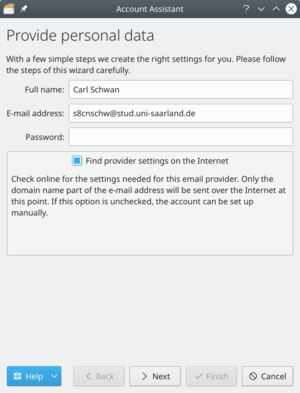
*'''Provide personal data''' is the first screen of the wizard. It will prompt you for your basic account information: <menuchoice>Full name</menuchoice>, <menuchoice>E-mail address</menuchoice>, and <menuchoice>Password</menuchoice>. By default, the <menuchoice>Find provider settings on the Internet</menuchoice> option is checked, the wizard will attempt to retrieve the necessary information from the server. Uncheck this option if you are an expert user and you need to set up advanced configuration. Click the <menuchoice>Next</menuchoice> button once finished. | *'''Provide personal data''' is the first screen of the wizard. It will prompt you for your basic account information: <menuchoice>Full name</menuchoice>, <menuchoice>E-mail address</menuchoice>, and <menuchoice>Password</menuchoice>. By default, the <menuchoice>Find provider settings on the Internet</menuchoice> option is checked, the wizard will attempt to retrieve the necessary information from the server. Uncheck this option if you are an expert user and you need to set up advanced configuration. Click the <menuchoice>Next</menuchoice> button once finished. | ||
Revision as of 17:12, 6 October 2020
Postfach-Assistent

Bei ihrem ersten Start von KMail werden Sie von dem Postfach-Assistenten begrüßt.
Der Assistent führt Sie durch den Prozess der Erstellung eines neuen E-Mail-Postfachs. Die folgenden Schritte hängen stark davon ab wie viel der Assistent automatisch ermitteln kann. Unten folgt ein Überblick über die Schritte, die ihnen bei der Verwendung des Postfach-Assistenten begegnen können.
- Provide personal data is the first screen of the wizard. It will prompt you for your basic account information: , , and . By default, the option is checked, the wizard will attempt to retrieve the necessary information from the server. Uncheck this option if you are an expert user and you need to set up advanced configuration. Click the button once finished.
- Select Account Type screen will be next if the wizard cannot determine your account type. Select your account type from the list (if you do not know, you will need to contact your email provider). If your account type is not listed, click the button. Once your account type has been selected, click the button, and you will be presented with the Personal Settings screen.
- Provide personal data screen will show again with the server details it found if the wizard was successful at determining the account type. Click the button, and it will set up the account. Click the to complete the wizard and close the window.
- Personal Settings screen will show if you had to enter your account type. Verify that your information is correct on this page. Select if you want your messages available when you do not have an Internet connection (IMAP only). Click the button once finished.
Your account will then be set up, and you can click the button to complete the wizard and close the window.

