Digikam/Black and White/uk: Difference between revisions
Created page with "За допомогою вкладки <menuchoice>Плівка</menuchoice> ви зможете вибрати один з фільтрів, що імітуватиме певн..." |
|||
| Line 9: | Line 9: | ||
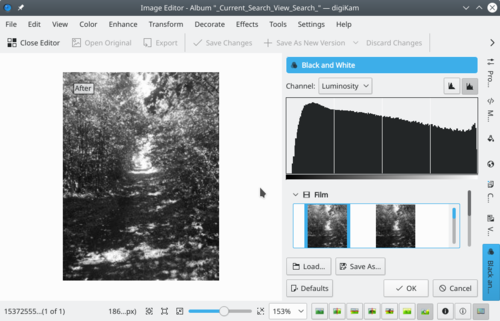
[[Image:Digikam_bw.png|center|thumb|500px|Авторські права на зображення належать Дмітрію Попову (Dmitri Popov).]] | [[Image:Digikam_bw.png|center|thumb|500px|Авторські права на зображення належать Дмітрію Попову (Dmitri Popov).]] | ||
За допомогою вкладки <menuchoice>Плівка</menuchoice> ви зможете вибрати один з фільтрів, що імітуватиме певний тип плівки, зокрема Agfa Pan, Kodak Tmax, Kodak TriX або Ilford SPX. За допомогою цих фільтрів можна просто і швидко виконати коригування чорно-білого знімка. Який з фільтрів виявиться найкращим? Це залежить від самої фотографії, отже вам варто спробувати скористатися декількома фільтрами і вибрати той, який дає найкращі результати. Виберіть фільтр зі списку, і результати буде негайно показано на панелі попереднього перегляду. | |||
As the name suggests, the <menuchoice>Lens Filters</menuchoice> section contains several color filters, including orange, green, yellow, and red. While you can experiment by applying different filters to the photo, the easiest way to find out which filter is best suited for the specific photo is to use the context help. Press <keycap>Shift + F1</keycap> and click on any filter to get a brief description of it. Once you’ve applied the desired filter, you can specify its intensity by using the <menuchoice>Strength</menuchoice> slider. | As the name suggests, the <menuchoice>Lens Filters</menuchoice> section contains several color filters, including orange, green, yellow, and red. While you can experiment by applying different filters to the photo, the easiest way to find out which filter is best suited for the specific photo is to use the context help. Press <keycap>Shift + F1</keycap> and click on any filter to get a brief description of it. Once you’ve applied the desired filter, you can specify its intensity by using the <menuchoice>Strength</menuchoice> slider. | ||
Revision as of 17:44, 15 February 2011
Перетворення фотографій на чорно-білі за допомогою digiKam
На основі запису блогу Дмітрія Попова (Dmitri Popov), 11 лютого 2011 року.
Якщо вам подобаються чорно-білі фотографії, вам буде приємно дізнатися, що серед можливостей digiKam є потужний інструмент перетворення кольорових фотографій на чорно-білі. Для перетворення поточної позначеної фотографії у digiKam на чорно-білу достатньо скористатися пунктом меню . Зазвичай, перетворене зображення потребує додаткової обробки. Для її виконання у програмі передбачено декілька відмінних інструментів.

За допомогою вкладки ви зможете вибрати один з фільтрів, що імітуватиме певний тип плівки, зокрема Agfa Pan, Kodak Tmax, Kodak TriX або Ilford SPX. За допомогою цих фільтрів можна просто і швидко виконати коригування чорно-білого знімка. Який з фільтрів виявиться найкращим? Це залежить від самої фотографії, отже вам варто спробувати скористатися декількома фільтрами і вибрати той, який дає найкращі результати. Виберіть фільтр зі списку, і результати буде негайно показано на панелі попереднього перегляду.
As the name suggests, the section contains several color filters, including orange, green, yellow, and red. While you can experiment by applying different filters to the photo, the easiest way to find out which filter is best suited for the specific photo is to use the context help. Press Shift + F1 and click on any filter to get a brief description of it. Once you’ve applied the desired filter, you can specify its intensity by using the slider.
Besides the straight black and white conversion, digiKam lets you turn your photos into duotone images. And the section offers several tone filters such as sepia, platinum, and green.
Finally, the section lets you manually adjust the curve and the contrast. This feature can come in handy if you want to fix under- or overexposed areas and improve the overall contrast of the photo.
