Digikam/Using digiKam with MySQL/uk: Difference between revisions
Created page with "Category:Фотографія/uk
Category:Підручники/uk" |
Created page with "Типово, для зберігання важливих метаданих та мініатюр у '''digiKam''' використовується '''SQLite'''. Але у ці..." |
||
| Line 3: | Line 3: | ||
Створено на основі допису у блозі Дмітрія Попова (Dmitri Popov), 15 жовтня 2010 року | Створено на основі допису у блозі Дмітрія Попова (Dmitri Popov), 15 жовтня 2010 року | ||
Типово, для зберігання важливих метаданих та мініатюр у '''digiKam''' використовується '''SQLite'''. Але у цій програмі для керування фотографіями також передбачено підтримку популярного рушія баз даних '''MySQL'''. До пакунка вбудовано програму для перетворення бази даних, яка допоможе вам перетворити дані у форматі '''SQLite''' на дані у форматі '''MySQL'''. Звичайно ж, у вас може виникнути питання: навіщо переходити на '''MySQL''', якщо '''SQLite''' вже добре працює для керування даними? Використання '''MySQL''' як основи бази даних '''digiKam''' надасть вам змогу зберігати дані на віддаленому сервері. Отже ви можете встановити декілька копій '''digiKam''' у різних системах (наприклад, на вашому ноутбуці або стаціонарному комп’ютері) для доступу до ваших збірок фотографій та керування ними. Ви також зможете скористатися інструментами '''MySQL''' для створення резервних копій даних '''digiKam''' та їхнього аналізу. | |||
Obviously, to use '''digiKam''' with '''MySQL''', you need a '''MySQL''' server. You also have to create two '''MySQL''' databases: one for storing photo metadata (e.g., ''digikam'') and the other for storing thumbnails (e.g., ''thumbnails-digikam''). And before you proceed, note the database connection information such as '''MySQL''' server address, user name, and password — you’ll need it when configuring '''MySQL''' settings in '''digiKam'''. | Obviously, to use '''digiKam''' with '''MySQL''', you need a '''MySQL''' server. You also have to create two '''MySQL''' databases: one for storing photo metadata (e.g., ''digikam'') and the other for storing thumbnails (e.g., ''thumbnails-digikam''). And before you proceed, note the database connection information such as '''MySQL''' server address, user name, and password — you’ll need it when configuring '''MySQL''' settings in '''digiKam'''. | ||
Revision as of 18:03, 14 March 2011
Робота у digiKam з використанням MySQL
Створено на основі допису у блозі Дмітрія Попова (Dmitri Popov), 15 жовтня 2010 року
Типово, для зберігання важливих метаданих та мініатюр у digiKam використовується SQLite. Але у цій програмі для керування фотографіями також передбачено підтримку популярного рушія баз даних MySQL. До пакунка вбудовано програму для перетворення бази даних, яка допоможе вам перетворити дані у форматі SQLite на дані у форматі MySQL. Звичайно ж, у вас може виникнути питання: навіщо переходити на MySQL, якщо SQLite вже добре працює для керування даними? Використання MySQL як основи бази даних digiKam надасть вам змогу зберігати дані на віддаленому сервері. Отже ви можете встановити декілька копій digiKam у різних системах (наприклад, на вашому ноутбуці або стаціонарному комп’ютері) для доступу до ваших збірок фотографій та керування ними. Ви також зможете скористатися інструментами MySQL для створення резервних копій даних digiKam та їхнього аналізу.
Obviously, to use digiKam with MySQL, you need a MySQL server. You also have to create two MySQL databases: one for storing photo metadata (e.g., digikam) and the other for storing thumbnails (e.g., thumbnails-digikam). And before you proceed, note the database connection information such as MySQL server address, user name, and password — you’ll need it when configuring MySQL settings in digiKam.
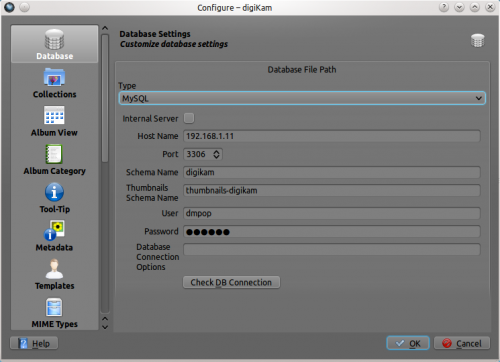
There are two ways to switch digiKam from SQLite to MySQL. If you’ve just installed digiKam, and you haven’t yet added any collection to it, choose , and switch to the section. Select the item from the drop-down list.

Enter the IP address of your MySQL server in the Host Name field and specify the correct port in the Port field (the default port is 3306). In the Schema Name field, enter the name of the database for storing photo metadata, and specify the name of the database for storing thumbnails in the Thumbnails Schema Name field. Enter your MySQL user name and password in the appropriate fields. To check whether the database connection works properly, press the button. If everything works as it’s supposed to, switch to the section, and add the directories containing your photos. Hit , and wait till digiKam populates the databases with data from photos. This can take a while if you have a lot of photos.

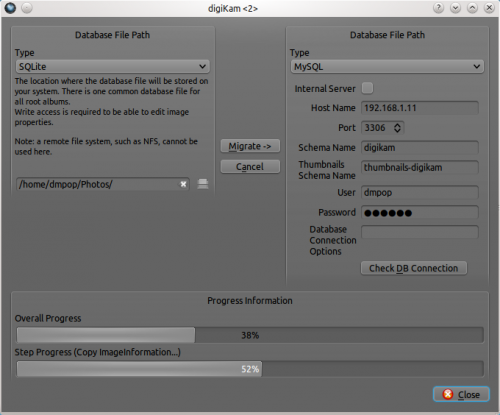
If you are already using digiKam with SQLite, you can use the database migration tool to move the existing data to MySQL databases. Choose , and select the item in the drop-down list in the right section. Fill out the required fields as previously described, and use the button to test the connection. Finally, press the button to copy the data from to </menuchoice>MySQL</menuchoice>.
