Digikam/Lens Correction Using digiKam/it: Difference between revisions
Created page with "Nessuna lente è otticamente perfetta. Anche le più costose hanno delle imperfezioni, tuttavia '''digiKam''' può correggere le imperfezioni delle lenti come la distorsione, l'a..." |
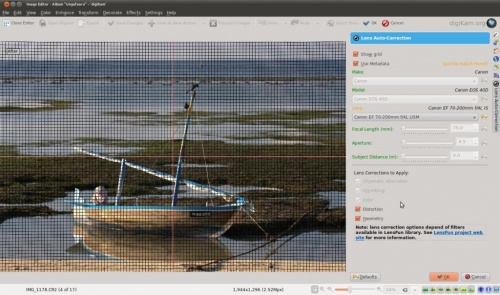
Created page with "Scegli l'immagine a cui vuoi applicare le correzioni e premi <keycap>F4</keycap> sulla tastiera. Passerai così alla vista <menuchoice>Editor</menuchoice>. In questa vista vai s..." |
||
| Line 5: | Line 5: | ||
Nessuna lente è otticamente perfetta. Anche le più costose hanno delle imperfezioni, tuttavia '''digiKam''' può correggere le imperfezioni delle lenti come la distorsione, l'aberrazione cromatica, la vignettatura, il colore e la geometria. | Nessuna lente è otticamente perfetta. Anche le più costose hanno delle imperfezioni, tuttavia '''digiKam''' può correggere le imperfezioni delle lenti come la distorsione, l'aberrazione cromatica, la vignettatura, il colore e la geometria. | ||
Scegli l'immagine a cui vuoi applicare le correzioni e premi <keycap>F4</keycap> sulla tastiera. Passerai così alla vista <menuchoice>Editor</menuchoice>. In questa vista vai su <menuchoice>Migliora -> Lente -> Correzione automatica</menuchoice>. | |||
Revision as of 16:22, 30 May 2011
Correzione lenticolare utilizzando digiKam
Trascritto dal blog di Mohammed Malik, 18 marzo 2011
Nessuna lente è otticamente perfetta. Anche le più costose hanno delle imperfezioni, tuttavia digiKam può correggere le imperfezioni delle lenti come la distorsione, l'aberrazione cromatica, la vignettatura, il colore e la geometria.
Scegli l'immagine a cui vuoi applicare le correzioni e premi F4 sulla tastiera. Passerai così alla vista . In questa vista vai su .

This feature uses lens data from the lensfun library and it has a very much up to date database of lenses which are available. It has more than a hundred lenses in its current databases. It also uses the metadata from the image to find-out which lens is used. If the exact used to take the picture is available it will mention that it matches with the meta-data, however if the exact match is not available it will choose the settings from the most closes match. In this case it also allows users to select the lens themselves.
You can either enable or disable the grid lines. Select the corrections you want to apply move you mouse inwards and outwards of the preview window which will show you before and after. When you are satisfied with the result press .
