Digikam/Lens Correction Using digiKam/da: Difference between revisions
Importing a new version from external source |
Importing a new version from external source |
||
| Line 11: | Line 11: | ||
Denne funktion bruger data om linser fra [http://lensfun.berlios.de/ lensfun biblioteket], som har en meget up-to-date database over tilgængelige linser. Der er mere end hundrede linser i den aktuelle database. Det bruget også fotoets metadata for at finde ud af, hvilken linse, der blev brugt. Hvis den linse, der blev brugt til at tage billedet findes i databasen, så vil det blive nævnt; ellers vil de indstillinger, som bedst passer til den aktuelle linse blive valgt. I dette tilfælde kan du også selv vælge linse. | |||
You can either enable or disable the grid lines. Select the corrections you want to apply move you mouse inwards and outwards of the preview window which will show you before and after. When you are satisfied with the result press <menuchoice>OK</menuchoice>. | You can either enable or disable the grid lines. Select the corrections you want to apply move you mouse inwards and outwards of the preview window which will show you before and after. When you are satisfied with the result press <menuchoice>OK</menuchoice>. | ||
Revision as of 07:56, 11 June 2011
Linsekorrektioner med digiKam
Fra Mohammed Maliks blog, 18. Marts 2011
Ingen linse er optisk perfekt. Selv de dyreste linser har deres egne imperfektioner, men digiKam kan korrigere for konsekvenser af linsefejl så som forvrængning, kromatisk aberration, vignettering, farve og geometri.
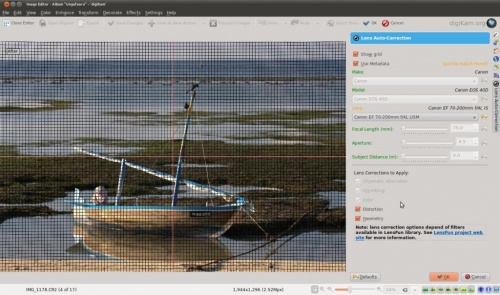
Vælg det foto, som du vil korrigere og tast F4 på tastaturet. Dette vil tage dig til -visningen. Her skal du vælge menuen .

Denne funktion bruger data om linser fra lensfun biblioteket, som har en meget up-to-date database over tilgængelige linser. Der er mere end hundrede linser i den aktuelle database. Det bruget også fotoets metadata for at finde ud af, hvilken linse, der blev brugt. Hvis den linse, der blev brugt til at tage billedet findes i databasen, så vil det blive nævnt; ellers vil de indstillinger, som bedst passer til den aktuelle linse blive valgt. I dette tilfælde kan du også selv vælge linse.
You can either enable or disable the grid lines. Select the corrections you want to apply move you mouse inwards and outwards of the preview window which will show you before and after. When you are satisfied with the result press .
