Amarok/Manual/Organization/Collection/ExternalDatabase/fr: Difference between revisions
Created page with "Connectez vous à la base de données locale en tapant {{Input|1=mysql -u root -p}} On vous demandera le mot de passe de l'utilisateur administrateur de '''MySQL'''. Vous obti..." |
Created page with "Créez un nouvel utilisateur '''''amarokuser''''' avec le mot de passe '''''amarokpass''''' en utilisant la commande {{Input|1=CREATE USER '''<nowiki>'</nowiki>amarokuser<nowi..." |
||
| Line 19: | Line 19: | ||
On vous demandera le mot de passe de l'utilisateur administrateur de '''MySQL'''. Vous obtiendrez l'invite de commande {{Output|1=mysql>}}. | On vous demandera le mot de passe de l'utilisateur administrateur de '''MySQL'''. Vous obtiendrez l'invite de commande {{Output|1=mysql>}}. | ||
Créez un nouvel utilisateur '''''amarokuser''''' avec le mot de passe '''''amarokpass''''' en utilisant la commande | |||
{{Input|1=CREATE USER '''<nowiki>'</nowiki>amarokuser<nowiki>'</nowiki>'''@'''<nowiki>'</nowiki>localhost<nowiki>'</nowiki>''' IDENTIFIED BY '''<nowiki>'</nowiki>amarokpass<nowiki>'</nowiki>''';}} | {{Input|1=CREATE USER '''<nowiki>'</nowiki>amarokuser<nowiki>'</nowiki>'''@'''<nowiki>'</nowiki>localhost<nowiki>'</nowiki>''' IDENTIFIED BY '''<nowiki>'</nowiki>amarokpass<nowiki>'</nowiki>''';}} | ||
Donnez l'accès à la base de données au nouvel utilisateur en saisissant la commande | |||
{{Input|1=GRANT ALL ON '''amarokdb'''.* TO '''<nowiki>'</nowiki>amarokuser<nowiki>'</nowiki>'''@'''<nowiki>'</nowiki>%<nowiki>'</nowiki>''' IDENTIFIED BY '''<nowiki>'</nowiki>amarokpass<nowiki>'</nowiki>''';}} | {{Input|1=GRANT ALL ON '''amarokdb'''.* TO '''<nowiki>'</nowiki>amarokuser<nowiki>'</nowiki>'''@'''<nowiki>'</nowiki>%<nowiki>'</nowiki>''' IDENTIFIED BY '''<nowiki>'</nowiki>amarokpass<nowiki>'</nowiki>''';}} | ||
où "%" est un métacaractère autorisant tous les hôtes à se connecter à la base de données. À présent, utilisez | |||
{{Input|1=FLUSH PRIVILEGES;}} | {{Input|1=FLUSH PRIVILEGES;}} | ||
pour recharger les divers caches internes utilisés par '''MySQL'''. Finalement | |||
{{Input|1=exit}} | {{Input|1=exit}} | ||
ferme l'invite de commande de '''MySQL'''. | |||
By default the server can only be accessed by the local host. To change this you need to edit the file <tt>/etc/mysql/my.cnf</tt> and adjust the address near ''bind-address'' to the one your server listens on the network. '''0.0.0.0''' listens on all interfaces. After that you need to restart the server using | By default the server can only be accessed by the local host. To change this you need to edit the file <tt>/etc/mysql/my.cnf</tt> and adjust the address near ''bind-address'' to the one your server listens on the network. '''0.0.0.0''' listens on all interfaces. After that you need to restart the server using | ||
Revision as of 18:28, 11 September 2014
Base de données externe
À partir de la version 2.2, Amarok prend en charge la base de données externes MySQL en tant que dorsale (backend).
Configurer le serveur
Installer le serveur MySQL
Premièrement, vous devez installer un serveur MySQL. Sur les distributions fondées sur Debian tel qu'Ubuntu, vous pouvez utiliser
sudo apt-get install mysql-server mysql-client
pour l'installer. On vous demandera de spécifier un mot de passe pour le compte administrateur (root) de la base de données. Le paquetage mysql-client est nécessaire afin d'exécuter quelques commandes dans ce document, mais il n'est pas fondamental pour l'utilisation d'Amarok.
Configurer la base de données
Connectez vous à la base de données locale en tapant
mysql -u root -p
On vous demandera le mot de passe de l'utilisateur administrateur de MySQL. Vous obtiendrez l'invite de commande
mysql>
.
Créez un nouvel utilisateur amarokuser avec le mot de passe amarokpass en utilisant la commande
CREATE USER ''''amarokuser''''@''''localhost'''' IDENTIFIED BY ''''amarokpass'''';
Donnez l'accès à la base de données au nouvel utilisateur en saisissant la commande
GRANT ALL ON '''amarokdb'''.* TO ''''amarokuser''''@''''%'''' IDENTIFIED BY ''''amarokpass'''';
où "%" est un métacaractère autorisant tous les hôtes à se connecter à la base de données. À présent, utilisez
FLUSH PRIVILEGES;
pour recharger les divers caches internes utilisés par MySQL. Finalement
exit
ferme l'invite de commande de MySQL.
By default the server can only be accessed by the local host. To change this you need to edit the file /etc/mysql/my.cnf and adjust the address near bind-address to the one your server listens on the network. 0.0.0.0 listens on all interfaces. After that you need to restart the server using
sudo service mysql restart
Configure Client
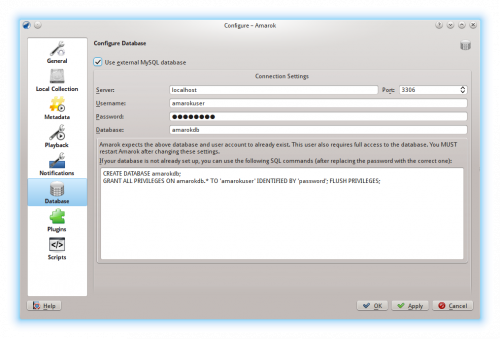
Open the configuration dialog by clicking . Enable the checkbox and enter the user data.

You need to restart Amarok so that the changes take effect.
Migrating from MySQL Embedded to MySQL Server
If you want to maintain the statistics, etc. that you have in the embedded MySQL database from before Amarok 2.2, you can do the following: First, start Amarok 2.2+ at least once to give the database a chance to update to the latest schema version.
Next, kill the running MySQL service
sudo /etc/init.d/mysql stop
and start a MySQL daemon from your ~/.kde4/share/apps/amarok directory (--defaults-file MUST be the first option!):
/usr/sbin/mysqld --defaults-file=`pwd`/my.cnf --default-storage-engine=MyISAM --datadir=`pwd`/mysqle --socket=`pwd`/sock --skip-grant-tables
The skip-grant-tables means you can use any password or username to connect to it. 'localhost' will not work, the MySQL client will try to use a Unix socket. Using 127.0.0.1 as the host makes it work. Some systems may restrict this access through apparmor or SELinux. They can be temporarily disabled with
sudo /etc/init.d/apparmor stop
Now, run mysqldump, passing in the -S option to specify the local socket. This will dump your old embedded DB out to a SQL file.
mysqldump -S sock amarok > amarok.mysql
You can then restart your MySQL service and load this SQL file into your MySQL server. You'll have needed to already run the GRANT statement above and create an Amarok database ("CREATE DATABASE amarok;"):
sudo /etc/init.d/mysql stop
mysql -u amarokuser -p amarok < amarok.mysql

