Kdenlive/Manual/Effects/ru: Difference between revisions
Updating to match new version of source page |
Updating to match new version of source page |
||
| Line 16: | Line 16: | ||
=== Список эффектов === | === Список эффектов === | ||
Make the Effect List visible from the <menuchoice>View</menuchoice> menu (<menuchoice>View -> Effect List</menuchoice>) | |||
[[File:Effects List with info.png|thumb|left|520px|Figure 1b]] | |||
[[File:Effects List with info.png|thumb|left|520px|Figure | |||
<div class="clearfix"></div> | <div class="clearfix"></div> | ||
To have a brief description of the effect display at the bottom of the list, click the {{Icon|dialog-information}} button as highlighted in ''figure 1b''. | |||
To add an effect to a clip, simply drag it from the '''Effect List''' to the clip on the [[Special:MyLanguage/Kdenlive/Manual/Timeline|timeline]]. | |||
=== Effect Stack and its Menu === | |||
== | ==== The Effect Stack ==== | ||
==== | |||
''Figure 2'' показывает стойку эффектов для клипоа. The effect stack can be made visible from the <menuchoice>View</menuchoice> menu [[Special:MyLanguage/Kdenlive/Manual/View_Menu/Effect_Stack|Effect Stack]] | ''Figure 2'' показывает стойку эффектов для клипоа. The effect stack can be made visible from the <menuchoice>View</menuchoice> menu [[Special:MyLanguage/Kdenlive/Manual/View_Menu/Effect_Stack|Effect Stack]] | ||
| Line 61: | Line 51: | ||
[[File:Toggle effect on and off.png]] | [[File:Toggle effect on and off.png]] | ||
To remove an effect from a clip, click the trash can icon labelled 3 in the image below. The arrow labelled 1 minimizes the effect in the Properties Window. And the arrow labelled 2 brings up the menu shown. | |||
[[File:Kdenlive Effect stack icons2 0.9.3.png]] | [[File:Kdenlive Effect stack icons2 0.9.3.png]] | ||
| Line 73: | Line 61: | ||
Это позволяет сохранить текущий эффект и все его настройки. Сохраненный эффект появится в Списке эффектов в пользовательской категории. | Это позволяет сохранить текущий эффект и все его настройки. Сохраненный эффект появится в Списке эффектов в пользовательской категории. | ||
==== Create Group ==== | |||
=== | This creates an Effect Group. An Effect Group is a place holder for multiple effects. You can then save the group of effects — they will the appear in the Effect List, in the Custom Section. You can then later apply the whole group of effects to other parts of the timeline. | ||
To add effects to the group, first add the effect in question to a clip. Then drag that effect and drop it onto the Effect Group in the Effect Stack. | To add effects to the group, first add the effect in question to a clip. Then drag that effect and drop it onto the Effect Group in the Effect Stack. | ||
==== Create Region ==== | ==== Create Region ==== | ||
New in ver >=0.9.3 | |||
" | |||
The "Create Region" feature enables a user to apply an effect to a part of a clip only. It is a really powerful feature but currently the UI is not fully ready to get its full potential. | |||
Basically, you add an effect to a clip — for example "Sepia" — then you go in the effect's menu and select "Create Region". This will now open a file dialog. | |||
In that dialog, you need to point to an MLT clip with alpha transparency. This is where Kdenlive is not 100% ready because there are many ways we could create such clips, using for example a threshold filter or rotoscoping. But as a start, let's say you can open any image with alpha transparency, or a title clip created with Kdenlive. Then, the "sepia" effect will only be applied on the non-transparent areas of this "region" clip. | |||
=== Использование в эффектах ключевых кадров === | === Использование в эффектах ключевых кадров === | ||
Many effects use the concept of "Keyframes". Keyframes are user-defined points in your clip where you want an effect to start, stop or change. You can set the parameters for your effects to different values at different keyframes and '''Kdenlive''' will then gradually change the parameters between the two keyframes so that by the time the video has arrived at the next keyframe it will have adjusted the parameter to match that key frame. It interpolates between keyframes. | |||
См. в [[Special:MyLanguage/Kdenlive/Manual/QuickStart#Effects|Быстрый Старт - Эффекты]] пример настроек RGB эффекта по ключевым кадрам | См. в [[Special:MyLanguage/Kdenlive/Manual/QuickStart#Effects|Быстрый Старт - Эффекты]] пример настроек RGB эффекта по ключевым кадрам | ||
| Line 104: | Line 83: | ||
=== Поиск активного кадра === | === Поиск активного кадра === | ||
Some keyframe controls have a ''seek to active frame'' button [[File:kdenlive_Seek_to_active_frame_button.png]] (labeled 1 in screenshot A below). When ''seek to active frame'' is toggled on and you click on one of the keyframes in the keyframe list, Kdenlive will scroll the preview window to that keyframe. In the example of the screenshot, we have selected the keyframe at 9:20 in A and the clip position caret (highlighted in red box) shows the location of this keyframe. Clicking the keyframe at 10:00 in B shows how the clip position has moved. | |||
[[File:Kdenlive Seek to active frame.png ]] | [[File:Kdenlive Seek to active frame.png ]] | ||
=== Демонстрации эффектов === | === Демонстрации эффектов === | ||
You can find screenshots describing 33 of the video effects [http://www.kdenlive.org/about-kdenlive/creative-effects here]. | |||
The following three YouTube videos display the results of a number of the video effects available in '''Kdenlive''' (Spanish captioning). | |||
{{#evp:youtube|C6oeu2Yc64I}} | {{#evp:youtube|C6oeu2Yc64I}} | ||
| Line 129: | Line 102: | ||
{{#evp:youtube|capV7lUzbOw}} | {{#evp:youtube|capV7lUzbOw}} | ||
See also this YouTube play list from [http://www.youtube.com/playlist?list=PLc1VErdvjnSFE6w6sryFWIu4lfKavhnvz Franz M.P.] | |||
=== Категории эффектов === | === Категории эффектов === | ||
See also [[Special:myLanguage/Kdenlive/Manual/Effects_And_Transitions|Effects and Transitions]] for an alphabetical list of effects and transitions. | |||
You can find screenshots describing 33 of the video effects [http://www.kdenlive.org/about-kdenlive/creative-effects here]. | |||
The effects are divided into the following categories: | |||
| Line 165: | Line 130: | ||
# [[Special:myLanguage/Kdenlive/Manual/Effects/Motion|Движение]]<br /><br /> | # [[Special:myLanguage/Kdenlive/Manual/Effects/Motion|Движение]]<br /><br /> | ||
The available effects are defined by <tt>.xml</tt> files found in <tt>$KDEDIR/share/kde4/apps/kdenlive/effects</tt> (e.g. <tt>/usr/share/kde4/apps/kdenlive/effects</tt>). <br> | |||
Or at <tt>/usr/share/kdenlive/effects</tt> on version 15.n. | |||
</ | |||
These .xml files contain the default values for the effects parameters. So if you don't like the default values for the effects in Kdenlive, you can modify the defaults by editing these .xml files. | |||
===FAQ:=== | ===FAQ:=== | ||
| Line 177: | Line 139: | ||
П: Как дублировать эффект, чтобы воспользоваться теми же параметрами для другого фрагмента видео? | П: Как дублировать эффект, чтобы воспользоваться теми же параметрами для другого фрагмента видео? | ||
A: Select your effect in the timeline. In the Effect Stack widget choose <menuchoice>Save</menuchoice>, you find it available in the '''Effect List''' <menuchoice>Custom</menuchoice> section. | |||
A: | |||
A: Other solution: select a strip containing the effect, <menuchoice>Copy</menuchoice>, then, where you want to apply it again, right-click and select <menuchoice>Paste effect</menuchoice> instead of <menuchoice>Paste</menuchoice>. | |||
П: Как применить эффект одновременно в нескольких (или всех) клипов? | П: Как применить эффект одновременно в нескольких (или всех) клипов? | ||
A: You can select multiple clips with <keycap>Shift</keycap> + drag (left mouse button) around them. Then right-click and group clips (or <keycap>Ctrl + G</keycap>). | |||
{{Prevnext2 | {{Prevnext2 | ||
Revision as of 07:40, 21 September 2016
Эффекты
Эффектами в "'Kdenlive"' можно воспользоваться для внесения изменений в свойства звуковых и видеоданных исходного материала.
Вы добавляете эффекты к клипам, выбрав их из Списка эффектов (Effects List) и перетащив на клип на монтажном столе. Или выделите клип на монтажном столе и выберите в меню Линия времени или из контекстное меню клипа на линии времени. Более подробно см. Быстрый старт - Эффекты
Эффекты, примененные к данному клипу могут быть просмотрены и отредактированы с помощью Стойки эффектов, которая отображается, когда клип выделен на монтажном столе.
You can also apply effects to an entire track. This is achieved by dragging an effect from the Effect List to the Track Header. Or you can click on the track header and chose from the Timeline menu . Tracks which have effects added in this fashion will have a gold star icon in the track header.

Список эффектов
Make the Effect List visible from the menu ()
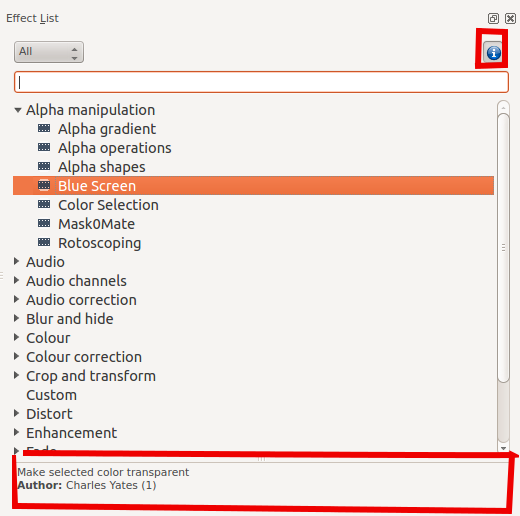
To have a brief description of the effect display at the bottom of the list, click the ![]() button as highlighted in figure 1b.
button as highlighted in figure 1b.
To add an effect to a clip, simply drag it from the Effect List to the clip on the timeline.
Effect Stack and its Menu
The Effect Stack
Figure 2 показывает стойку эффектов для клипоа. The effect stack can be made visible from the menu Effect Stack
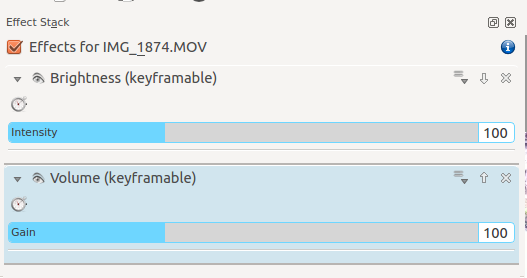
In kdenlive version 15.12 the effect stack is merged with the "Transition" window to create a "Properties" window.
The Properties window displays the settings for the effects on the currently selected clip (Figure 3) or the settings for the currently selected transition (Figure 4) depending on whether it is a clip or a transition that is currently selected.
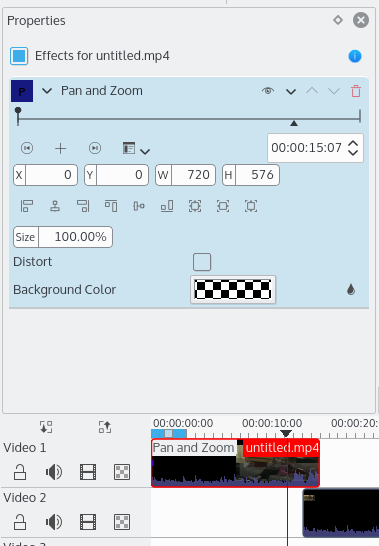 |
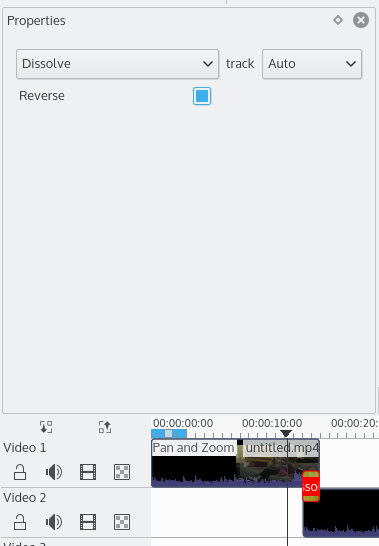 |
Click the eye icon shown at 2 to temporarily disable the effect and toggle the button to the state shown at 1. Click the empty eye icon shown at 1 to re-enable a disabled effect and toggle the button to the state shown at 2.
To remove an effect from a clip, click the trash can icon labelled 3 in the image below. The arrow labelled 1 minimizes the effect in the Properties Window. And the arrow labelled 2 brings up the menu shown.
Reset Effect
Возвращает всё к настройкам по умолчанию..
Сохранить эффект
Это позволяет сохранить текущий эффект и все его настройки. Сохраненный эффект появится в Списке эффектов в пользовательской категории.
Create Group
This creates an Effect Group. An Effect Group is a place holder for multiple effects. You can then save the group of effects — they will the appear in the Effect List, in the Custom Section. You can then later apply the whole group of effects to other parts of the timeline.
To add effects to the group, first add the effect in question to a clip. Then drag that effect and drop it onto the Effect Group in the Effect Stack.
Create Region
New in ver >=0.9.3
The "Create Region" feature enables a user to apply an effect to a part of a clip only. It is a really powerful feature but currently the UI is not fully ready to get its full potential.
Basically, you add an effect to a clip — for example "Sepia" — then you go in the effect's menu and select "Create Region". This will now open a file dialog.
In that dialog, you need to point to an MLT clip with alpha transparency. This is where Kdenlive is not 100% ready because there are many ways we could create such clips, using for example a threshold filter or rotoscoping. But as a start, let's say you can open any image with alpha transparency, or a title clip created with Kdenlive. Then, the "sepia" effect will only be applied on the non-transparent areas of this "region" clip.
Использование в эффектах ключевых кадров
Many effects use the concept of "Keyframes". Keyframes are user-defined points in your clip where you want an effect to start, stop or change. You can set the parameters for your effects to different values at different keyframes and Kdenlive will then gradually change the parameters between the two keyframes so that by the time the video has arrived at the next keyframe it will have adjusted the parameter to match that key frame. It interpolates between keyframes.
См. в Быстрый Старт - Эффекты пример настроек RGB эффекта по ключевым кадрам
Поиск активного кадра
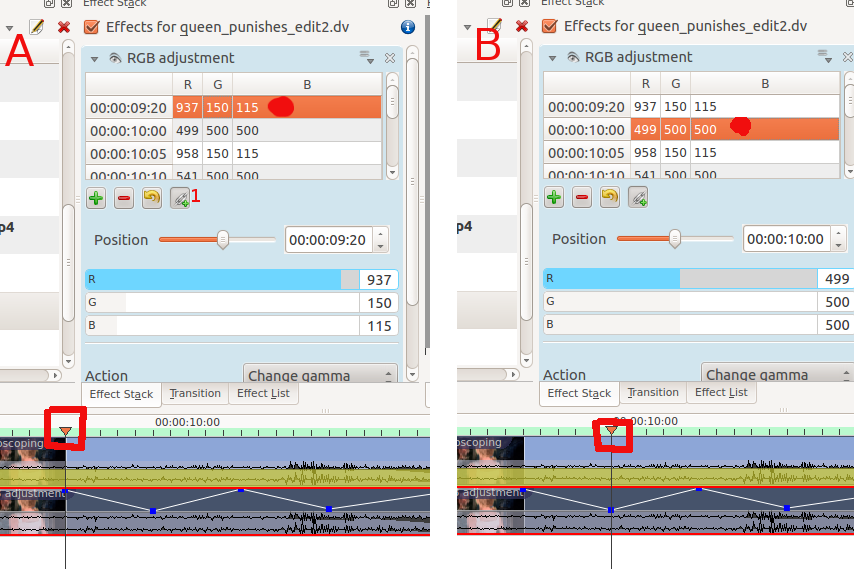
Some keyframe controls have a seek to active frame button ![]() (labeled 1 in screenshot A below). When seek to active frame is toggled on and you click on one of the keyframes in the keyframe list, Kdenlive will scroll the preview window to that keyframe. In the example of the screenshot, we have selected the keyframe at 9:20 in A and the clip position caret (highlighted in red box) shows the location of this keyframe. Clicking the keyframe at 10:00 in B shows how the clip position has moved.
(labeled 1 in screenshot A below). When seek to active frame is toggled on and you click on one of the keyframes in the keyframe list, Kdenlive will scroll the preview window to that keyframe. In the example of the screenshot, we have selected the keyframe at 9:20 in A and the clip position caret (highlighted in red box) shows the location of this keyframe. Clicking the keyframe at 10:00 in B shows how the clip position has moved.
Демонстрации эффектов
You can find screenshots describing 33 of the video effects here.
The following three YouTube videos display the results of a number of the video effects available in Kdenlive (Spanish captioning).
{{#evp:youtube|C6oeu2Yc64I}}
{{#evp:youtube|jrC4F_G64jA}}
{{#evp:youtube|XMoSgHHbA4k}}
Другое видео Youtube (английские титры)
{{#evp:youtube|capV7lUzbOw}}
See also this YouTube play list from Franz M.P.
Категории эффектов
See also Effects and Transitions for an alphabetical list of effects and transitions.
You can find screenshots describing 33 of the video effects here.
The effects are divided into the following categories:
- Обработка Альфа-канала
- Звук
- Каналы звука
- Коррекция звука
- Размывание и сокрытие
- Цвет
- Цветокоррекция
- Обрезка и трансформации
- Custom
- Искажения
- Улучшение
- Нарастание и затухание
- Занятные
- Разное
- Движение
The available effects are defined by .xml files found in $KDEDIR/share/kde4/apps/kdenlive/effects (e.g. /usr/share/kde4/apps/kdenlive/effects).
Or at /usr/share/kdenlive/effects on version 15.n.
These .xml files contain the default values for the effects parameters. So if you don't like the default values for the effects in Kdenlive, you can modify the defaults by editing these .xml files.
FAQ:
П: Как дублировать эффект, чтобы воспользоваться теми же параметрами для другого фрагмента видео?
A: Select your effect in the timeline. In the Effect Stack widget choose , you find it available in the Effect List section.
A: Other solution: select a strip containing the effect, , then, where you want to apply it again, right-click and select instead of .
П: Как применить эффект одновременно в нескольких (или всех) клипов?
A: You can select multiple clips with Shift + drag (left mouse button) around them. Then right-click and group clips (or Ctrl + G).

