Archive:Kdenlive/Manual/Projects and Files/Clips/da: Difference between revisions
Updating to match new version of source page |
Updating to match new version of source page |
||
| Line 9: | Line 9: | ||
The {{Icon|kdenlive-add-clip}} button (Add Clip) brings up the '''Add Clip''' Dialog where you can choose video, audio or still image clips to add to the [[Special:myLanguage/Kdenlive/Manual/Projects_and_Files/Project_Tree|Project Bin]]. | The {{Icon|kdenlive-add-clip}} button (Add Clip) brings up the '''Add Clip''' Dialog where you can choose video, audio or still image clips to add to the [[Special:myLanguage/Kdenlive/Manual/Projects_and_Files/Project_Tree|Project Bin]]. | ||
[[File:Add clip dialog.png|450px]] | [[File:Add clip dialog.png|450px|center]] | ||
The button {{Icon|view-previews}} labeled 1 toggles File Preview on and off (applies to image files only). The slider labeled 2 adjusts the size of the preview icons. The <menuchoice>Import image sequence</menuchoice> checkbox labeled 3 enables the import of a series of images that can be used to make a stop motion animation. The <menuchoice>Transparent background for images</menuchoice> checkbox labeled 4 makes the process respect an alpha channel in the source images [http://opensource.com/life/11/11/effects-and-transitions-kdenlive ref]. | The button {{Icon|view-previews}} labeled 1 toggles File Preview on and off (applies to image files only). The slider labeled 2 adjusts the size of the preview icons. The <menuchoice>Import image sequence</menuchoice> checkbox labeled 3 enables the import of a series of images that can be used to make a stop motion animation. The <menuchoice>Transparent background for images</menuchoice> checkbox labeled 4 makes the process respect an alpha channel in the source images [http://opensource.com/life/11/11/effects-and-transitions-kdenlive ref]. | ||
| Line 59: | Line 59: | ||
===== Opret mappe ===== | ===== Opret mappe ===== | ||
Se [[Special:myLanguage/Kdenlive/Manual/Project Menu/Create Folder|Opret mappe]] | Se [[Special:myLanguage/Kdenlive/Manual/Project Menu/Create Folder|Opret mappe]] | ||
===== Online ressourcer ===== | ===== Online ressourcer ===== | ||
Se [[Special:myLanguage/Kdenlive/Manual/Project Menu/Online Resources|Menuen Projekt - Online-ressourcer]] | Se [[Special:myLanguage/Kdenlive/Manual/Project Menu/Online Resources|Menuen Projekt - Online-ressourcer]] | ||
===== Stop-motion ===== | ===== Stop-motion ===== | ||
| Line 99: | Line 98: | ||
===== Klipegenskaber ===== | ===== Klipegenskaber ===== | ||
You can display and edit clip properties by selecting a clip in the [[Special:myLanguage/Kdenlive/Manual/Projects_and_Files/Project_Tree|Project Bin]] and choosing <menuchoice>Clip Properties</menuchoice> from the <menuchoice>Project</menuchoice> menu or from the right-click menu. Or by turning on the display of clip properties the <menuchoice>View > Clip Properties</menuchoice> check box. | You can display and edit clip properties by selecting a clip in the [[Special:myLanguage/Kdenlive/Manual/Projects_and_Files/Project_Tree|Project Bin]] and choosing <menuchoice>Clip Properties</menuchoice> from the <menuchoice>Project</menuchoice> menu or from the right-click menu. Or by turning on the display of clip properties the <menuchoice>View</menuchoice> → <menuchoice>Clip Properties</menuchoice> check box. | ||
====== Videoegenskaber ====== | ====== Videoegenskaber ====== | ||
The <menuchoice>File Info</menuchoice> tab displays information about the file. | |||
[[File:Clip properties video.png]] | [[File:Clip properties video.png]] | ||
====== | ====== Properties ====== | ||
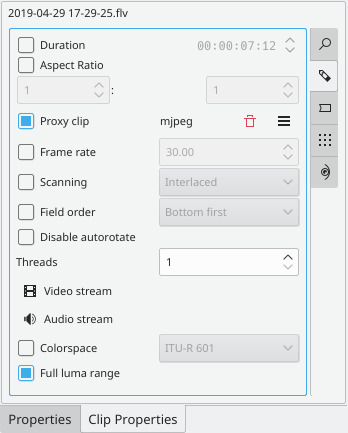
The <menuchoice> | The <menuchoice>Properties</menuchoice> tab displays advanced properties of the clip where you can select a check box and then force the clip to take the property you specify. For example, you can use <menuchoice>Aspect ratio</menuchoice> to tell a clip that seems to have forgotten it was 16:9 ratio that it really is 16:9 ratio. | ||
[[File:Clip properties advanced.png]] | [[File:Clip properties advanced.png]] | ||
| Line 113: | Line 114: | ||
De avancerede klipegenskaber er: | De avancerede klipegenskaber er: | ||
* | * Duration: Change the clip duration. If the duration is shorter than the clip duration, then the clip is '''cropped'''. If the duration is bigger than the clip duration, then the last image is repeated until the new duration is over. | ||
* | * Aspect ratio: Change the clip aspect. | ||
* | * Proxy clips: Enable a proxy clip for this clip. See [[Special:myLanguage/Kdenlive/Manual/Projects_and_Files/Clips#Proxy_clips|Proxy clips]]. | ||
* | * Frame rate: Change the clip frame rate. See [https://en.wikipedia.org/wiki/Frame_rate Wikipedia Frame rate]. | ||
* | * Scanning | ||
* Video | * Field order | ||
* Audio | * Disable autorotate | ||
* | * Threads | ||
* Video stream | |||
* Audio stream | |||
* Colorspace | |||
* [[Special:myLanguage/Kdenlive/Manual/Full_Luma|Full Luma range]] | * [[Special:myLanguage/Kdenlive/Manual/Full_Luma|Full Luma range]] | ||
<span id="Markers"></span> | <span id="Markers"></span> | ||
====== Markører ====== | ====== Markører ====== | ||
Revision as of 18:30, 1 May 2019
Clips
See also Clip Menu.
Clips (Video, Audio and Images)
The ![]() button (Add Clip) brings up the Add Clip Dialog where you can choose video, audio or still image clips to add to the Project Bin.
button (Add Clip) brings up the Add Clip Dialog where you can choose video, audio or still image clips to add to the Project Bin.
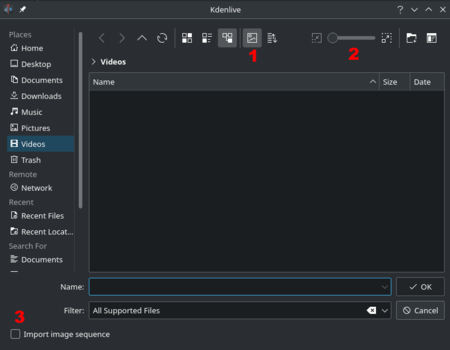
The button ![]() labeled 1 toggles File Preview on and off (applies to image files only). The slider labeled 2 adjusts the size of the preview icons. The checkbox labeled 3 enables the import of a series of images that can be used to make a stop motion animation. The checkbox labeled 4 makes the process respect an alpha channel in the source images ref.
labeled 1 toggles File Preview on and off (applies to image files only). The slider labeled 2 adjusts the size of the preview icons. The checkbox labeled 3 enables the import of a series of images that can be used to make a stop motion animation. The checkbox labeled 4 makes the process respect an alpha channel in the source images ref.
You can add other types of clips by choosing a clip type from the menu brought up from the drop down button next to the ![]() button.
button.
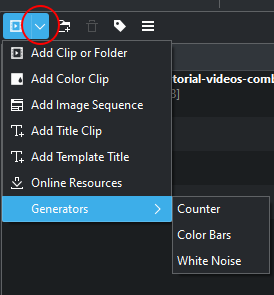
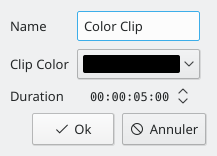
Farveklip
Farveklip er billeder af en enkelt farve, som kan føjes til projekttræet. De kan bruges som en baggrund for titler.
Add color clips by choosing from the drop down button next to the ![]() button.
button.
Dette frembringer dialogen Farveklip, hvorfra du kan vælge en farve og varighed.
Når du klikker på , så føjes klippet til projekttræet. Klippet kan så trækkes ud på tidslinjen. Farveklippets varighed kan også justeres på tidslinjen.
Titelklip
Se Titler
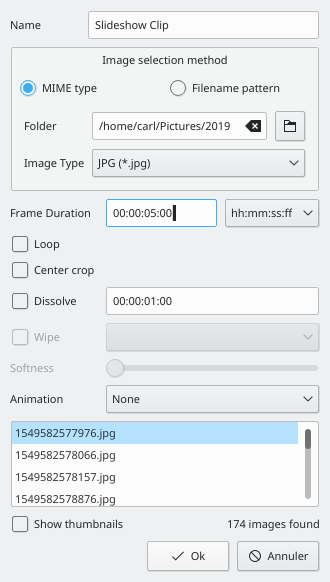
Diasshow-klip
Diasshow-klip er klip, som laves ud fra en række af stillbilleder. Funktionen kan bruges til at lave animationer fra en samling af stillbilleder eller til at lave et diasshow. Til det første formål bruges en kort framevarighed; til den andet en lang framevarighed.
For at lave et diasshow vælger du fra drop-ned-knappen ved siden af knappen ![]() .
.
I dialogen Diasshow-klip vælger du under Metode til valg af billeder.
Navigér til den mappe, hvor billederne til dit diasshow ligger og vælg det første billede i diasshowet. De efterfølgende billeder vil blive valgt på grundlag af filnavns-algoritme, som bestemmer, hvad det næste billeds filnavn skal være.
Hvis for eksempel det første billede er 100_1697.jpg, så vil det næste være 100_1698.jpg osv.
Vælg en passende framevarighed — dette definerer, hvor lang tid hvert billede vil blive vist.
Klik så på . En videofil bestående af alle billederne i mappen fra det første billede, som du valgte vil blive føjet til projekttræet.
Du kan nu trække denne video ind i tidslinjen.
Center crop: fylder automatisk output-videoframen med billederne idet den bevarer akpektforholdet ved at croppe lige meget fra hver kant. Sagt på en anden måde fjernes de sorte felter, som ellers optræder, når fotoets orientering eller aspektforhold ikke matcher videoens.
Animation: tilføjer forudindstillet langsom panorerings- og zoomeffekter kendt som Ken Burns-effekten. Du kan vælge imellem ingen animation, kun panorering, kun zoom eller en kombination af panorering og zoom. Hver valgmulighed har også et lavpasfilter til at reducere den støj, som kan opstå under denne operation. Lavpasfiltrering er meget langsommere, så du bør forhåndsvise uden og så aktivere det til renderingen.
Opret mappe
Se Opret mappe
Online ressourcer
Se Menuen Projekt - Online-ressourcer
Stop-motion
Proxy-klip
Proxy-klip er en af de nyttigste opfindelser til redigering, hvis du ikke arbejder på en ekstermt kraftfuld maskine. Selv ganske kraftfulde PC'er kan have problemer med optagelser i High Definition, hvis du ikke slår proxy-klip til. Proxy-klippenes trick er, at de oprindelige klip erstattes af klip med en lavere opløsning og et mindre komplekst codec. Videoafkodning af f.eks. H.264-klip kræver en masse beregningskraft, og der skal også bruges regnekraft til at rendere effekter i realtid. Hvis der ikke er nok regnekraft til stede, så vil afspilningen hakke i det. Proxy-klip kræver næsten ingen regnekraft, hvilket gør flydende afspilning mulig.
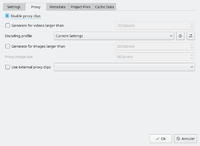
Proxy-klip kan slås til og fra for det aktuelle projekt i projektindstillingerne ().
For at slå proxy-klip til som standard for nye projekter skal du gå til . Se også siden Projektindstillinger.
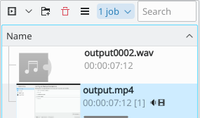
Lige så snart proxy-klip er slået til kan de genereres for specifikke klip i projekttræet via kontekstmenuen . Efter at have valgt for et klip startes et job, som laver proxy-klippet. Den lille grå fremgangslinje nederst i klippet viser, hvor langt jobbet er nået — se billedet. Klikker du igen på , så slås proxy fra for for dette klip.
Du kan markere flere klip i projekttræet og vælge for at starte et batch-job til at lave proxy-klip, som vil sætte flere jobs i kø.

Når genereringen af proxy-klippet er overstået, så vises proxy-klippet med et P-ikon i projekttræet.
Når du renderer til den endelige outputfil, så kan du også vælge om du vil bruge proxy-klip. Det er slået fra som standard, men kan være nyttig ved en hurtig rendering til forhåndsvisning.
Klipegenskaber
You can display and edit clip properties by selecting a clip in the Project Bin and choosing from the menu or from the right-click menu. Or by turning on the display of clip properties the → check box.
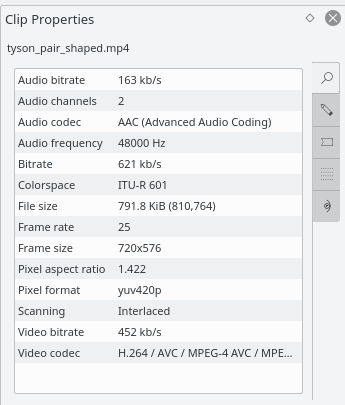
Videoegenskaber
The tab displays information about the file.
Properties
The tab displays advanced properties of the clip where you can select a check box and then force the clip to take the property you specify. For example, you can use to tell a clip that seems to have forgotten it was 16:9 ratio that it really is 16:9 ratio.
De avancerede klipegenskaber er:
- Duration: Change the clip duration. If the duration is shorter than the clip duration, then the clip is cropped. If the duration is bigger than the clip duration, then the last image is repeated until the new duration is over.
- Aspect ratio: Change the clip aspect.
- Proxy clips: Enable a proxy clip for this clip. See Proxy clips.
- Frame rate: Change the clip frame rate. See Wikipedia Frame rate.
- Scanning
- Field order
- Disable autorotate
- Threads
- Video stream
- Audio stream
- Colorspace
- Full Luma range
Markører
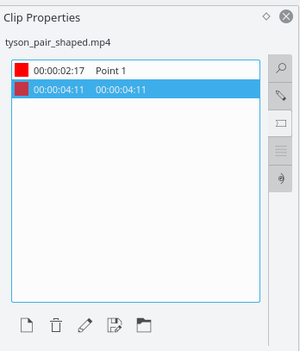
Du kan bruge fanebladet til at føje markører til særligt vigtige punkter i kildefilen. Det er dog nok lettere at tilføje markører til dine klip i klipmonitoren, for lader dig forhåndsvise filen på det sted, hvor du tilføjer markøren.
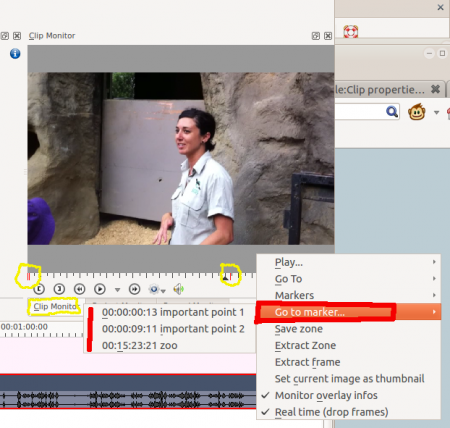
Once markers are put in your clip, you can access them in the Clip Monitor by right-clicking and selecting (see picture.) Also note how the markers appear as red vertical lines in the Clip Monitor (see yellow highlighted regions in the picture.) You can turn on the display of the marker comments in the timeline too (see Show Marker Comments).
Markers can also be added to clips on the timeline. Right-click the clip and choose . Markers added this way also appear in the clip in the Project Bin.
Metadata
You expect this to show any meta data that is contained in the clip. Does not appear to work.
Analysis
You can view and delete motion vector data that is associated with the clip from here. This is data created by Auto Mask - Motion Tracking
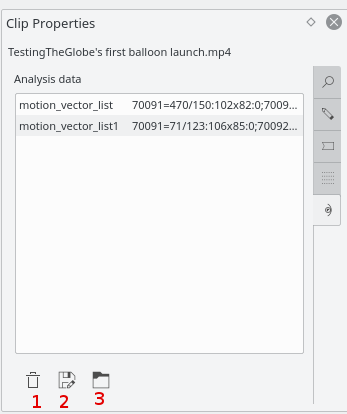
Button 1 Will delete the selected analysis data, Button 2 will allow you to export the data (semi colon delimited text file), Button 3 will allow you to import analysis data.
Generatorer
Counter
This generates a counter timer clip in various formats which you can put onto the timeline.
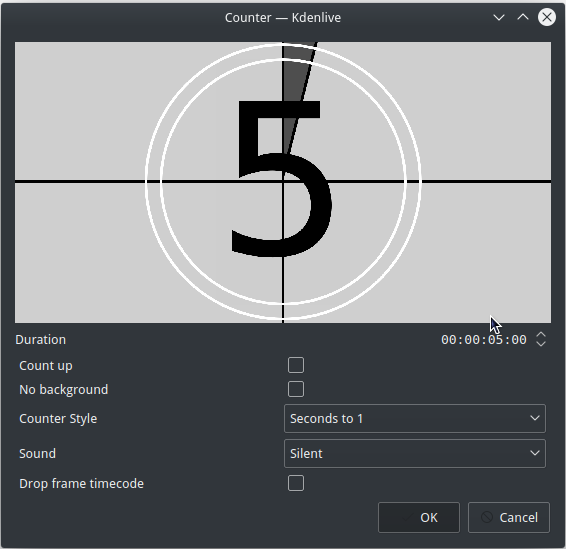 Previous versions of Kdenlive you could have the background to the counter be transparent.
There may be a defect here because it appears the No Background check box does not remove the background from the counter.
Det virker som om, at du skal bruge effekten pan and zoom for at formindske fonten i nedtællingstimeren mindre.
White Noise
This generates a video noise clip — like the "snow" on an out-of-tune analogue TV. In ver 17.04 it generates audio white noise as well as video snow.
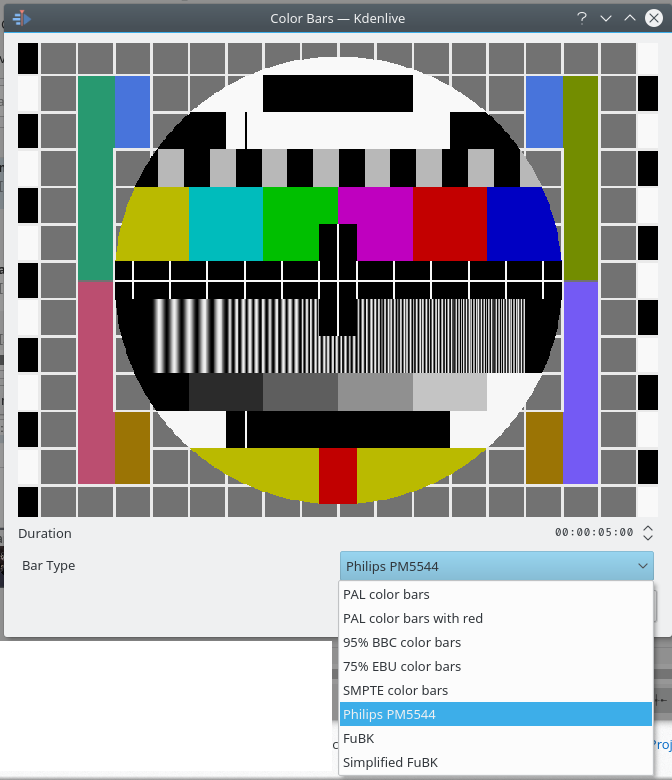
Color Bars
This generator came in to Kdenlive around ver 17.04.
Generates a color test pattern of various types.
Including PAL color bars, BBC color bars, EBU color bars, SMPTE color bars, Philips PM5544, FuBK
