Digikam/Tutorials/Setup of digiKam for Windows compatibility
Introduction
It is safe to say that digiKam (7.4) is the most powerful image metadata management photo gallery software. Unless you use command-line tools, there is no more universal program to read and write any metadata that you can imagine than digiKam (it even allows you to define new metadata namespaces to read and write data to, in case something is missing). As it is free for everyone, open-source, writes metadata back to files and runs on multiple operating systems – digiKam is truly future-proof tool to manage all your image and video metadata (people face tags, descriptive tags, location, captions, star ratings and more).
Unfortunately, as digiKam tries to be (and can be) cross-compatible with everything at once, the default digiKam settings cannot satisfy everyone. This tutorial provides a suggestion on how to best configure digiKam for new users or people who have managed their photos using any of the Microsoft software, including Windows built-in metadata tools.
The recommended configuration
Of course, you can use digiKam with default settings, but here are the reasons why you may want to follow this tutorial and change the Metadata configuration.
The Advantages:
- Less garbage in the files – the default configuration writes the same metadata multiple times under many metadata fields. While it can be good for ultimate compatibility outside digiKam, it practically guarantees that any other software will read and modify only part of those fields. As a result, if another software is involved, your image will carry both updated metadata as well as old metadata that was originally created by digiKam but not recognized by the other software that did the latest edit (for example OneDrive, Lightroom, etc.)
- More robust – This configuration keeps your digiKam tagged images cross-compatible with Microsoft OneDrive and Windows so you can correctly use and edit metadata even on Windows computers where digiKam is not installed (for example if you send files to your relatives). In addition a lot of major photo metadata software, including online services will correctly read Microsoft compatible tags, because it is one of the most common image metadata formats embedded into image files).
- This configuration will correctly preserve hierarchical tag structures, without creating lots of duplicate tags (when the same information is written in many metadata fields, other software, for example, Microsoft Windows may interpret the metadata from default digiKam configuration as multiple separate tags)
The Drawbacks:
- By disabling Read and Write to less common metadata fields, you are also stopping digiKam from correctly importing such metadata. But it is not very likely to find files that exclusively use the less common metadata fields which we are disabling – usually, the same information will be duplicated in another enabled field. (Plus it is possible to individually disable writing certain metadata fields while still reading them by un-checking “Unify read and write” in the Advanced Metadata settings).
What you need to know
- You have to re-check the Metadata settings every time you update digiKam to a new version, before you resume using digiKam as usual. Currently (digiKam 7.4) you do need to repeat the manual Metadata setting changes after each digiKam update.
- There may be bugs, special exceptions or just format changes that could break cross-compatibility that we try to achieve (from digiKam to Microsoft programs). The good news is that such metadata issues are almost always resolvable either by tools built in into digiKam or in the worst cases by other programs, where ExifTool is usually the ultimate solution to just about any metadata problem (see one old example here).
- If you are migrating from some Microsoft metadata editing software, there is a dedicated additional tutorial to help specifically WLPG, OneDrive and other Microsoft software users - how-to Switch from Microsoft OneDrive or WLPG to digiKam.
- The statement “This configuration keeps your digiKam tagged images cross-compatible with Microsoft” does include some limitations:
- If you save people face tags in digiKam it will automatically create descriptive tags for each person in a hierarchy “People/<face tag name>”. This is not the same as WLPG behavior, but still shows-up nicely in any Microsoft software.
- If you save people face tags in digiKam it will also create "MWG regions" which follow the main standard to save face tags and performs the same function as Microsoft People Tags. Microsoft software will always display correctly people tags saved in digiKam (and digiKam always reads Microsoft created People Tags), but you can not edit digiKam created face tags in Microsoft software!
- Trully cross-compatible changes (edit in digKam or Microsoft at any time) are:
- selecting/deselecting descriptive tags,
- changing caption,
- changing star rating.
- If you encounter some problems while following this tutorial – please add a “Warning” box to the tutorial to warn everyone about a potential issue and consider filing a bug report at https://bugs.kde.org/describecomponents.cgi?product=digikam
Change the settings
Here are all the steps to correctly set up your digiKam for the recommended configuration.
Step 1 – Configure the basics
Before you begin with the details it is good to have the basics right:
- Check the folder and file Properties of your photo collection using a basic file browser. Check that:
- Either all your image files can be modified (“NOT Read-Only”) – necessary if you want to store all your tags and metadata inside the image files (this is the typical approach for the best metadata preservation).
- Or in case you plan to only use sidecar files for all your media (more information about “Sidecar” files further below), then you may choose to set your files to “Read-Only” (but not folders).
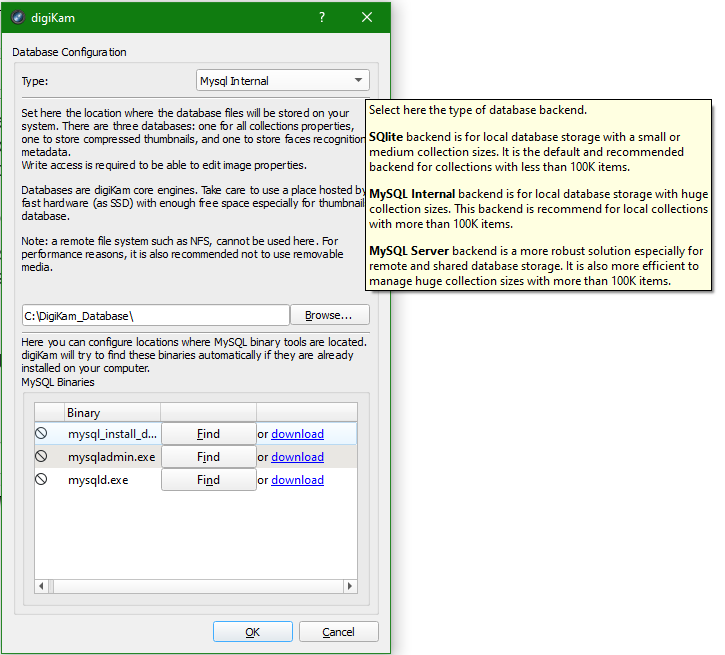
- Select the right database type for digiKam. According to the documentation, all database options are good but have different pros and cons:
- SQLite is effortless to configure, but if you have more than about 100 000 files in your collection it can become a performance bottleneck. Note that you can always migrate to another database type later, so no need to worry about this.
- MySQL Internal requires more work to set up, but should pay off in terms of performance in large photo collections. You will actually need to follow the 1st provided “download” link and install “MariaDB Server” (you can leave the root password empty for MariaDB and Disable Networking) and then click “Find” and locate the 1st required .exe file in the MariaDB installation folder.
- MySQL Server is only used if multiple computers with digiKam will access the same shared photo library. Again, you can migrate to this type of database at alter point.
Finally when you choose which folders with images and videos digiKam will manage, consider that:
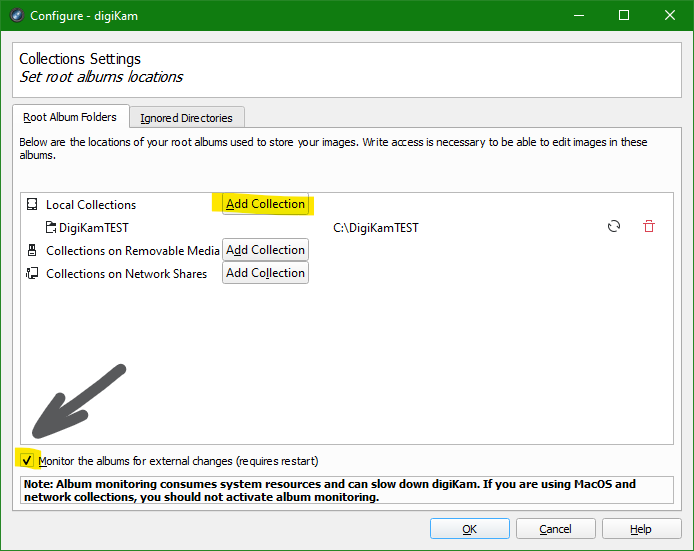
- You should NOT add your true main collection to digiKam before you complete "Step 2" and decide if you want to Set up digiKam to ignore RAW files. But you can add some test folder(s) to initialize digiKam and run some tests.
- Consider ticking the “Monitor the albums for external changes” setting. It should make digiKam more intuitive to use, but could also impact performance.
Step 2 - Fix which metadata is written into files
The main Metadata settings are under → → → . Here we will set DigiKam to not-write to various unnecessary Metadata fields. (For simplicity we are also disabling reading of those fields, but you are welcome to disable only the writing by un-checking the “Unify read and write”.
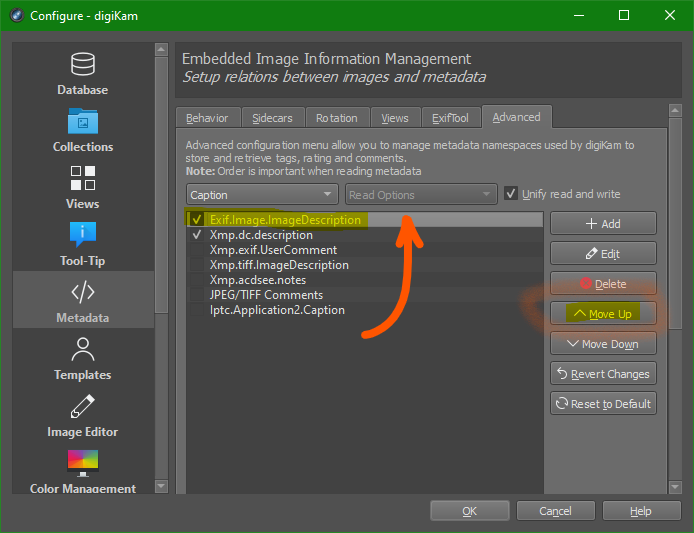
- Start with (aka Comments): here deselect all namespaces except for “Xmp.dc.description” and “Exif.Image.ImageDescription”. AND using button raise the “Exif.Image.ImageDescription” field to the 1st priority (this is important to stop WLPG from overwriting your Caption by duplicating Title text). Remember that Microsoft WLPG confuses Title & Caption, so it is safer to only use either “Title” or “Caption” but not both at the same time. See “What tags to use” for more info.
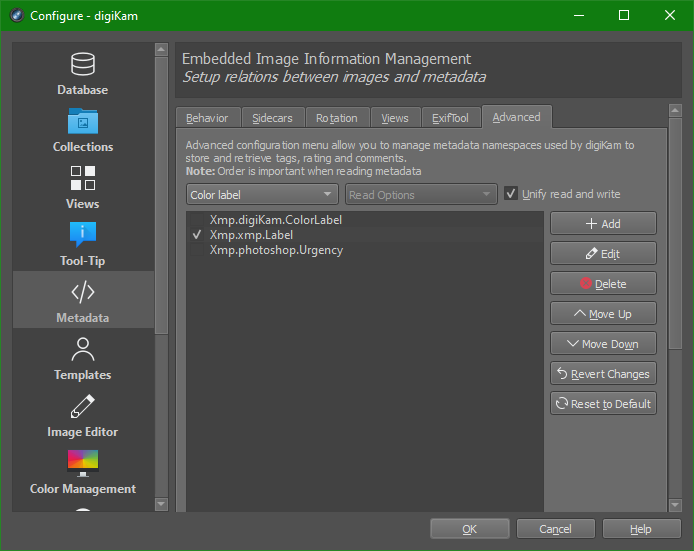
- Under – leave only “Xmp.xmp.Label” (it is enough)
- Under – leave only “Xmp.xmp.Rating” and “Xmp.MicrosoftPhoto.Rating”.
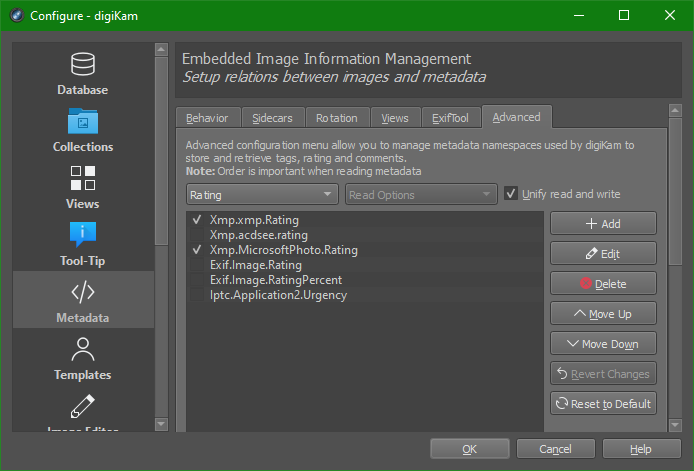
- Under we have a more complex case (see screenshot):
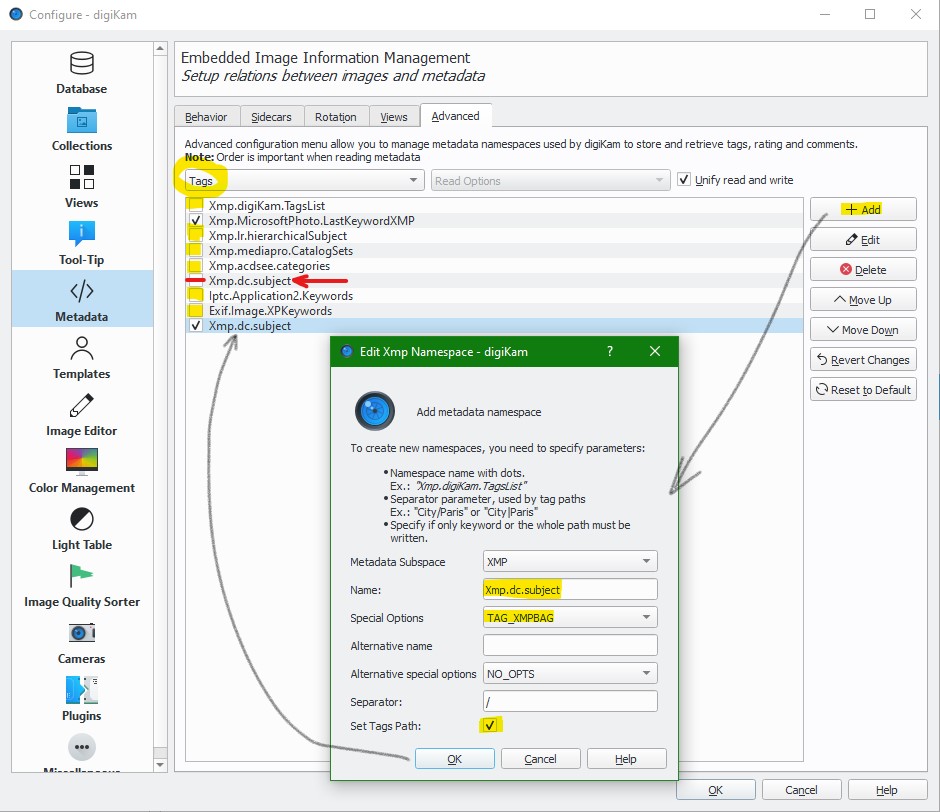
| Name: | Xmp.dc.subject | (substitute for the existing one) | ||
| Spec_options: | TAG_XMPBAG | |||
| Separator: | / | |||
| Set Tags Path: | YES | <== this is the FIX to the main problem! |
- Leave enabled "Xmp.Micosoft Photo.LastKeywordXMP" namespace (as it is used by WLPG)
- Then disable all other namespaces (unless you have a specific reason to keep some of them enabled)
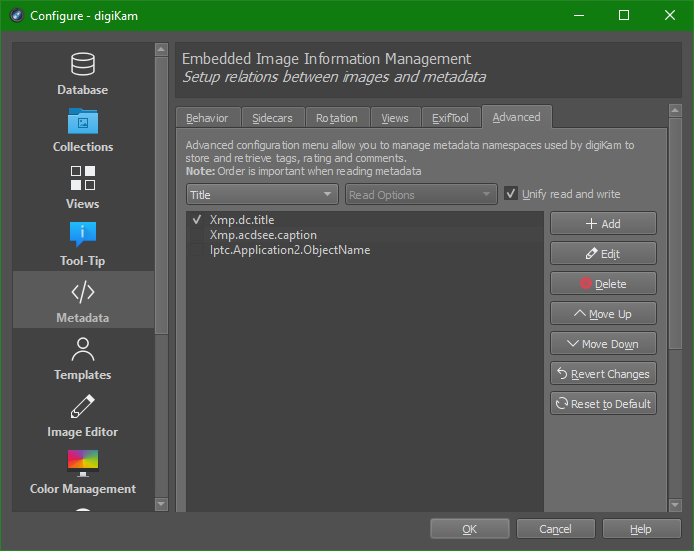
- Finally under – leave only “Xmp.dc.title”. Remember that due to Title & Caption confusion in Microsoft WLPG, it is safer to only use either “Title” or “Caption” but not both at the same time.
Step 3 - Other important metadata settings
Here we check that Metadata is actually written into files, and not just left in the temporary digiKam database.
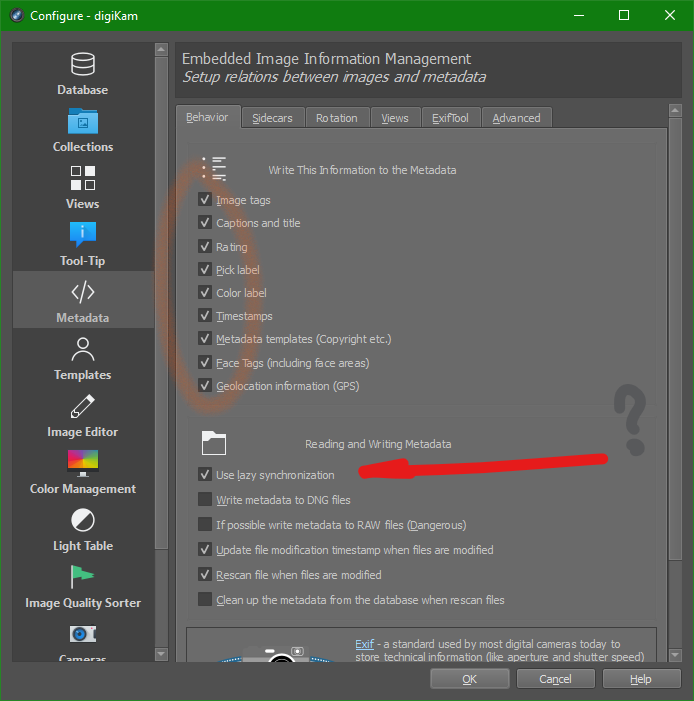
- Under → → → make sure that all Information is written into the Metadata.
- There is also “Use lazy synchronization” option which I recommend to enable to improve performance and avoid re-writing each file multiple times for every little edit that you make. It also can help to detect accidental metadata changes.
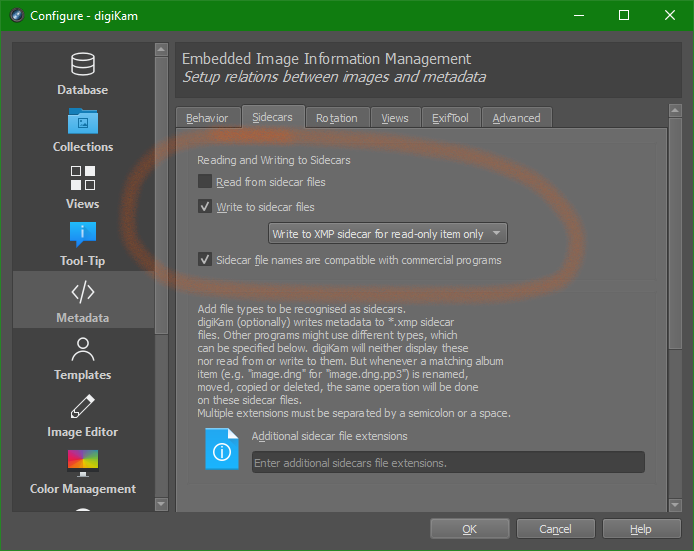
- Under the basic idea is to allow digiKam to write sidecar files, but only for media files that can not contain metadata directly (most useful for video files or any file that is set to read-only). According to the documentation, the option “Read from sidecar files” means "digiKam will only read the sidecar while ignoring the embedded metadata.”
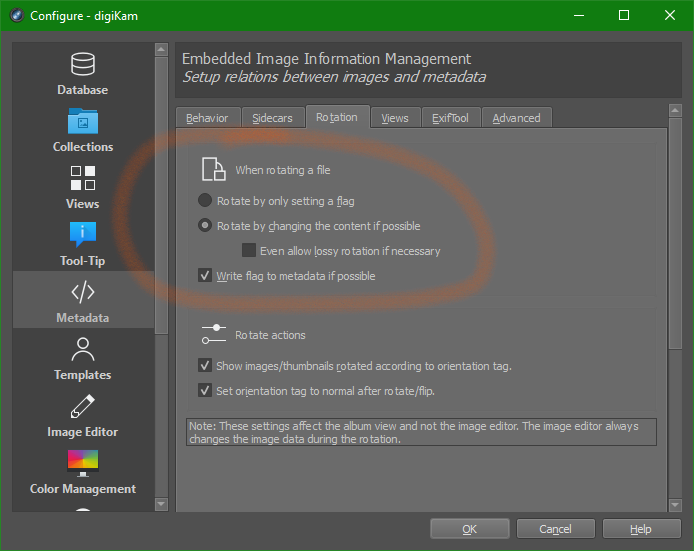
- Finally for it is preferable to choose lossless data rotation instead of using the orientation metadata flag. (The main reason is Microsoft – MS still does not respect the orientation flags and it causes issues such as your pictures may appear on a side when viewed in Windows as well as problems with rotated face tag regions)
Fix Tree view
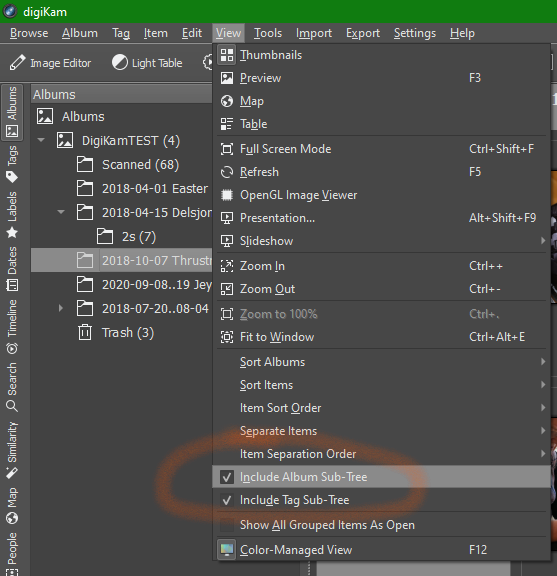
This setting is not essential, but if you do not have ticks in the → and → , then the tree structures in the left panel will not behave as most users would expect – highly recommended to make this change if you are setting up digiKam for a new user.
Unfortunately in digiKam (7.4) the Albums tree still has a limitation that only one tree entry can be selected at the same time - https://bugs.kde.org/show_bug.cgi?id=269340. (it is possible to select multiple tree entries in the Tags tree, but not in the Albums tree.)
Personalize appearance
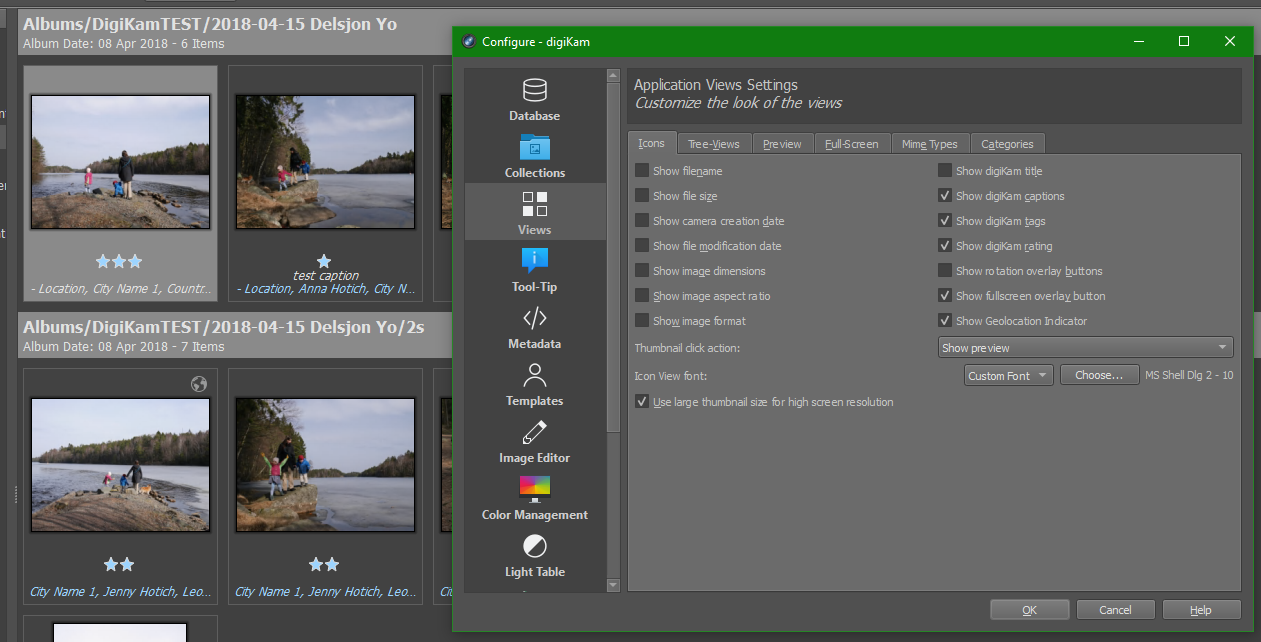
In addition I would suggest to experiment with settings for digiKam's
- appearance in → ),
- thumbnails in → → → and
- sorting in → to get to an optimal look and feel for digiKam.
RAW file handling
If you have “digital negatives” (RAW files) together with the usual .JPG image files in your collection there is always a concern about how to best handle these files. Here are some of the common options:
- Show All
- Most software by default just shows both JPG and RAW files as equals. This is the worst option because it makes it very cumbersome to view, sort or tag your pictures. Remember that when you do need to see both JPG and RAW files together, there are always normal file browsers that are simple and reliable.
- Grouping RAWs under JPGs
- More advanced software offers to automatically recognize which RAW files belong to which JPGs and apply all operations on the “groups” of files. This is a valid approach IF it is easy to use and robust. DigiKam can do grouping, but there are a few things to consider if you choose to use it:
- It is not possible to permanently enable grouping in digiKam (7.4) – grouping must be manually enabled every time by selecting all photos that should be grouped, then right-clicking one thumbnail and selecting → .
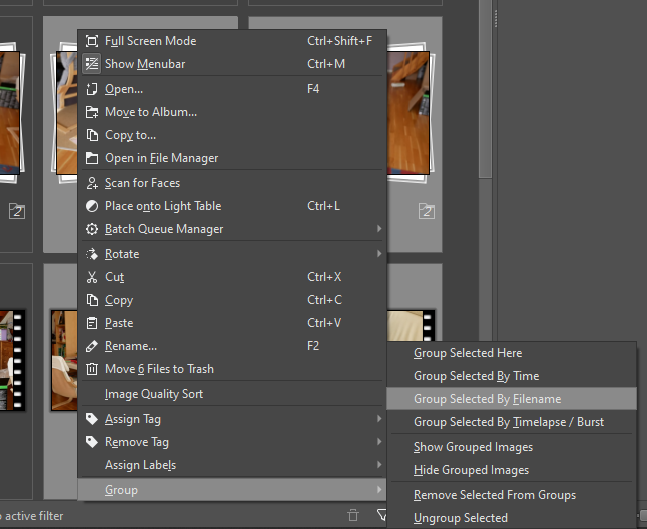
- As grouping is not always enabled, it is difficult to explain how to use grouping to infrequent users. And even geeks will not appreciate the required extra manual steps.
- Finally the grouping by Filename is very simplistic in digiKam 7.4. If you make any changes to the filename of the JPG file, for example, add “_cropped” or “_altColor” to the filename, it will no longer be grouped with a corresponding RAW file (so you will again see that RAW file during slideshow and will need to tag it separately.
- Ignoring RAWs
- As digiKam is not a true competitor to a dedicated RAW processor, I prefer to use digiKam only to manage metadata in the photo collection. Then it is optimal to block digiKam from reading RAW files and only deal with JPGs and videos. It means:
- Simplicity – even inexperienced users will not get distracted by the RAW format duplicates of every image. And the limitations in grouping of RAW+JPG in digiKam are not a problem.
- Perfect consistency – if you do not try to sync RAW file metadata with the JPGs then all potential metadata mismatch problems go away. (for example if you import RAW+JPG files where only JPGs have been tagged by another program)
- As RAW files are ignored, they never get modified and there are no additional .xmp sidecar files when you make changes to the Metadata – which is good for backups and performance.
- The downside – to move images between folders, you would have to use a generic file browser, because in “Ignore” mode digiKam will normally not do any operations with RAW files.
- Also you will need to remove RAW files which are left after you delete unwanted JPGs. This is not just digiKam issue as I personally use multiple image viewers for sorting pictures which also leave RAW files behind. My preferred solution for leftover RAW files is this simple Python executable script that automatically removes all orphaned RAW files: "CleanUp_RAW_files.py"
| If you... | Show All | Grouping RAWs under JPGs | Ignoring RAWs |
|---|---|---|---|
| Move complete album | All files & folders are moved | All files & folders are moved | All files & folders are moved |
| Move file by file | All files can be moved | All files can be moved | ONLY "JPG" files will be moved |
| Delete file by file | All files can be deleted | All files can be deleted | ONLY "JPG" files will be deleted |
Set up digiKam to ignore RAW files
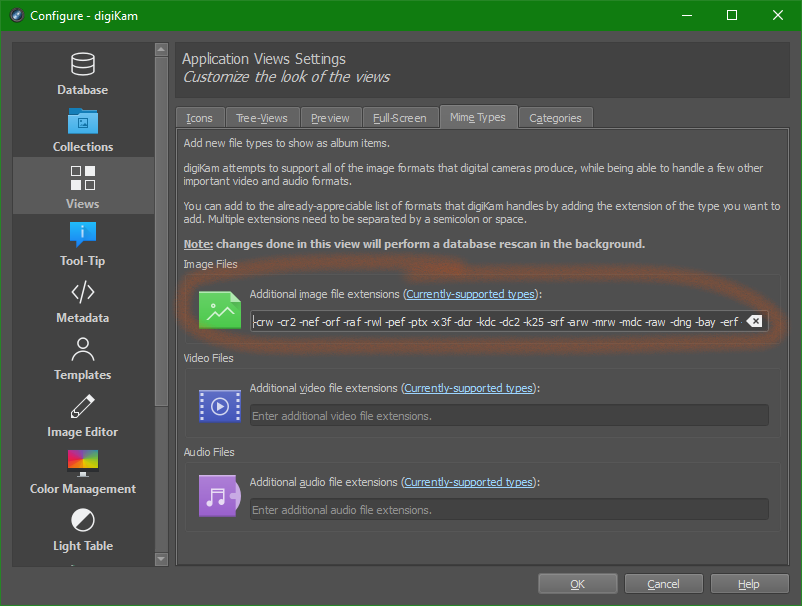
My recommendation is to stop digiKam from reading RAW files and make any changes to RAW files in other software. The full list of RAW file extensions that digiKam can load is given in the documentation [link].
To disable all RAW files (or any other file extensions) go to → → → and under “Image Files” add this list with all file extensions that need to be ignored by digiKam:
-rw2 -crw -cr2 -nef -orf -raf -rwl -pef -ptx -x3f -dcr -kdc -dc2 -k25 -srf -arw -mrw -mdc -raw -dng -bay -erf -fff -mos -pxn –rdc
What tags to use
Even when all the metadata settings are correct, to ensure best cross-compatibility it is still important to use the tags in a compatible way. For example, Windows does not differentiate between “Title”, “Caption” or “Comments” so if you use all of these fields simultaneously, some Microsoft software can overwrite part of what you wrote and cause permanent metadata loss [source].
Here are the strongly-recommended; safe-to-use metadata fields (notice, almost the same as in WLPG):
- Descriptive Tags organized in tag hierarchies – tags are good, but tag hierarchy greatly enhances the usefulness of predefined tags. With the recommended settings, tag hierarchy is fully supported and cross-compatible with Microsoft tools.
- Face Tags or people tags are excellent to specify who is who in the photo. Supported and useful. Note you can as well tag pets or other non-human points of interest using face regions.
- Edit “Title” field – this field is effectively the primary filed for all Comments and Captions despite the name of the field. (In WLPG this data is editable as Caption. More details below.)
- Secondary: “Caption” field can be used if you really have to. Microsoft software will show it as “Comment” in file properties, but for example WLPG cannot edit this field.
- Star rating – fully supported and a more robust alternative to Colors or Flag labels.
- GPS geotag data.
- Names (Author) and Copyright under the Information – Rights in the right digiKam sidebar.
- Plus you can rename the file, but be careful in case your image has a corresponding RAW file. After re-naming, RAW file should still match the beginning of the new filename.
- Finally it is useful to keep meaningful folder names that can contain some basic “Caption” and start with a relevant date in “YYYY-MM-DD” format (to have some control over your files outside dedicated photo management software like digiKam).
For more information how to actually efficiently apply tags in digiKam see “Tagging and Face Tags” tutorial.
For all other Metadata fields and types – use at your own risk. Everything will work in digiKam, but may be hard to access for other software.
Title, Captions and Comments confusion in Windows
Under construction...
Future improvement suggestions
No doubt we would like faster, more robust and intuitive way to configure digiKam for an average user. Here are some suggestions on how to make digiKam configuration better:
- Macro – as a temporary measure, someone could write a script to modify digiKam settings using one executable file. The advantage would be that anyone could read and modify what the script does and therefore make a custom one-click setup script for their unique configuration.
- Configuration presets – just as many other programs (for example see Blender keymap presets), digiKam could offer users a choice which Metadata configuration preset to use already during initial configuration. This way there could be multiple ready-made profiles depending on the use case; depending on which other software user migrates from or uses in parallel.
- Simplified digiKam – just as there is ShowFoto as a standalone part of digiKam for image editing, there could be a simplified gallery viewer and manager suitable for non-geeks so that everyone could use the metadata features without complex setup tutorials and editing of configurations.
The good news is – digiKam is open source, so anyone can pick up a challenge and make the improvements we all need. Meanwhile digiKam works already, so happy tagging after the setup!
About this tutorial
This tutorial was originally written for digiKam 7.4 in 2021-12. You are very welcome to edit, update and Upgrade this tutorial page to make it better and keep it up to date. No attribution or copyrights on this page (all illustrations are original as well)!


