Digikam/Noise Reduction/it: Difference between revisions
(Importing a new version from external source) |
(Importing a new version from external source) |
||
| Line 9: | Line 9: | ||
Se stai utilizzando '''digiKam''', hai a disposizione un ottimo strumento per la riduzione dei disturbi. Fai doppio clic sull'immagine di cui vuoi ridurre il rumore e fai un clic destro -> <menuchoice>Modifica</menuchoice>. Puoi anche premere <keycap>F4</keycap> sulla tastiera e otterrai la stessa cosa. | Se stai utilizzando '''digiKam''', hai a disposizione un ottimo strumento per la riduzione dei disturbi. Fai doppio clic sull'immagine di cui vuoi ridurre il rumore e fai un clic destro -> <menuchoice>Modifica</menuchoice>. Puoi anche premere <keycap>F4</keycap> sulla tastiera e otterrai la stessa cosa. | ||
Dopo questo ti verrà presentata la vista editor. | |||
From here go to <menuchoice>Enhance -> Noise Reduction</menuchoice> and you will be presented with this window. | From here go to <menuchoice>Enhance -> Noise Reduction</menuchoice> and you will be presented with this window. | ||
Revision as of 19:08, 25 March 2011
Riduzione dei disturbi utilizzando digiKam
Trascritto dal blog di Mohamed Malik, 12 febbraio 2011
Tutte le fotocamere DSLR in qualche misura soffrono del problema del rumore. Questo è particolarmente vero per quelle di fascia bassa e media anche quando hanno prestazioni ISO molto buone fino a qualcosa come 800.
Utilizzo una Nikon D3000 e la sua prestazione ISO è buona fino a 800. A 1600 ISO è utilizzabile per risoluzioni ridotte, mentre immagini a 3200 ISO sono molto granulose e bisogna applicare la riduzione del rumore.
Se stai utilizzando digiKam, hai a disposizione un ottimo strumento per la riduzione dei disturbi. Fai doppio clic sull'immagine di cui vuoi ridurre il rumore e fai un clic destro -> . Puoi anche premere F4 sulla tastiera e otterrai la stessa cosa.
Dopo questo ti verrà presentata la vista editor.
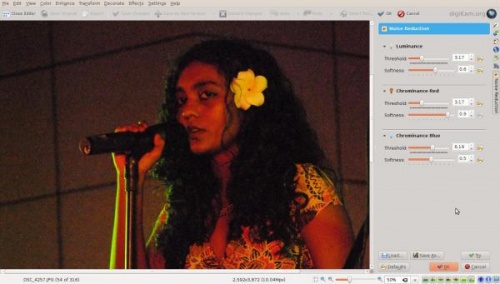
From here go to and you will be presented with this window.

Choose from the settings or you can choose your own settings. Here is a picture of before and after from my tests. They are much more usable and better looking after the noise reduction has been applied.
Before Noise Reduction Was Applied:

After Noise Reduction Was Applied:

Here is another picture in which the noise reduction was applied:

After:


