KWord/Vejledninger/Grundlæggende Layout
Det første layoutprojekt
I denne lektion skal du
- tilføje tekstbokse og justere deres størrelse og position
- formattere tekst
- tilføje illustrationer
- justere deres størrelse og position
Start KWord og vælg skabelonen . Du får nu en tom side i den størrelse, som er mest almindelig i dit område - sædvanligvis ISO A4 eller US Letter. Du kan ændre sidestørrelsen ved brug af menuen . I dette projekt bruger jeg A4, men du kan nemt tilpasse det til Letter, hvis du vil.
Til denne slags layout skal du bruge en ret stor margen, så sæt top til 25mm og de tre andre sider til 20mm (eller til hhv. 1" og 3/4" hvis du bruger imperiale enheder).
Gå nu til fanebladet i værktøjskassen til højre, klik på værktøjet ![]() og træk en 3cm høj boks fra margen til margen - du kan se markørens position på linealen i venstre side. Resultater bliver en farvet boks, men det er blot en markering. Nu dukker dialogen op - du kan ændre navnet på boksen, hvis du vil, resten kan du lade være som det er. Når du klikker på , så fyldes boksen med en prøvetekst. Klik nu på tekstredigeringsværktøjet , så forsvinder prøveteksten og du kan skrive din overskrift. Jeg har brugt URW Chancery L, 48 pt til titlen og 24 pt til under-overskriften. Marker begge linjer og klik på
og træk en 3cm høj boks fra margen til margen - du kan se markørens position på linealen i venstre side. Resultater bliver en farvet boks, men det er blot en markering. Nu dukker dialogen op - du kan ændre navnet på boksen, hvis du vil, resten kan du lade være som det er. Når du klikker på , så fyldes boksen med en prøvetekst. Klik nu på tekstredigeringsværktøjet , så forsvinder prøveteksten og du kan skrive din overskrift. Jeg har brugt URW Chancery L, 48 pt til titlen og 24 pt til under-overskriften. Marker begge linjer og klik på ![]() for at centrere dem. Lav endnu en tekstboks fra margen til margen 1,5 cm høj og tilføj teksten:
for at centrere dem. Lav endnu en tekstboks fra margen til margen 1,5 cm høj og tilføj teksten:
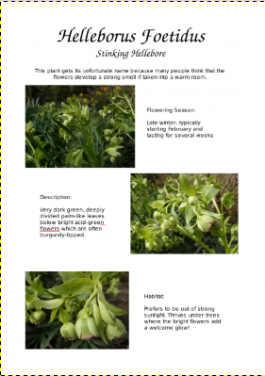
This plant gets its unfortunate name because many people think that the flowers
develop a strong smell if taken into a warm room
Hvis du holder markøren svævende over boksen mens den er valgt, så dukker der en markør med fire pile op. Den kan du bruge til at flytte boksen. Vi vil senere bruge til at finjustere positionen.
Så er titlen klaret. Nu skal vi til at se på illustrationerne. Mange kameraer bruger et 4:3 format, så vi vil lave Billedrammer på 8cm x 6cm.
 |
Gentag processen ved at lave en billedboks direkte herunder, som rører margen forneden. Vælg filen Hellebore3.jgp. |
| The third image box should be the same size, touching the right margin, and positioned vertically as close as you can to half-way between the other two. Select the file Hellebore2.jpg |  |
Now we need to tweak the position, to get them exactly where we want them. First, make sure you are using the ![]()
Look at the image frame that is best aligned to the left margin - select that frame by clicking on it, right-click and select . On the tab you can see position and size. If your is 20mm, set to 2cm. Correct the to 8cm and to 6 cm.
Repeat these settings on the other left-hand image, so that they are perfectly aligned. For the right-hand image, set the and to match the others. Setting to 11cm should line it up nicely.
Now we turn our attention to adding the descriptive text boxes.
Select the ![]() , and draw a box approximately 6cm wide and 3 cm deeps, in the center of the space to the right of your first picture. Into that paste the text:
, and draw a box approximately 6cm wide and 3 cm deeps, in the center of the space to the right of your first picture. Into that paste the text:
Flowering Season:

Late winter, typically starting February and lasting for several weeks.
You will see the text automatically wrap to the box. Right-click to get the , and adjust the width until the wrap gives you reasonably balanced lines.
The second text box is created and adjusted in the same way, using the text:
Description:

Very dark green, deeply divided palm-like leaves below bright acid-green flowers which are often burgundy-tipped.
The final text box uses the words:
Habitat:

Prefers to be out of strong sunlight.  Thrives under trees where the bright flowers add a welcome glow.
Again, adjust the width on the tab of the . You now need to check the setting for the two text boxes Flowering Season and Habitat, making sure that they are identical. The width is less important, but a badly-aligned box is very noticeable. The middle box doesn't have anything to line up with, so just adjust until it looks central in the space.
Just one task left. Return to the heading and sub-heading banners and use the to ensure that they start and end on the margins.
That's all there is to it. If you were doing an advertising flyer you could have a smaller-text banner across the bottom with your contact details.
In the next tutorial you will use your own images and text, and we will explore text-flow, both around shapes and between boxes.


