Plasma/de: Difference between revisions
Neverendingo (talk | contribs) No edit summary |
(Created page with '300px|center') |
||
| Line 44: | Line 44: | ||
* Man kann die Ordner-Ansicht auch andere Verzeichnisse anzeigen lassen (sowohl lokal als auch im Netzwerk). | * Man kann die Ordner-Ansicht auch andere Verzeichnisse anzeigen lassen (sowohl lokal als auch im Netzwerk). | ||
<span class="mw-translate-fuzzy"> | |||
Neben der Ordner-Ansicht kann man auf den Desktop noch alle möglichen anderen Widgets platzieren - von der Wettervorhersage über ein Notiz-Widget bis hin zu Dateibetrachtern. Es gibt keine Grenzen und alles kann den individuellen Ansprüchen angepasst werden. | Neben der Ordner-Ansicht kann man auf den Desktop noch alle möglichen anderen Widgets platzieren - von der Wettervorhersage über ein Notiz-Widget bis hin zu Dateibetrachtern. Es gibt keine Grenzen und alles kann den individuellen Ansprüchen angepasst werden. | ||
</span> | |||
<span class="mw-translate-fuzzy"> | |||
=== Widgets überall === | === Widgets überall === | ||
</span> | |||
<span class="mw-translate-fuzzy"> | |||
In KDE SC 4.x unterstützt Plasma nicht nur Widgets, die speziell für Plasma geschrieben wurden (auch bekannt als Plasmoide), sondern auch aus anderen Quellen, wie Google Gadgets and Dashboard Widgets aus Mac OSX. Zusätzliche Widgets können einfach über [[Glossary#Get Hot New Stuff|Get Hot New Stuff]] gefunden und installiert werden. | In KDE SC 4.x unterstützt Plasma nicht nur Widgets, die speziell für Plasma geschrieben wurden (auch bekannt als Plasmoide), sondern auch aus anderen Quellen, wie Google Gadgets and Dashboard Widgets aus Mac OSX. Zusätzliche Widgets können einfach über [[Glossary#Get Hot New Stuff|Get Hot New Stuff]] gefunden und installiert werden. | ||
</span> | |||
Widgets that are docked into the panel usually have an Options menu, while those on the desktop have the configuration options within the 'handle', the shaded area which pops up, sometimes right or sometimes left of the widget. Clicking and holding the mouse on the blank part of the handle will allow you to drag the widget to the desired position. | Widgets that are docked into the panel usually have an Options menu, while those on the desktop have the configuration options within the 'handle', the shaded area which pops up, sometimes right or sometimes left of the widget. Clicking and holding the mouse on the blank part of the handle will allow you to drag the widget to the desired position. | ||
| Line 147: | Line 153: | ||
==Weitere Informationen== | ==Weitere Informationen== | ||
<span class="mw-translate-fuzzy"> | |||
* [[Plasma/FAQ | Die Plasma-FAQ]] | * [[Plasma/FAQ | Die Plasma-FAQ]] | ||
* [[Plasma/HowTo | Plasma HowTo - short screencasts]] | * [[Plasma/HowTo | Plasma HowTo - short screencasts]] | ||
| Line 153: | Line 160: | ||
* [[Plasma/Installing Plasmoids|Here's how to install more Plasmas widgets]] | * [[Plasma/Installing Plasmoids|Here's how to install more Plasmas widgets]] | ||
* [[Plasma/Krunner|Learn the versatility of KRunner]] | * [[Plasma/Krunner|Learn the versatility of KRunner]] | ||
</span> | |||
Revision as of 14:59, 29 July 2010
Template:I18n/Language Navigation Bar
Eine Einführung: Was Plasma ist und was es tut
Plasma stellt die Desktop-Oberfläche für KDE SC4, einschließlich dem Programm-Starter (Start-Menü), dem Desktop selber und den Leisten zur Verfügung.
Plasma auf einem Blick
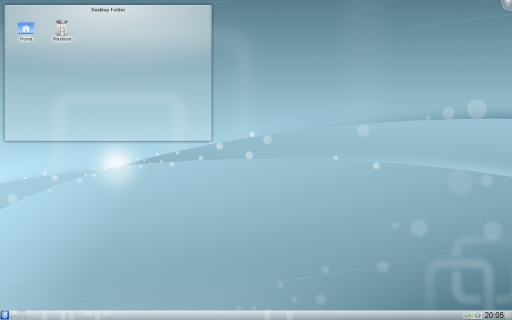
Ein typischer Plasma-Desktop sieht so aus:

Die drei Schlüsselkomponenten eines Plasma-Desktops sind:
- Die Leiste mit dem Programm-Menü, der Liste an geöffneten Progammen, einer Uhr und den laufenden Dienstprogrammen;
- Der Desktop ist der Bereich, auf dem sich Miniprogramme (Symbole und Applets) befinden;
- Der Plasma-Werkzeugkasten in der oberen rechten Ecke des Bildschirms - auch bekannt als Cashew. Ein analoger Button ist auch in der Leiste vorhanden.
Sich in Plasma zurechtfinden
Man kann Plasma so benutzen, wie man den Desktop beliebiger anderer Betriebssysteme benutzen würde, indem man das Programm-Menü (K-Menü) aufruft, die aktuell geöffneten Programme in der Programmleiste ansieht, Dienstprogramme öffnet, und so weiter.
Ein wichtiger Teil Plasmas sind die sogenannten Widgets. Widgets sind die individuellen Einheiten des Desktops und beinhalten beispielsweise das Programm-Menü, Icons, den Dienstprogrammbereich, die Uhr... Widgets können entweder auf dem Desktop selber sein, oder in der Leiste liegen. Leisten und Desktops sind letztendlich nichts anderes als spezielle Widgets, die andere Widgets beinhalten können (in Plasma werden sie "Containments" genannt).
Wie geht das mit der Benutzung des Desktops zusammen? Plasma hat auch einige neue Funktionen, die die herkömmliche Desktop-Benutzung berücksichtigen. Wir haben die "Cashews" bereits erwähnt: Sie sind der Einstiegspunkt zur Kontrolle und Anpassung von Plasma. Indem man sie anklickt, öffnet sich ein Menü, das eine Reihe Möglichkeiten eröffnet: Widgets hinzufügen, in der Größe verändern, Leisten hinzufügen oder entfernen, sowies andere Operationen.
Desktop und Icons
Wie man vielleicht auf dem Screenshot gesehen hat, befinden sich keine Icons direkt auf dem Desktop. Stattdessen werden sie in einem Container platziert, auch bekannt als "Ordner-Ansicht" oder "Folder View". Obwohl es einige technische Gründe für dieses Vorgehen gibt, kann sich diese Ordner-Ansicht wie ein vollkommener Desktop-Ersatz verhalten. Man kann Icons hineinziehen, ausschneiden, kopieren, einfügen, Dateien umbenennen und auch neue Verzeichnise/Dateien erstellen.
Die Hauptunterschiede vom gewohnten Desktop sind im Wesentlichen zwei:
- Man kann mehr als eine Ordner-Ansicht haben;
- Man kann die Ordner-Ansicht auch andere Verzeichnisse anzeigen lassen (sowohl lokal als auch im Netzwerk).
Neben der Ordner-Ansicht kann man auf den Desktop noch alle möglichen anderen Widgets platzieren - von der Wettervorhersage über ein Notiz-Widget bis hin zu Dateibetrachtern. Es gibt keine Grenzen und alles kann den individuellen Ansprüchen angepasst werden.
Widgets überall
In KDE SC 4.x unterstützt Plasma nicht nur Widgets, die speziell für Plasma geschrieben wurden (auch bekannt als Plasmoide), sondern auch aus anderen Quellen, wie Google Gadgets and Dashboard Widgets aus Mac OSX. Zusätzliche Widgets können einfach über Get Hot New Stuff gefunden und installiert werden.
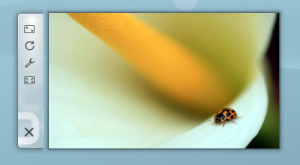
Widgets that are docked into the panel usually have an Options menu, while those on the desktop have the configuration options within the 'handle', the shaded area which pops up, sometimes right or sometimes left of the widget. Clicking and holding the mouse on the blank part of the handle will allow you to drag the widget to the desired position.

You have four tools on this handle. The top one is the re-sizer. Click and hold on the tool and you can drag the size.
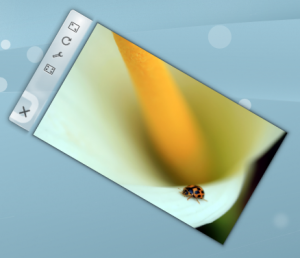
The second tool is a rotate tool. Again, click and hold the tool, while rotating to desired angle.

The third is the wrench or spanner which allows you to configure that particular widget's settings.
Finally, the forth tool is used on some widgets like the Picture Frame. If you use the Picture Frame widget for example, it will open the image viewer.
Some of our favourite widgets are discussed on the Plasma Widgets page
Start menus etc.
The Panel

The panel can be configured by clicking on the toolbox on the right of the panel which puts the panel into configure mode. This lets you configure the panel to fit your needs.
Panel Alignment: Allows the alignment of the panel to be set in three pre-set positions.
Always Visible: Keeps the panel visible at all times, even when windows are maximised.
Auto Hide: Hides the panel off screen until the mouse is placed near the screen edge.
Windows can cover: This allows windows to cover the panel and if maximised, will cover the panel.
Windows go below: This allows windows to go below the panel, even when maximised.
Maximise Panel: Makes the panel fit to the screen edges, if it has been resized.
Remove this panel: Removes the current panel.
Lock Widgets: Locks the panel and widgets in position.
Add Spacer: Allows you to add a spacer into the panel giving space between the items in it.
Add Widgets: Allows widgets to be added to the panel.
Height: Allows the panel height to be adjusted.
Screen Edge: Allows you to drag the panel to any of the four edges of the screen.

The arrows on the edge, just below the main settings allow the panel's size to be adjusted. Dragging the arrow makes the panel smaller or larger. Dragging the arrow pointing down, moves the panel's position.
Advanced usage
Special cases not covered here
Activities and the Zooming User Interface (ZUI)
KDE Plasma has brought a lot of new features to the modern linux desktop, however many people are only using a fraction of the desktop's full potential. One of the most useful and underused features is the plasma activities. The basic idea behind is that your desktop space is limited to how many widgets it can hold. A user will want to use a lot of widgets but doesn't want their desktop to be cluttered. The answer to this problem is activities; they allow you to specialize each desktop to whatever task you need to accomplish. To make a new activity you have to click on the toolbox in the upper right hand corner, from there click zoom out. The desktop will zoom out then click add new activity under the small desktop. It will make a new desktop right next to it. Now go click the zoom in button under the new desktop. With this desktop you can add whatever widgets to this desktop and it will not affect the other desktop.
Activities and Virtual Desktops
Virtual desktops, the ability to have a separate sets of windows on separate desktops, can tie in with Activities. You can have a different activity on each virtual desktop. In Plasma Desktop 4.4, this can be configured by entering System Settings and navigating to Desktop -> Multiple Desktops, and checking "Different Activity for Each Desktop".
In Plasma Desktop 4.3, You configure this by zooming out and choosing "configure Plasma". Then select "use a different activity on each desktop" and zoom in again.
Use Cases
A user likes web comics so they add their favorite web comics via the comics widget. The user now has a full desktop activity dedicated to their favorite web comics. Now the user is happy with the web comics, but the user now has to go to work, so the user creates a activity with the folder view widgets set to the folders of the projects the user is currently working on. After work the user goes home and works on a side project of writing romance novels. The user always gains inspiration by looking at pictures of the user's significant other. The user now creates a new Activity but now puts pictures frame widgets with pictures of the user's significant other. The user also has a folder view of the romance novel project folder. Now no matter what the user is doing the user has a custom tailored activity to match it.
Go to this blog to read a few tips on using activities.
Hints and Tips
The Taskbar
Accessing the Taskbar Settings Menu: Click the panel toolbox (aka cashew), then right-click on the taskbar. From there you can access the Taskbar Settings dialog. The following settings are particularly useful:
- Grouping and Sorting: Grouping can be by program name, manually, or not at all. (You can also choose to only enable grouping if the taskbar is full.) Similarly, Sorting defaults to alphabetically, but it can also be by desktop, manually, or not sorted.
- Only Show Tasks from the Current Desktop: A checkbox on the Filters section.
- Have More than One Row on the Taskbar: If you use many applications at one time you may find it advantageous to set Maximum Rows and then Force Row Settings.
- Showing or Hiding Tooltips: A simple checkbox in the Appearance section of the General page.
Tweaking Plasma
- Learn how to add a sidebar with clock and news
- Customize your Plasma by mixing multiple Plasma themes
Weitere Informationen
* Die Plasma-FAQ
- Plasma HowTo - short screencasts
- Glossar
- Some of our favourite plamoids - why not add yours?
- Here's how to install more Plasmas widgets
- Learn the versatility of KRunner
| Back to the Introduction page |

