Working with Google Calendar/ca: Difference between revisions
(Created page with "Treballar amb Google Calendar") |
(Importing a new version from external source) |
||
| (16 intermediate revisions by the same user not shown) | |||
| Line 1: | Line 1: | ||
<languages /> | <languages /> | ||
{{Warning|1= | {{Warning/ca|1=Aquestes instruccions no són necessàries a causa d'un recurs de Google Calendar que ve amb el KDE. No necessitareu més utilitzar DAV. Al KOrganizer, simplement aneu a Arranjament -> General -> Calendaris i filtreu per google.}} | ||
{{Note|1= | {{Note/ca|1=Per a fins de demostració, el compte de Google utilitzat en aquesta guia d'aprenentatge és [email protected]}} | ||
== | == Introducció == | ||
== | ==La integració de Google Calendar amb Kontact a través de recursos DAV== | ||
Per a sincronitzar Google Calendar amb '''Kontact''', primerament accediu a l'àrea <menuchoice>Calendari</menuchoice> de '''Kontact''' seleccionant-la a la barra de navegació esquerra. Després, obriu la finestra de configuració amb <menuchoice>Arranjament -> Configura el calendari</menuchoice>. | |||
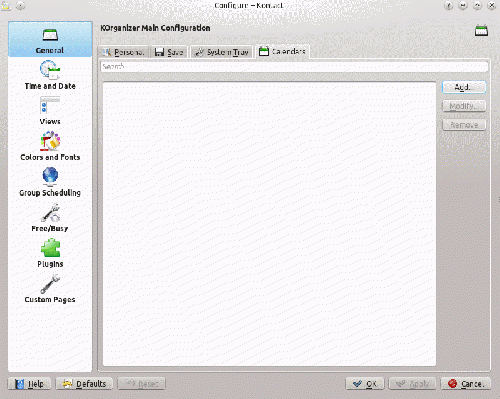
Seleccioneu la pestanya <menuchoice>Calendaris</menuchoice> a l'àrea <menuchoice>General</menuchoice> per a preparar l'afegit d'un calendari de Google. A continuació, seleccioneu <menuchoice>Recurs de treball en grup DAV</menuchoice> (pot ser necessitareu afegir primer aquest recurs fent clic a <menuchoice>Afegeix...</menuchoice> i seleccioneu-lo des de la llista). Després d'això feu clic a <menuchoice>Cancel·la</menuchoice> quan aparegui un missatge demanant-vos que introduïu les vostres credencials per iniciar una sessió al servidor de treball en grup (groupware). | |||
Apareixerà una altra finestra, des d'on podeu introduir la ubicació del vostre recurs de Google Calendar. A l'àrea '''Configuració del servidor''', feu clic a <menuchoice>Afegeix</menuchoice>. Ara s'obrirà una última finestra. En aquest cas, assegureu-vos que està seleccionat <menuchoice>CalDAV</menuchoice> com el '''Protocol d'accés al calendari remot'''. | |||
L'URL remot prendrà la forma: | |||
<tt><nowiki>https://www.google.com/calendar/dav/</nowiki>'''''GoogleCalendarID'''''/events/</tt> | <tt><nowiki>https://www.google.com/calendar/dav/</nowiki>'''''GoogleCalendarID'''''/events/</tt> | ||
Pel vostre calendari principal, el '''''GoogleCalendarID''''' serà el vostre compte de Google (adreça de Gmail). Seleccioneu <menuchoice></menuchoice>. Pel <menuchoice>Nom d'usuari</menuchoice> i la <menuchoice>Contrasenya</menuchoice> empreu una altra vergada el vostre compte de Google. | |||
Després d'introduir aquesta informació, el prémer el botó <menuchoice>Recupera</menuchoice> permetrà al '''Kontact''' sincronitzar amb Google per descobrir el vostre calendari. El vostre calendari s'hauria de mostrar a sota de la finestra '''Col·leccions descobertes'''. | |||
Premeu <menuchoice>Bé</menuchoice> i permeteu la integració de la [[Special:myLanguage/KDE_Wallet_Manager|Cartera del KDE]] a <menuchoice>Sempre</menuchoice> per a més comoditat. Per afegir calendaris addicionals, simplement feu clic al botó <menuchoice>Afegeix</menuchoice> per seguir el mateix procediment que amb l'anterior. | |||
{{Note|1= | {{Note/ca|1=Per a altres calendaris, l'ID del calendari es pot obtenir prement la fletxa cap avall i seleccionant <menuchoice>Configuració del calendari</menuchoice> a través de www.google.com/calendar.}} | ||
Premeu <menuchoice>Bé</menuchoice> per a finalitzar l'addició del Google Calendar i després hauria de començar a sincronitzar amb '''Kontact'''. A la llista de calendaris de a continuació, marqueu la casella al costat a la vostra adreça de Gmail per habilitar el mostrar un calendari. Per actualitzar els esdeveniments, simplement premeu <keycap>F5</keycap>. | |||
=== | === Guia d'aprenentatge per GIF animat == | ||
{{Note|1= | {{Note/ca|1=Aquest GIF animat recapitula els passos adoptats per obtenir la sincronització del Google Calendar.}} | ||
[[Image:Calendar_tutorial.gif|thumb|500px|center]] | [[Image:Calendar_tutorial.gif|thumb|500px|center]] | ||
Felicitacions, teniu correctament configurada la integració de Google Calendar amb '''Kontact'''! | |||
[[Category: | [[Category:Oficina/ca]] | ||
[[Category:Internet]] | [[Category:Internet/ca]] | ||
Latest revision as of 15:52, 22 December 2013
Introducció
La integració de Google Calendar amb Kontact a través de recursos DAV
Per a sincronitzar Google Calendar amb Kontact, primerament accediu a l'àrea de Kontact seleccionant-la a la barra de navegació esquerra. Després, obriu la finestra de configuració amb .
Seleccioneu la pestanya a l'àrea per a preparar l'afegit d'un calendari de Google. A continuació, seleccioneu (pot ser necessitareu afegir primer aquest recurs fent clic a i seleccioneu-lo des de la llista). Després d'això feu clic a quan aparegui un missatge demanant-vos que introduïu les vostres credencials per iniciar una sessió al servidor de treball en grup (groupware).
Apareixerà una altra finestra, des d'on podeu introduir la ubicació del vostre recurs de Google Calendar. A l'àrea Configuració del servidor, feu clic a . Ara s'obrirà una última finestra. En aquest cas, assegureu-vos que està seleccionat com el Protocol d'accés al calendari remot.
L'URL remot prendrà la forma: https://www.google.com/calendar/dav/GoogleCalendarID/events/
Pel vostre calendari principal, el GoogleCalendarID serà el vostre compte de Google (adreça de Gmail). Seleccioneu . Pel i la empreu una altra vergada el vostre compte de Google.
Després d'introduir aquesta informació, el prémer el botó permetrà al Kontact sincronitzar amb Google per descobrir el vostre calendari. El vostre calendari s'hauria de mostrar a sota de la finestra Col·leccions descobertes.
Premeu i permeteu la integració de la Cartera del KDE a per a més comoditat. Per afegir calendaris addicionals, simplement feu clic al botó per seguir el mateix procediment que amb l'anterior.
Premeu per a finalitzar l'addició del Google Calendar i després hauria de començar a sincronitzar amb Kontact. A la llista de calendaris de a continuació, marqueu la casella al costat a la vostra adreça de Gmail per habilitar el mostrar un calendari. Per actualitzar els esdeveniments, simplement premeu F5.
= Guia d'aprenentatge per GIF animat

Felicitacions, teniu correctament configurada la integració de Google Calendar amb Kontact!


