Kopete/Jabber/Messaging and sending files: Difference between revisions
Created page with "You can start chatting with a contact by clicking on the name. A new window will open and you can type in messages into the smaller field at the bottom, where the cursor already ..." |
m fix tag |
||
| (3 intermediate revisions by 2 users not shown) | |||
| Line 1: | Line 1: | ||
<languages /> | |||
<translate> | |||
<!--T:1--> | |||
You can start chatting with a contact by clicking on the name. A new window will open and you can type in messages into the smaller field at the bottom, where the cursor already resides. When you want to send your text, hit <keycap>Enter</keycap> or press the <menuchoice>Send</menuchoice> button. You and your partner can communicate now via Jabber. | You can start chatting with a contact by clicking on the name. A new window will open and you can type in messages into the smaller field at the bottom, where the cursor already resides. When you want to send your text, hit <keycap>Enter</keycap> or press the <menuchoice>Send</menuchoice> button. You and your partner can communicate now via Jabber. | ||
<!--T:2--> | |||
[[File:Kopetetutorial_snap013_firstchat.png|thumb|center|300px|Your first chat]] | [[File:Kopetetutorial_snap013_firstchat.png|thumb|center|300px|Your first chat]] | ||
== Transfer files == | == Transfer files == <!--T:3--> | ||
<!--T:4--> | |||
Jabber | To transfer files via Jabber click on <menuchoice>Send File</menuchoice> and select the file you want to send in the popup window. You will be notified when the transaction is complete or failed for some reason. | ||
<!--T:5--> | |||
{{Warning|1= This may not work in some cases due to incompatible configurations of some servers}} | |||
== Group chat == <!--T:6--> | |||
<!--T:7--> | |||
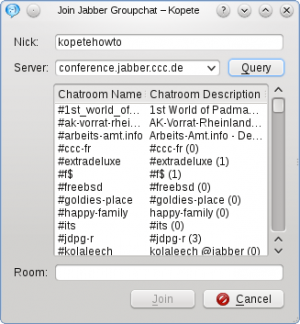
Jabber is not only capable of communicating with one person. You can use Group Chat to do an [http://en.wikipedia.org/wiki/IRC IRC] style discussion, where many people can talk with each other. To use Group Chat, you have to right-click on the '''Kopete''' [http://en.wikipedia.org/wiki/Systray#KDE systray] icon, and select <menuchoice>yourJID -> Join Groupchat...</menuchoice>, where "yourJID" stands for your own Jabber ID. A new window appears where you can join a chatroom. | |||
<!--T:8--> | |||
[[File:Kopete_snap021_groupchat.png|thumb|center|300px|Groupchat]] | [[File:Kopete_snap021_groupchat.png|thumb|center|300px|Groupchat]] | ||
<!--T:9--> | |||
Click on <menuchoice>Query</menuchoice> to show the list of existing chatrooms on your Jabber server. Select one and press <keycap>Enter</keycap> to enter this room. | Click on <menuchoice>Query</menuchoice> to show the list of existing chatrooms on your Jabber server. Select one and press <keycap>Enter</keycap> to enter this room. | ||
<!--T:10--> | |||
Alternatively you can type in and create your own chatroom by writing its name into the line <menuchoice>Room</menuchoice>. Then press <keycap>Enter</keycap> or click <menuchoice>Join</menuchoice> to join. | Alternatively you can type in and create your own chatroom by writing its name into the line <menuchoice>Room</menuchoice>. Then press <keycap>Enter</keycap> or click <menuchoice>Join</menuchoice> to join. | ||
After you created the chatroom, you'll see a new field appearing in your Kopete window with the JID '''''[email protected]'''''. Treat it as a normal contact, i.e. you have to click on this JID to chat etc. | <!--T:11--> | ||
After you created the chatroom, you'll see a new field appearing in your '''Kopete''' window with the JID '''''[email protected]'''''. Treat it as a normal contact, i.e. you have to click on this JID to chat etc. | |||
<!--T:12--> | |||
At this point you have set up a working Jabber client and are in principle able to chat with your contacts. But for a better experience of '''Kopete''', you are able to configure the application for your best needs. A set of [[Special:myLanguage/Kopete/Jabber/Useful_configuration_hints|Useful configuration hints]] is the content of the next page in this tutorial. | |||
<!--T:13--> | |||
<hr> | <hr /> | ||
{{Prevnext|Special:myLanguage/Kopete/Jabber|Special:myLanguage/Kopete/Jabber/Useful_configuration_hints|Return to index|Page 7 - Useful configuration hints}} | {{Prevnext|Special:myLanguage/Kopete/Jabber|Special:myLanguage/Kopete/Jabber/Useful_configuration_hints|Return to index|Page 7 - Useful configuration hints}} | ||
[[Category:Internet]] | |||
</translate> | |||
Latest revision as of 18:39, 4 December 2010
You can start chatting with a contact by clicking on the name. A new window will open and you can type in messages into the smaller field at the bottom, where the cursor already resides. When you want to send your text, hit Enter or press the button. You and your partner can communicate now via Jabber.

Transfer files
To transfer files via Jabber click on and select the file you want to send in the popup window. You will be notified when the transaction is complete or failed for some reason.
Group chat
Jabber is not only capable of communicating with one person. You can use Group Chat to do an IRC style discussion, where many people can talk with each other. To use Group Chat, you have to right-click on the Kopete systray icon, and select , where "yourJID" stands for your own Jabber ID. A new window appears where you can join a chatroom.

Click on to show the list of existing chatrooms on your Jabber server. Select one and press Enter to enter this room.
Alternatively you can type in and create your own chatroom by writing its name into the line . Then press Enter or click to join.
After you created the chatroom, you'll see a new field appearing in your Kopete window with the JID [email protected]. Treat it as a normal contact, i.e. you have to click on this JID to chat etc.
At this point you have set up a working Jabber client and are in principle able to chat with your contacts. But for a better experience of Kopete, you are able to configure the application for your best needs. A set of Useful configuration hints is the content of the next page in this tutorial.
- ← Return to index
- Kopete/Jabber/Messaging and sending files
- Page 7 - Useful configuration hints →

