Marble/Bookmarks: Difference between revisions
Danielmarth (talk | contribs) No edit summary |
m Added emphasis |
||
| (7 intermediate revisions by 3 users not shown) | |||
| Line 1: | Line 1: | ||
<languages /> | |||
<translate> | |||
<!--T:1--> | |||
{{Prevnext|Special:myLanguage/Marble/MapThemes|Special:myLanguage/Marble/Search|Map Themes|Search}} | |||
== | == Introduction == <!--T:2--> | ||
<!--T:3--> | |||
In this tutorial you learn how to create and manage bookmarks in '''Marble'''. Bookmarks are used to quickly navigate to places on a map. Bookmark support is introduced in '''Marble''' 1.0 where it offers basic functionality. More advanced bookmark management is planned for future releases. | |||
== | == Adding Bookmarks == <!--T:4--> | ||
<!--T:5--> | |||
Bookmarks can be added in two different ways. Both show the same dialog window to change the name and description of the bookmark. | |||
<!--T:6--> | |||
[[File:bookmark_addbookmark.png]] | |||
By | <!--T:7--> | ||
A useful default name for the bookmark name is automatically suggested when there is an Internet connection. Otherwise the plain geodetic coordinates of the center are used as the default name. After adding a place as bookmark, it's part of the <menuchoice>Bookmarks</menuchoice> menu in the menu bar. | |||
<!--T:8--> | |||
[[File:bookmark_menulist.png]] | |||
<!--T:9--> | |||
You can move the map center to the bookmarked location by simply clicking on the menu entry. | |||
=== Menu Bar === <!--T:10--> | |||
<!--T:11--> | |||
The current center position is used as the bookmark location in the dialog mentioned above when you click on <menuchoice>Bookmarks -> Add Bookmark</menuchoice>. | |||
=== Context Menu === <!--T:12--> | |||
<!--T:13--> | |||
By clicking on the map with the right mouse button and choosing <menuchoice>Add Bookmark</menuchoice> a position can be added to your favorites. | |||
<!--T:14--> | |||
[[File:bookmark_contextmenu.png]] | [[File:bookmark_contextmenu.png]] | ||
== | == Organizing Bookmarks in Folders == <!--T:15--> | ||
<!--T:16--> | |||
Folders can be created to organize the bookmarks. This can either be done by clicking on <menuchoice>Add Folder</menuchoice> in the '''Add Bookmark''' dialog mentioned above or by using <menuchoice>Bookmarks -> New Bookmark Folder</menuchoice> in the menu bar. | |||
<!--T:17--> | |||
[[File:bookmark_addbookmarkfolder.png]] | |||
<!--T:18--> | |||
After that the folder appears in the combobox in the '''Add Bookmark''' dialog. Now bookmarks are organized in folders in the <menuchoice>Bookmarks</menuchoice> menu. | |||
<!--T:19--> | |||
[[File:bookmark_menulistfolders.png]] | |||
You can remove all bookmarks using the menu bar using <menuchoice>Bookmarks -> Remove all Bookmarks</menuchoice>.< | == Removing Bookmarks == <!--T:20--> | ||
<!--T:21--> | |||
You can remove all bookmarks using the menu bar using <menuchoice>Bookmarks -> Remove all Bookmarks</menuchoice>. More versatile management features are planned for a future '''Marble''' release. | |||
<!--T:22--> | |||
[[File:bookmark_menu.png]] | [[File:bookmark_menu.png]] | ||
== | == Bookmarks on the N900 == <!--T:23--> | ||
<!--T:24--> | |||
The N900 version of '''Marble''' also supports bookmarks. Click on the point of the map you want to bookmark and select <menuchoice>Add Bookmark</menuchoice> in the upcoming menu. The interface to add and choose bookmarks is very similar to that of the desktop version. | |||
<!--T:25--> | |||
[[File:bookmark_maemoaddbookmark.png|center]] | |||
<!--T:26--> | |||
[[File: | Accessing bookmarks is done differently to the Desktop version. Instead of using the application menu, click anywhere on the map and select <menuchoice>Go To...</menuchoice> in the upcoming menu. Among other placemarks, all your bookmarks are listed in a dialog. Choose the bookmark you want to jump to. | ||
<!--T:27--> | |||
[[File:bookmark_maemochoosebookmark.png|center]] | |||
== Using Bookmarks for Route Planning == <!--T:28--> | |||
<!--T:29--> | |||
Your bookmarks are also available for planning routes. Instead of typing in the route target, press the button next to the input field (Desktop: left side of the input field, N900: right side of the input field) and choose the bookmark to use. | |||
<!--T:30--> | |||
{{Prevnext|Special:myLanguage/Marble/MapThemes|Special:myLanguage/Marble/Search|Map Themes|Search}} | |||
<!--T:31--> | |||
[[ | [[Category:Education]] | ||
</translate> | |||
Latest revision as of 05:43, 27 May 2011
- ← Map Themes
- Marble/Bookmarks
- Search →
Introduction
In this tutorial you learn how to create and manage bookmarks in Marble. Bookmarks are used to quickly navigate to places on a map. Bookmark support is introduced in Marble 1.0 where it offers basic functionality. More advanced bookmark management is planned for future releases.
Adding Bookmarks
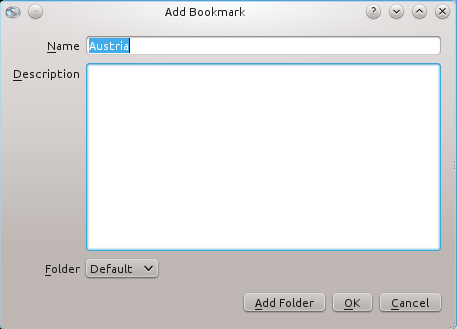
Bookmarks can be added in two different ways. Both show the same dialog window to change the name and description of the bookmark.
A useful default name for the bookmark name is automatically suggested when there is an Internet connection. Otherwise the plain geodetic coordinates of the center are used as the default name. After adding a place as bookmark, it's part of the menu in the menu bar.
You can move the map center to the bookmarked location by simply clicking on the menu entry.
Menu Bar
The current center position is used as the bookmark location in the dialog mentioned above when you click on .
Context Menu
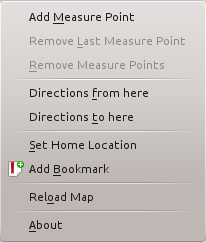
By clicking on the map with the right mouse button and choosing a position can be added to your favorites.
Organizing Bookmarks in Folders
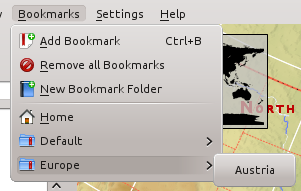
Folders can be created to organize the bookmarks. This can either be done by clicking on in the Add Bookmark dialog mentioned above or by using in the menu bar.
After that the folder appears in the combobox in the Add Bookmark dialog. Now bookmarks are organized in folders in the menu.
Removing Bookmarks
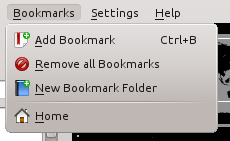
You can remove all bookmarks using the menu bar using . More versatile management features are planned for a future Marble release.
Bookmarks on the N900
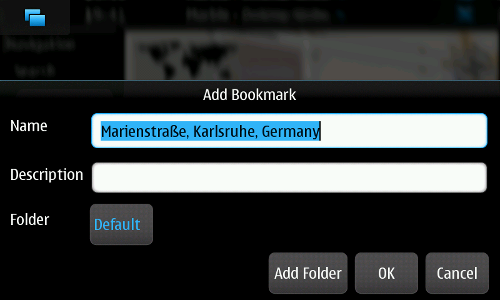
The N900 version of Marble also supports bookmarks. Click on the point of the map you want to bookmark and select in the upcoming menu. The interface to add and choose bookmarks is very similar to that of the desktop version.
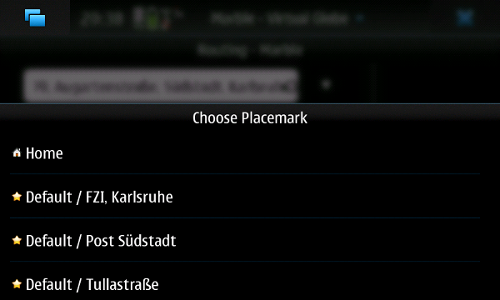
Accessing bookmarks is done differently to the Desktop version. Instead of using the application menu, click anywhere on the map and select in the upcoming menu. Among other placemarks, all your bookmarks are listed in a dialog. Choose the bookmark you want to jump to.
Using Bookmarks for Route Planning
Your bookmarks are also available for planning routes. Instead of typing in the route target, press the button next to the input field (Desktop: left side of the input field, N900: right side of the input field) and choose the bookmark to use.
- ← Map Themes
- Marble/Bookmarks
- Search →

