Digikam/BleachBypassEffect: Difference between revisions
Appearance
Created page with "<languages /> <translate> == Create a Bleach Bypass Effect in digiKam == Transcribed from Dmitri Popov's blog, 2 April 2013 Using tools available in '''digiKam''', you can s..." |
formatting tweek |
||
| (One intermediate revision by one other user not shown) | |||
| Line 2: | Line 2: | ||
<translate> | <translate> | ||
== Create a Bleach Bypass Effect in digiKam == | == Create a Bleach Bypass Effect in digiKam == <!--T:1--> | ||
Transcribed from Dmitri Popov's blog, 2 April 2013 | Transcribed from Dmitri Popov's blog, 2 April 2013 | ||
<!--T:2--> | |||
Using tools available in '''digiKam''', you can simulate a number of effects, including bleach bypass. This effect produces a desaturated high-contrast image. Creating the bleach bypass effect in '''digiKam''' is done in two simple steps. Open a photo for editing and choose <menuchoice>Color -> Hue/Saturation/Lightness</menuchoice>. Specify the desired saturation value somewhere between -35 and -59, then press <menuchoice>OK</menuchoice> to desaturate the photo. | Using tools available in '''digiKam''', you can simulate a number of effects, including bleach bypass. This effect produces a desaturated high-contrast image. Creating the bleach bypass effect in '''digiKam''' is done in two simple steps. Open a photo for editing and choose <menuchoice>Color -> Hue/Saturation/Lightness</menuchoice>. Specify the desired saturation value somewhere between -35 and -59, then press <menuchoice>OK</menuchoice> to desaturate the photo. | ||
<!--T:3--> | |||
[[Image:Digikam-bleachbypasseffect.png||center||thumb||500px]] | [[Image:Digikam-bleachbypasseffect.png||center||thumb||500px]] | ||
Choose then <menuchoice>Color -> Curves Adjust</menuchoice>, select <menuchoice>Luminosity</menuchoice> from the Channel drop-down list, and adjust the curve so it’s shaped as S. Feel free to experiment with the steepness of the curve to achieve the best result. As a starting point, you can download a [http://dmpop.homelinux.com/digikamrecipes/files/s.crv ready-made S curve] and import it into '''digiKam''' using the <menuchoice>Load</menuchoice> button. | <!--T:4--> | ||
Choose then <menuchoice>Color -> Curves Adjust</menuchoice>, select <menuchoice>Luminosity</menuchoice> from the '''Channel''' drop-down list, and adjust the curve so it’s shaped as S. Feel free to experiment with the steepness of the curve to achieve the best result. As a starting point, you can download a [http://dmpop.homelinux.com/digikamrecipes/files/s.crv ready-made S curve] and import it into '''digiKam''' using the <menuchoice>Load</menuchoice> button. | |||
<!--T:5--> | |||
[[Category:Graphics]] | [[Category:Graphics]] | ||
[[Category:Photography]] | [[Category:Photography]] | ||
[[Category:Tutorials]] | [[Category:Tutorials]] | ||
</translate> | </translate> | ||
Latest revision as of 09:40, 16 June 2013
Create a Bleach Bypass Effect in digiKam
Transcribed from Dmitri Popov's blog, 2 April 2013
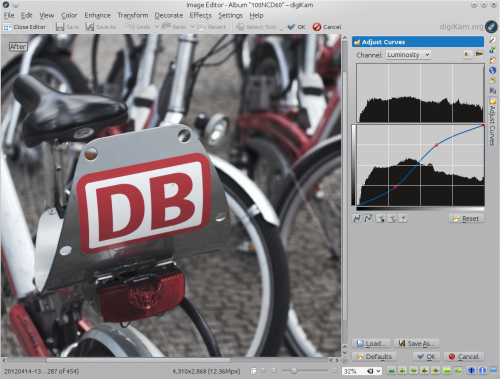
Using tools available in digiKam, you can simulate a number of effects, including bleach bypass. This effect produces a desaturated high-contrast image. Creating the bleach bypass effect in digiKam is done in two simple steps. Open a photo for editing and choose . Specify the desired saturation value somewhere between -35 and -59, then press to desaturate the photo.

Choose then , select from the Channel drop-down list, and adjust the curve so it’s shaped as S. Feel free to experiment with the steepness of the curve to achieve the best result. As a starting point, you can download a ready-made S curve and import it into digiKam using the button.
