Digikam/Noise Reduction/da: Difference between revisions
Importing a new version from external source |
Importing a new version from external source |
||
| Line 5: | Line 5: | ||
Alle [http://en.wikipedia.org/wiki/Digital_single-lens_reflex_camera DSLR]-kameraer introducerer støj i en eller anden grad. Dette gælder især almindelige kameraer til ikke-professionelt brug, selv om disse har ret god ISO-ydelse op til omkring ISO 800. | Alle [http://en.wikipedia.org/wiki/Digital_single-lens_reflex_camera DSLR]-kameraer introducerer støj i en eller anden grad. Dette gælder især almindelige kameraer til ikke-professionelt brug, selv om disse har ret god ISO-ydelse op til omkring ISO 800. | ||
Jeg bruger et Nikon D3000 og dets ISO-ydelse er god op til ISO 800. ISO 1600 er god og kan bruges i små størrelser; men billeder i ISO 3200 bliver kornede og støjreducering skal anvendes. | |||
If you are using '''digiKam''' it has a great noise reduction tool. Double click the image where you want to reduce noise and give a right click -> <menuchoice>Edit</menuchoice>. You can even press <keycap>f4</keycap> on the keyboard and it will do the same thing. | If you are using '''digiKam''' it has a great noise reduction tool. Double click the image where you want to reduce noise and give a right click -> <menuchoice>Edit</menuchoice>. You can even press <keycap>f4</keycap> on the keyboard and it will do the same thing. | ||
Revision as of 06:48, 3 March 2011
Støjreducering i digiKam
Fra Mohamed Maliks blog, 12. februar 2011
Alle DSLR-kameraer introducerer støj i en eller anden grad. Dette gælder især almindelige kameraer til ikke-professionelt brug, selv om disse har ret god ISO-ydelse op til omkring ISO 800.
Jeg bruger et Nikon D3000 og dets ISO-ydelse er god op til ISO 800. ISO 1600 er god og kan bruges i små størrelser; men billeder i ISO 3200 bliver kornede og støjreducering skal anvendes.
If you are using digiKam it has a great noise reduction tool. Double click the image where you want to reduce noise and give a right click -> . You can even press f4 on the keyboard and it will do the same thing.
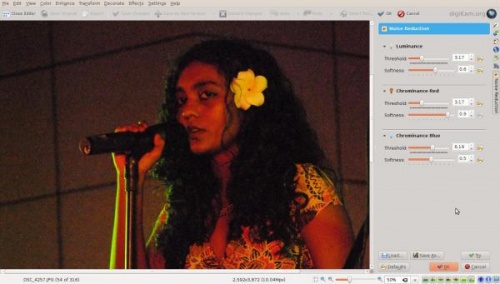
After this you will be presented with the editor view.
From here go to and you will be presented with this window.

Choose from the settings or you can choose your own settings. Here is a picture of before and after from my tests. They are much more usable and better looking after the noise reduction has been applied.
Before Noise Reduction Was Applied:

After Noise Reduction Was Applied:

Here is another picture in which the noise reduction was applied:

After:


