KDevelop4/Manual/Running programs/da: Difference between revisions
Importing a new version from external source |
Importing a new version from external source |
||
| Line 9: | Line 9: | ||
[[Image:kdevelop-2.png|thumb|400px|center]] | [[Image:kdevelop-2.png|thumb|400px|center]] | ||
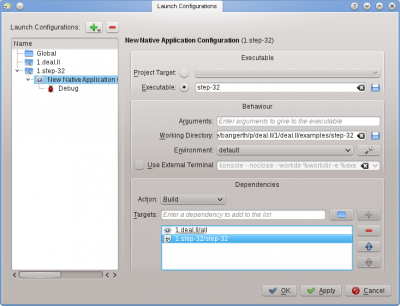
For at konfigurere opstarteren vælger du menuen <menuchoice>Kør -> Indstil opstarter...</menuchoice>, fremhæver det projekt, som du vil tilføje en opstarter for og klikker på knappen {{Plus}}. Skriv så navnet på den kørbare fil og stien til arbejdsmappen. Hvis kørsel af programmet afhænger af, at den kørbare file eller et bibliotek er blevet bygget først, så er det en god ide at føje dem til listen nederst i dialogen: Vælg <menuchoice>Byg</menuchoice> fra dropnedmenuen, klik på {{Icon|folder}} knappen og vælg det mål, som skal bygges. I eksemplet ovenfor har jeg valgt målet <menuchoice>all</menuchoice> fra projektet '''''1.deal.II''''' og '''''step-32''''' fra projektet '''''1.step-32''''' for at sikre mig, at både basisbiblioteket og programmet er blevet kompileret og er up to date før, før programmet faktisk køres. Mens du er her kan du lige så godt også konfigurere en fejlsøgningsopstart ved at klikke på <menuchoice>Fejlsøgning</menuchoice> og tilføje navnet på fejlsøgeren; hvis det er systemets standardfejlsøger (fx '''gdb''' på Linux), så behøver du ikke at gennemføre dette skridt. | |||
[[Image:kdevelop-3.png|thumb|650px|center]] | [[Image:kdevelop-3.png|thumb|650px|center]] | ||
Revision as of 05:49, 12 June 2011
Kør programmer i KDevelop
Efter at du har bygget et program, så vil du nok køre det. For at kunne gøre dette skal du konfigurere opstarteren for dit projekt. En opstart består af et navn på et program, nogle kommandolinjeparametre og et kørselsmiljø (så som "kør dette program i en skal" eller "kør dette program i fejlsøgeren").
Opsætning af opstarteren i KDevelop

For at konfigurere opstarteren vælger du menuen , fremhæver det projekt, som du vil tilføje en opstarter for og klikker på knappen ![]() . Skriv så navnet på den kørbare fil og stien til arbejdsmappen. Hvis kørsel af programmet afhænger af, at den kørbare file eller et bibliotek er blevet bygget først, så er det en god ide at føje dem til listen nederst i dialogen: Vælg fra dropnedmenuen, klik på
. Skriv så navnet på den kørbare fil og stien til arbejdsmappen. Hvis kørsel af programmet afhænger af, at den kørbare file eller et bibliotek er blevet bygget først, så er det en god ide at føje dem til listen nederst i dialogen: Vælg fra dropnedmenuen, klik på ![]() knappen og vælg det mål, som skal bygges. I eksemplet ovenfor har jeg valgt målet fra projektet 1.deal.II og step-32 fra projektet 1.step-32 for at sikre mig, at både basisbiblioteket og programmet er blevet kompileret og er up to date før, før programmet faktisk køres. Mens du er her kan du lige så godt også konfigurere en fejlsøgningsopstart ved at klikke på og tilføje navnet på fejlsøgeren; hvis det er systemets standardfejlsøger (fx gdb på Linux), så behøver du ikke at gennemføre dette skridt.
knappen og vælg det mål, som skal bygges. I eksemplet ovenfor har jeg valgt målet fra projektet 1.deal.II og step-32 fra projektet 1.step-32 for at sikre mig, at både basisbiblioteket og programmet er blevet kompileret og er up to date før, før programmet faktisk køres. Mens du er her kan du lige så godt også konfigurere en fejlsøgningsopstart ved at klikke på og tilføje navnet på fejlsøgeren; hvis det er systemets standardfejlsøger (fx gdb på Linux), så behøver du ikke at gennemføre dette skridt.

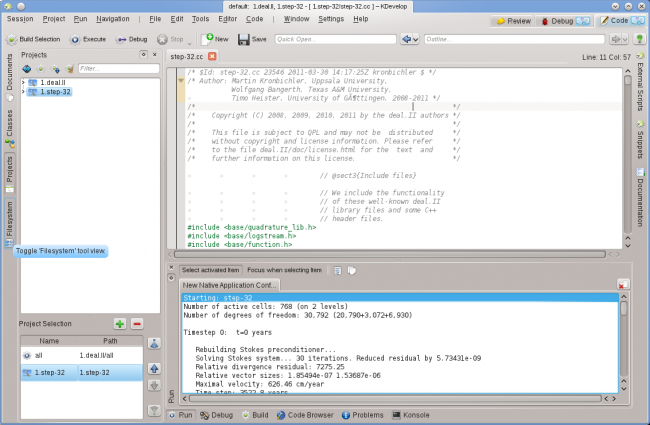
You can now try to run the program: Select from KDevelop's main window menu (or hit Shift + F9) and your program should run in a separate subwindow of KDevelop. The picture above shows the result: The new tool subwindow at the bottom shows the output of the program that is being run, in this case of the step-32 program.
Some useful keyboard shortcuts
| Running a program | |
|---|---|
| F8 | Build (call make) |
| Shift + F9 | Run |
| F9 | Run program in the debugger; you may want to set breakpoints beforehand, for example by right-clicking with the mouse on a particular line in the source code |

