Kdenlive/Manual/Effects/da: Difference between revisions
Importing a new version from external source |
Importing a new version from external source |
||
| Line 35: | Line 35: | ||
[[File:Kdenlive Effect stack icons2.png]] | [[File:Kdenlive Effect stack icons2.png]] | ||
=== | === Brug af keyframes i effekter === | ||
Many effects use the concept of "Keyframe". Keyframes are user defined points in your clip where you want and effect to start, stop or change. You can set the parameters for your effects to different values at different keyframes and '''Kdenlive''' will then gradually change the parameters between the two key frames so that by the time the video has arrived at the next keyframe it will have adjusted the parameter to match that key frame. It interpolates between key frames. | Many effects use the concept of "Keyframe". Keyframes are user defined points in your clip where you want and effect to start, stop or change. You can set the parameters for your effects to different values at different keyframes and '''Kdenlive''' will then gradually change the parameters between the two key frames so that by the time the video has arrived at the next keyframe it will have adjusted the parameter to match that key frame. It interpolates between key frames. | ||
Revision as of 19:56, 20 November 2012
Effekter
I Kdenlive kan effekter bruges til at modificere kildematerialets lyd- og videoegenskaber.
Du kan føje effekter til klip ved at vælge dem i listen Effekter og trække dem ind i tidslinjen; eller du kan markere et klip i tidslinjen og vælge fra tidslinjemenuen. Se Kom godt i gang - effekter for flere detaljer.
Effekterne som anvendes på et givet klip kan ses og redigeres i effektstakken, som vises når det pågældende klip markeres i tidslinjen.
Effektlisten
Få effektlisten frem ved at aktivere menutilvalget .
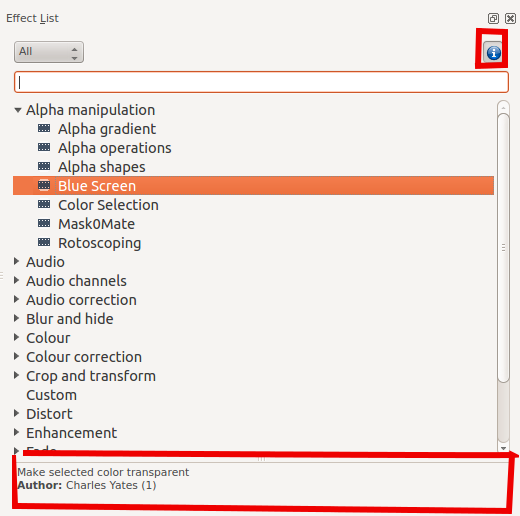
Klik på knappen ![]() (fremhævet i figur 1) for at få en kort beskrivelse af effekten vist nederst i listen.
(fremhævet i figur 1) for at få en kort beskrivelse af effekten vist nederst i listen.
For at føje en effekt til et klip skal du blot trække den fra fanebladet Effektliste til klippet.
Effektstakken
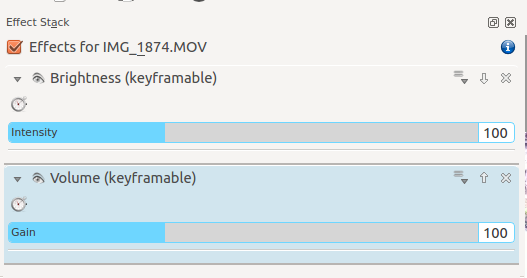
Figur 2 viser effektstakken for et klip. Effektstakken kan fås frem ved at aktivere menutilvalget .
Klik på øje-ikonet vist ved 2 herunder for at deaktivere effekten midlertidigt, hvorved ikonet skifter til tilstanden vist ved 1. Klik på det lukkede øje-ikon vist i 1 for at genaktivere en deaktiveret effekt og skift derved ikonet til tilstanden vist ved 2.
For at fjerne en effekt fra et klip kan du klikke på knappen X markeret med 3 herunder. Pilen markeret med 1 minimerer effekten i effektstakken, og pilen markeret med 2 bringer den viste menu frem.
Brug af keyframes i effekter
Many effects use the concept of "Keyframe". Keyframes are user defined points in your clip where you want and effect to start, stop or change. You can set the parameters for your effects to different values at different keyframes and Kdenlive will then gradually change the parameters between the two key frames so that by the time the video has arrived at the next keyframe it will have adjusted the parameter to match that key frame. It interpolates between key frames.
See QuickStart - Effects for an example on keyframing the RGB adjustment effect
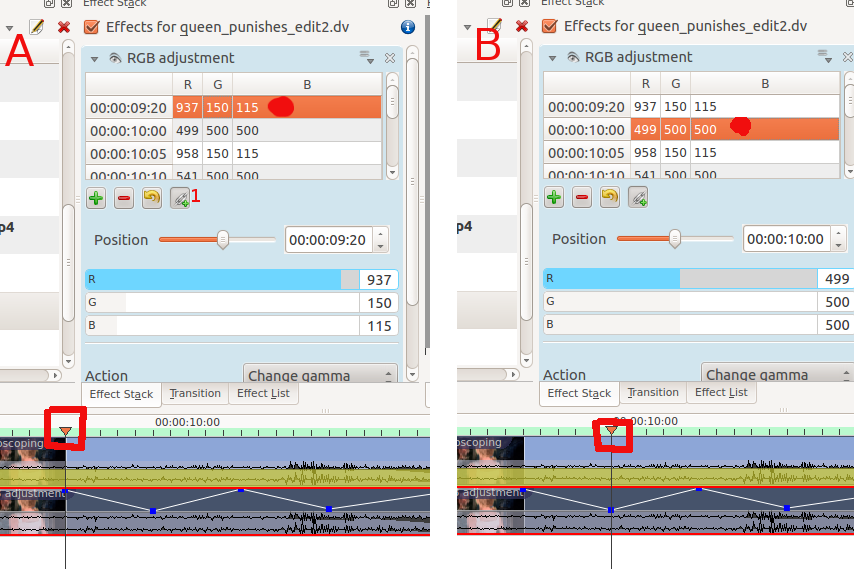
Some keyframe controls have a seek to active frame button (labeled 1 in the screen shot A below). When seek to active frame is toggled on and you click on one of the key frames in the keyframe list then Kdenlive will scroll the preview window to that keyframe. In the example of the screen shot we have selected the keyframe at 9:20 in A and the clip position carat (highlighted in red box) shows the location of this keyframe. Clicking the keyframe at 10:00 in B shows how the clip position has moved.

Effects Demos
You can find screen shots describing 33 of the video effects here
The following three youtube videos display the effects of a number of the video effects available in Kdenlive (Spanish captioning)
{{#evp:youtube|C6oeu2Yc64I}}
{{#evp:youtube|jrC4F_G64jA}}
{{#evp:youtube|XMoSgHHbA4k}}
Another Youtube video (English Captions)
{{#evp:youtube|capV7lUzbOw}}
Effects Categories
see also Effects and Transitions for an alphabetical list of effects and transitions.
You can find screen shots describing 33 of the video effects here
The effects are divided into the following categories
- Alpha manipulation
- Audio
- Audio channels
- Audio Correction
- Blur and hide
- Color
- Color Correction
- Crop and transform
- Custom
- Distort
- Enhancement
- Fade
- Fun
- Misc
- Motion
The available effects are defined by .xml files found in $KDEDIR/share/kde4/apps/kdenlive/effects (e.g. /usr/share/kde4/apps/kdenlive/effects)
FAQ:
Q: How to duplicate an effect to use similar settings somewhere else?
A: Select your effect in the timeline, in effects stack widget choose , you get it available in Effects List section
A: Other solution: select a strip containing the effect, , then where you want to apply it again right-click and select instead of
Q: How to apply an effect on several clips (all) at the same time?
A: You can select multiple clips with Shift+drag (left mouse button) around them. Then right click and group clips (or Ctrl+G)


