Digikam/Black and White/it: Difference between revisions
Importing a new version from external source |
Importing a new version from external source |
||
| Line 9: | Line 9: | ||
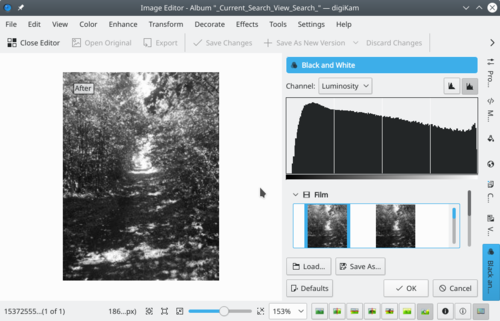
[[Image:Digikam_bw.png|center|thumb|500px|Copyright Dmitri Popov]] | [[Image:Digikam_bw.png|center|thumb|500px|Copyright Dmitri Popov]] | ||
La sezione <menuchoice>Pellicola</menuchoice> fornisce alcuni filtri che mimano diversi tipi di pellicole come Agfa Pan, Kodak Tmax, Kodak TriX e Ilford SPX. Questi filtri offrono un modo facile e veloce per regolare la foto in bianco e nero. Quale pellicola rende meglio dipende dalla foto attualmente modificata, puoi quindi voler provare vari filtri per ottenere il migliore risultato. Seleziona il filtro che ti piace e puoi immediatamente vedere il risultato nel riquadro di anteprima. | |||
As the name suggests, the <menuchoice>Lens Filters</menuchoice> section contains several color filters, including orange, green, yellow, and red. While you can experiment by applying different filters to the photo, the easiest way to find out which filter is best suited for the specific photo is to use the context help. Press <keycap>Shift + F1</keycap> and click on any filter to get a brief description of it. Once you’ve applied the desired filter, you can specify its intensity by using the <menuchoice>Strength</menuchoice> slider. | As the name suggests, the <menuchoice>Lens Filters</menuchoice> section contains several color filters, including orange, green, yellow, and red. While you can experiment by applying different filters to the photo, the easiest way to find out which filter is best suited for the specific photo is to use the context help. Press <keycap>Shift + F1</keycap> and click on any filter to get a brief description of it. Once you’ve applied the desired filter, you can specify its intensity by using the <menuchoice>Strength</menuchoice> slider. | ||
Revision as of 08:37, 19 February 2011
Convertire foto in bianco e nero con digiKam
Trascrizione di un articolo del blog di Dmitri Popov, 11 febbraio 2011.
Se ti piacciono le fotografie in bianco e nero, sarai contento di sapere che digiKam è dotato di uno strumento abbastanza potente per convertire foto a colori in bianco e nero. In digiKam la conversione in bianco e nero di una foto attualmente in fase di modifica è solo una questione di scelta della voce . Ma nella maggior parte dei casi la foto convertita ha bisogno di regolazioni aggiuntive e l'applicazione offre alcuni strumenti ben fatti proprio per questo.

La sezione fornisce alcuni filtri che mimano diversi tipi di pellicole come Agfa Pan, Kodak Tmax, Kodak TriX e Ilford SPX. Questi filtri offrono un modo facile e veloce per regolare la foto in bianco e nero. Quale pellicola rende meglio dipende dalla foto attualmente modificata, puoi quindi voler provare vari filtri per ottenere il migliore risultato. Seleziona il filtro che ti piace e puoi immediatamente vedere il risultato nel riquadro di anteprima.
As the name suggests, the section contains several color filters, including orange, green, yellow, and red. While you can experiment by applying different filters to the photo, the easiest way to find out which filter is best suited for the specific photo is to use the context help. Press Shift + F1 and click on any filter to get a brief description of it. Once you’ve applied the desired filter, you can specify its intensity by using the slider.
Besides the straight black and white conversion, digiKam lets you turn your photos into duotone images. And the section offers several tone filters such as sepia, platinum, and green.
Finally, the section lets you manually adjust the curve and the contrast. This feature can come in handy if you want to fix under- or overexposed areas and improve the overall contrast of the photo.
