Digikam/Using digiKam with MySQL/ca: Difference between revisions
No edit summary |
Created page with "Per omissió, '''digiKam''' utilitza '''SQLite''' com el seu dorsal per a l'emmagatzematge de les metadades importants i les miniatures. Però l'aplicació de gestió de fotos ta..." |
||
| Line 3: | Line 3: | ||
Transcrit des de l'article d'en [[User:Dmitri Popov|Dmitri Popov]], el 15 d'octubre de 2010 | Transcrit des de l'article d'en [[User:Dmitri Popov|Dmitri Popov]], el 15 d'octubre de 2010 | ||
Per omissió, '''digiKam''' utilitza '''SQLite''' com el seu dorsal per a l'emmagatzematge de les metadades importants i les miniatures. Però l'aplicació de gestió de fotos també proporciona suport per al popular motor de base de dades '''MySQL''', i ve amb una eina de migració de base de dades que pot ajudar a moure les dades des de '''SQLite''' a '''MySQL'''. Per descomptat, podríeu preguntar per què canviar a '''MySQL''' atès que '''SQLite''' ja fa una bona feina en la gestió de les dades? Utilitzar '''MySQL''' com a dorsal de la base de dades de '''digiKam''' us permetrà emmagatzemar les dades en un servidor remot. D'aquesta manera, podreu utilitzar diverses instal·lacions de '''digiKam''' (per exemple, en el vostre portàtil i màquina d'escriptori) per accedir i gestionar les vostres col·leccions de fotos. També podeu utilitzar les eines de '''MySQL''' per fer còpies de seguretat i analitzar les dades de '''digiKam'''. | |||
Obviously, to use '''digiKam''' with '''MySQL''', you need a '''MySQL''' server. You also have to create two '''MySQL''' databases: one for storing photo metadata (e.g., ''digikam'') and the other for storing thumbnails (e.g., ''thumbnails-digikam''). And before you proceed, note the database connection information such as '''MySQL''' server address, user name, and password — you’ll need it when configuring '''MySQL''' settings in '''digiKam'''. | Obviously, to use '''digiKam''' with '''MySQL''', you need a '''MySQL''' server. You also have to create two '''MySQL''' databases: one for storing photo metadata (e.g., ''digikam'') and the other for storing thumbnails (e.g., ''thumbnails-digikam''). And before you proceed, note the database connection information such as '''MySQL''' server address, user name, and password — you’ll need it when configuring '''MySQL''' settings in '''digiKam'''. | ||
Revision as of 13:36, 6 April 2012
Utilitzar digiKam amb MySQL
Transcrit des de l'article d'en Dmitri Popov, el 15 d'octubre de 2010
Per omissió, digiKam utilitza SQLite com el seu dorsal per a l'emmagatzematge de les metadades importants i les miniatures. Però l'aplicació de gestió de fotos també proporciona suport per al popular motor de base de dades MySQL, i ve amb una eina de migració de base de dades que pot ajudar a moure les dades des de SQLite a MySQL. Per descomptat, podríeu preguntar per què canviar a MySQL atès que SQLite ja fa una bona feina en la gestió de les dades? Utilitzar MySQL com a dorsal de la base de dades de digiKam us permetrà emmagatzemar les dades en un servidor remot. D'aquesta manera, podreu utilitzar diverses instal·lacions de digiKam (per exemple, en el vostre portàtil i màquina d'escriptori) per accedir i gestionar les vostres col·leccions de fotos. També podeu utilitzar les eines de MySQL per fer còpies de seguretat i analitzar les dades de digiKam.
Obviously, to use digiKam with MySQL, you need a MySQL server. You also have to create two MySQL databases: one for storing photo metadata (e.g., digikam) and the other for storing thumbnails (e.g., thumbnails-digikam). And before you proceed, note the database connection information such as MySQL server address, user name, and password — you’ll need it when configuring MySQL settings in digiKam.
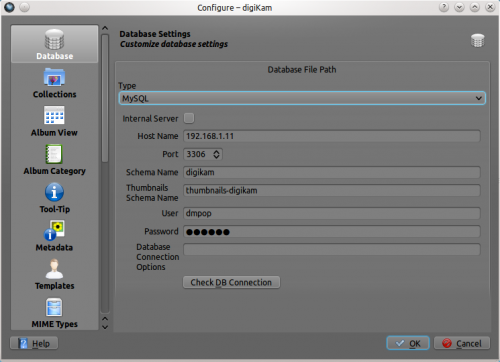
There are two ways to switch digiKam from SQLite to MySQL. If you’ve just installed digiKam, and you haven’t yet added any collection to it, choose , and switch to the section. Select the item from the drop-down list.

Enter the IP address of your MySQL server in the field and specify the correct port in the field (the default port is 3306). In the field, enter the name of the database for storing photo metadata, and specify the name of the database for storing thumbnails in the field. Enter your MySQL user name and password in the appropriate fields. To check whether the database connection works properly, press the button. If everything works as it’s supposed to, switch to the section, and add the directories containing your photos. Hit , and wait till digiKam populates the databases with data from photos. This can take a while if you have a lot of photos.

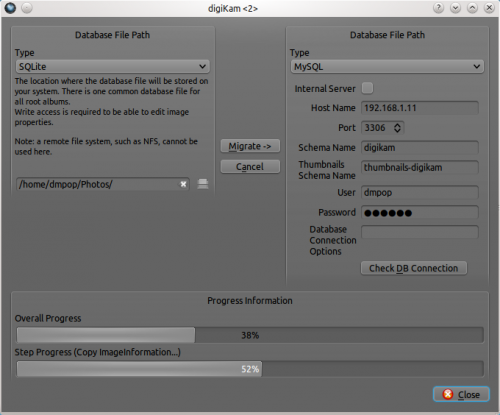
If you are already using digiKam with SQLite, you can use the database migration tool to move the existing data to MySQL databases. Choose , and select the item in the drop-down list in the right section. Fill out the required fields as previously described, and use the button to test the connection. Finally, press the button to copy the data from to .
