Showfoto/Levels Adjust/ca: Difference between revisions
Created page with "A la part superior dreta, podeu veure la imatge ''histograma''. (He premut el botó <menuchoice>Lineal</menuchoice> de l'histograma per a veure-ho amb més claredat). Llavors,..." |
Created page with "Podeu veure que la nostra imatge té l'histograma concentrat a la part esquerra. Per tant, és sobre tot negra. La part dreta de l'histograma no s'utilitza en absolut, com es ..." |
||
| Line 24: | Line 24: | ||
Llavors, «Què és l'histograma?». L'histograma sols és un recompte de píxels. Compta el nombre de píxels que hi ha per a cada nivell de gris, i els mostra en una gràfica. A la part esquerra de l'histograma hi ha els colors foscos/negre, i la part dreta de l'histograma hi ha els colors més brillants. | Llavors, «Què és l'histograma?». L'histograma sols és un recompte de píxels. Compta el nombre de píxels que hi ha per a cada nivell de gris, i els mostra en una gràfica. A la part esquerra de l'histograma hi ha els colors foscos/negre, i la part dreta de l'histograma hi ha els colors més brillants. | ||
Podeu veure que la nostra imatge té l'histograma concentrat a la part esquerra. Per tant, és sobre tot negra. La part dreta de l'histograma no s'utilitza en absolut, com es mostra a la figura. Per què ha passat això? El fet que la càmera no exposi correctament la imatge, o si s'ha configurat incorrectament. | |||
If a photo is visually pleasing, usually (not always), it covers most of the histogram, from black, to white. | If a photo is visually pleasing, usually (not always), it covers most of the histogram, from black, to white. | ||
Revision as of 19:52, 23 December 2012
Guia d'aprenentatge de fotos al KDE 1-1: Ajust de nivells
Unai Garro (uga): estiu de 2008
Probablement aquest és un dels mètodes més àmpliament utilitzat i més simple per ajustar una imatge. És tan simple i efectiu que a partir d'ara el voldreu utilitzar en totes les vostres fotografies, de manera que feu-hi un cop d'ull, i divertiu-vos.
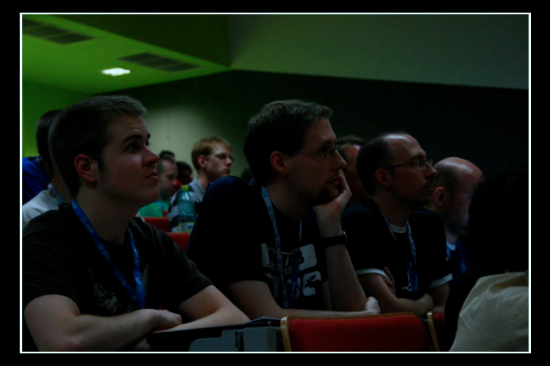
Veiem aquesta fotografia de mostra de la Akademy 2008, amablement donada per Sebastian Kugler:

|
Com podeu veure, la fotografia és fosca. Després de tot, es va prendre durant una presentació, i possiblement, l'habitació estava molt fosca. Però això no és excusa per a una mala fotografia ![]()
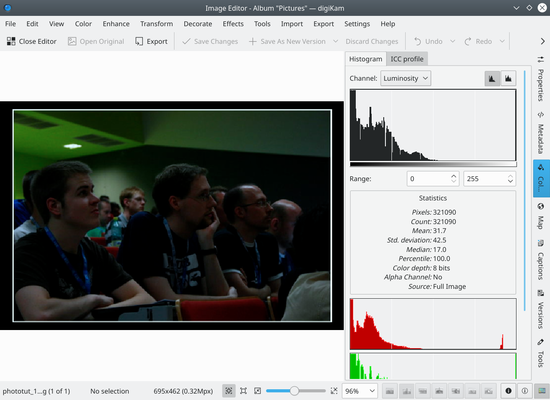
Per què està fosca? Obrim la foto a Showfoto (l'editor de Digikam') i veurem el que està passant:

|
A la part superior dreta, podeu veure la imatge histograma. (He premut el botó de l'histograma per a veure-ho amb més claredat). Llavors, «Què és l'histograma?». L'histograma sols és un recompte de píxels. Compta el nombre de píxels que hi ha per a cada nivell de gris, i els mostra en una gràfica. A la part esquerra de l'histograma hi ha els colors foscos/negre, i la part dreta de l'histograma hi ha els colors més brillants.
Podeu veure que la nostra imatge té l'histograma concentrat a la part esquerra. Per tant, és sobre tot negra. La part dreta de l'histograma no s'utilitza en absolut, com es mostra a la figura. Per què ha passat això? El fet que la càmera no exposi correctament la imatge, o si s'ha configurat incorrectament.
If a photo is visually pleasing, usually (not always), it covers most of the histogram, from black, to white.
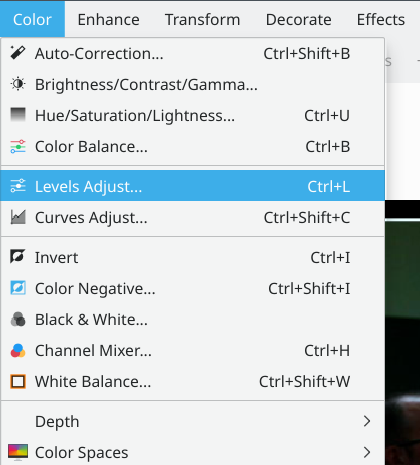
So, is there a way to fix this, then? Of course there is, and it's a very easy one. Select the menu :

|
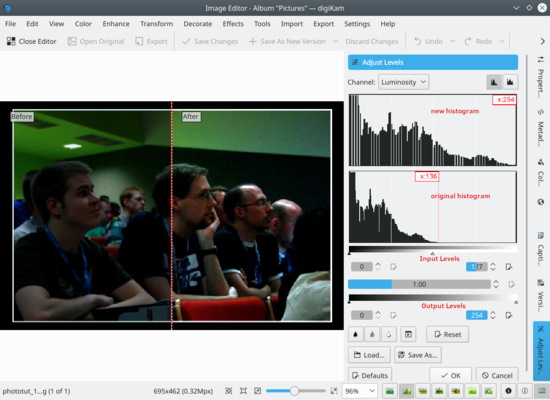
You will see a new popup showing a tool to adjust the histogram output. There are several parts in it. On the top right, there are two histograms. The first one is the output/new histogram, and the second (bottom) one is the input/original histogram.

|
As you can see, I have adjusted the output histogram to cover it all, see? So how have I done this? Very simple:
There are 4 sliders in this tool. The first two sliders mark the beginning and end of the part of the histogram that I am interested in. I have moved them to match the full histogram of our original image.
The other two sliders mark the range of the histogram we want as output. We want the histogram to cover from black to white, so just move the sliders to the left corner and to the right corner.
Press , et voilà, your nice photo is fixed. Congrats ![]()

|

