Kdenlive/Manual/Effects/da: Difference between revisions
Importing a new version from external source |
Updating to match new version of source page |
||
| Line 26: | Line 26: | ||
=== The Properties Tab and its Menu === | === The Properties Tab and its Menu === | ||
==== The Properties Tab==== | ==== The Properties Tab==== | ||
The Properties Tab displays the settings for the effects on the currently selected clip (Figure 3) or the settings for the currently selected transition (Figure 4) depending on whether it is a clip or a transition that is currently selected. | The Properties Tab displays the settings for the effects on the currently selected clip (Figure 3) or the settings for the currently selected transition (Figure 4) depending on whether it is a clip or a transition that is currently selected. | ||
| Line 48: | Line 50: | ||
==== Reset Effect ==== | ==== Reset Effect ==== | ||
This reverts all the settings in the effect back to their default values. | This reverts all the settings in the effect back to their default values. | ||
==== Save Effect ==== | ==== Save Effect ==== | ||
This allows you to save the current effect and all its settings. The saved effect will appear in the Effect List in the Custom category. | This allows you to save the current effect and all its settings. The saved effect will appear in the Effect List in the Custom category. | ||
==== Create Group ==== | ==== Create Group ==== | ||
This creates an Effect Group. An Effect Group is a place holder for multiple effects. You can then save the group of effects — they will the appear in the Effect List, in the Custom Section. You can then later apply the whole group of effects to other parts of the timeline. | This creates an Effect Group. An Effect Group is a place holder for multiple effects. You can then save the group of effects — they will the appear in the Effect List, in the Custom Section. You can then later apply the whole group of effects to other parts of the timeline. | ||
| Line 59: | Line 64: | ||
==== Create Region ==== | ==== Create Region ==== | ||
New in ver >=0.9.3 | New in ver >=0.9.3 | ||
Revision as of 15:50, 27 March 2018
Effekter
I Kdenlive kan effekter bruges til at modificere kildematerialets lyd- og videoegenskaber.
Du kan føje effekter til klip ved at vælge dem i fanebladet Effekter og trække dem ind på et klip i tidslinjen; eller du kan markere et klip i tidslinjen og vælge fra tidslinjemenuen eller du kan højreklikkke på klippet og vælge . Se Kom godt i gang - effekter for flere detaljer.
Effekterne som anvendes på et givet klip kan ses og redigeres i fanebladet Egenskaber, som vises når det pågældende klip markeres i tidslinjen.
Du kan også anvende effekter på et helt spor. Dette opnår du ved at trække en effekt fra fanebladet Effekter til sporheaderen; eller du kan klikke på sporheaderen og vælge menupunktet i menuen Tidslinje . Spor, som har fået tilføjet effekter på denne måde vil vise et ikon i form af en gylden stjerne i sporheaderen.

Fanebladet Effektlister
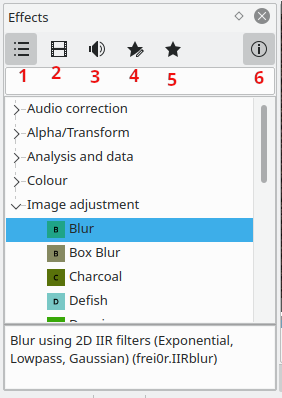
Få fanebladet effekter frem ved hjælp af menuen ().

For at føje en effekt til et klip skal du blot trække den fra fanebladet Effekter til klippet på tidslinjen.
The Properties Tab and its Menu
The Properties Tab
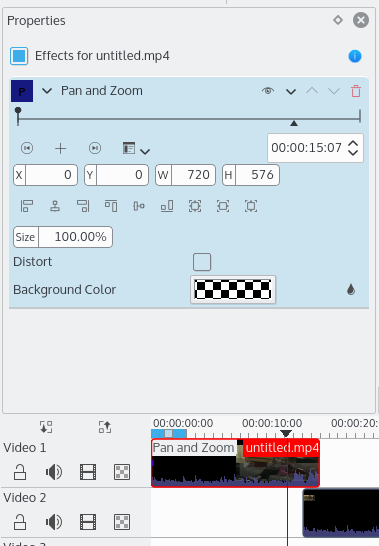
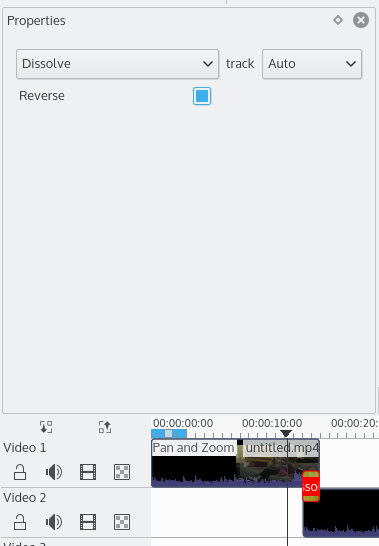
The Properties Tab displays the settings for the effects on the currently selected clip (Figure 3) or the settings for the currently selected transition (Figure 4) depending on whether it is a clip or a transition that is currently selected.
 |
 |
Click the eye icon shown at 2 to temporarily disable the effect and toggle the button to the state shown at 1. Click the empty eye icon shown at 1 to re-enable a disabled effect and toggle the button to the state shown at 2.
To remove an effect from a clip, click the trash can icon labelled 3 in the image below. The arrow labelled 1 minimizes the effect in the Properties Window. And the icon labelled 2 brings up the Properties Tab menu shown.
Reset Effect
This reverts all the settings in the effect back to their default values.
Save Effect
This allows you to save the current effect and all its settings. The saved effect will appear in the Effect List in the Custom category.
Create Group
This creates an Effect Group. An Effect Group is a place holder for multiple effects. You can then save the group of effects — they will the appear in the Effect List, in the Custom Section. You can then later apply the whole group of effects to other parts of the timeline.
To add effects to the group, first add the effect in question to a clip. Then drag that effect and drop it onto the Effect Group in the Properties Tab.
Create Region
New in ver >=0.9.3
The "Create Region" feature enables a user to apply an effect to a part of a clip only. It is a really powerful feature but currently the UI is not fully ready to get its full potential.
Basically, you add an effect to a clip — for example "Sepia" — then you go in the effect's menu and select "Create Region". This will now open a file dialog.
In that dialog, you need to point to an MLT clip with alpha transparency. This is where Kdenlive is not 100% ready because there are many ways we could create such clips, using for example a threshold filter or rotoscoping. But as a start, let's say you can open any image with alpha transparency, or a title clip created with Kdenlive. Then, the "sepia" effect will only be applied on the non-transparent areas of this "region" clip.
Brug af keyframes i effekter
Mange effekter bruger begrebet "'keyframes". Keyframes er brugerdefinerede steder i dit klip, hvor du ønsker at starte, stoppe eller ændre en effekt. Du kan angive forskellige værdier for dine effekters parametre ved forskellige keyframes; så vil Kdenlive gradvist ændre parametrene imellem de to keyframes, sådan at når videoen når til det næste keyframe, så vil parametrene være blevet justeret til værdierne her. Det interpolerer imellem keyframes.
Se Kom godt i gang - effekter for et eksempel på keyframing afeffekten RGB-justering
Spol hen til det aktive frame
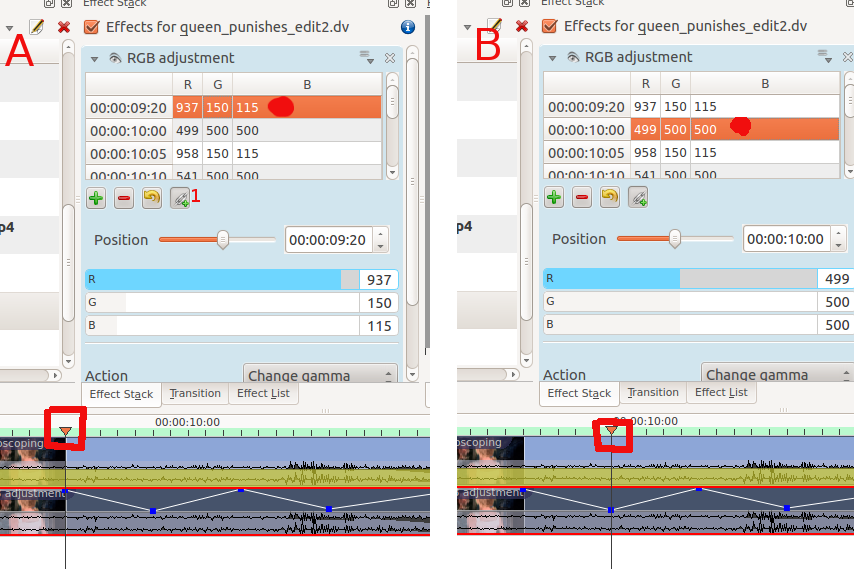
Nogle keyframekontroller har en knap ![]() til at spole frem til den aktive frame (markeret med 1 i skærmbilled A herunder). Når denne knap er trykket ind og du klikker på et af keyframene i keyframelisten vil Kdenlive rulle forhåndsvisningsvinduet frem til dette keyframe. I eksemplet i skærmbilledet har vi valgt keyframet ved 9:20 i A og tidslinjemarkøren (fremhævet i den røde firkant) viser positionen af dette keyframe. I B er der klikket på keyframet ved 10:00 og vi ser, hvordan tidslinjemarkøren er flyttet.
til at spole frem til den aktive frame (markeret med 1 i skærmbilled A herunder). Når denne knap er trykket ind og du klikker på et af keyframene i keyframelisten vil Kdenlive rulle forhåndsvisningsvinduet frem til dette keyframe. I eksemplet i skærmbilledet har vi valgt keyframet ved 9:20 i A og tidslinjemarkøren (fremhævet i den røde firkant) viser positionen af dette keyframe. I B er der klikket på keyframet ved 10:00 og vi ser, hvordan tidslinjemarkøren er flyttet.

Demonstration af effekter
Du kan finde skærmbilleder, som beskriver 33 af videoeffekterne her
De følgende tre YouTube-videoer viser hvordan flere af Kdenlives videoeffekter virker (spanske tekster).
Endnu en YouTube-video med engelske tekster.
See also this YouTube play list from Franz M.P.
Effektkategorier
Se også Effekter og overgange for en alfabetisk liste over effekter og overgange.
Du kan finde skærmbilleder, som beskriver 33 af videoeffekterne her
Effekterne er inddelt i følgende kategorier:
- Alfamanipulation
- Analysis and Data
- Artistic
- Lyd
- Lyd kanaler
- Lydkorrektion
- Slør og gem
- Farve
- Farvekorrektion
- Beskær og transformér
- Tilpasset
- Forvræng
- Enhancement
- Krydsblænd
- Diverse
- Bevægelse
The available effects are defined by .xml files found in $KDEDIR/share/kde4/apps/kdenlive/effects (e.g. /usr/share/kde4/apps/kdenlive/effects).
Or at /usr/share/kdenlive/effects on version 15.n.
These .xml files contain the default values for the effects parameters. So if you don't like the default values for the effects in Kdenlive, you can modify the defaults by editing these .xml files.
FAQ:
Q: Hvordan duplikerer man en effekt til at bruge lignende indstillinger et andet sted?
A: Select your effect in the timeline. In the Properties Tab choose (from the Properties Tab Menu). You will now find this effect available in the Effect List section.
A: En anden løsning: marker en sekvens, som indeholder effekten og vælg . Der, hvor du ønsker at anvende effekten højreklikker du igen og vælger i stedet for
Q: Hvordan anvendes en effekt på flere klip på en gang?
A: Du kan markere flere klip med Skift + træk (med venstre museknap) rundt om dem. Højreklik så og gruppér klippene (eller tast Ctrl + G).

