Kdenlive/Manual/Effects
Effects
Effects in Kdenlive can be used to modify the audio and video properties of the source material.
You add effects to clips by choosing them from the Effects List and dragging them onto a clip in the timeline. Or by selecting a clip in the timeline and choosing from the Timeline menu or from Clip in Timeline right click menu . For more detail see QuickStart - Effects
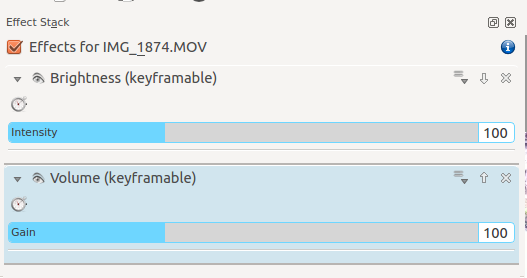
The effects that are in play on a given clip can be viewed and edited via the Effect Stack that displays when the clip in question is selected in the timeline.
You can also apply effects to an entire track. This is achieved by dragging an effect from the Effect List to the Track Header. Or you can click on the track header and chose Timeline>Add Effect. Tracks which have effects added in this fashion will have a gold star icon in the track header.

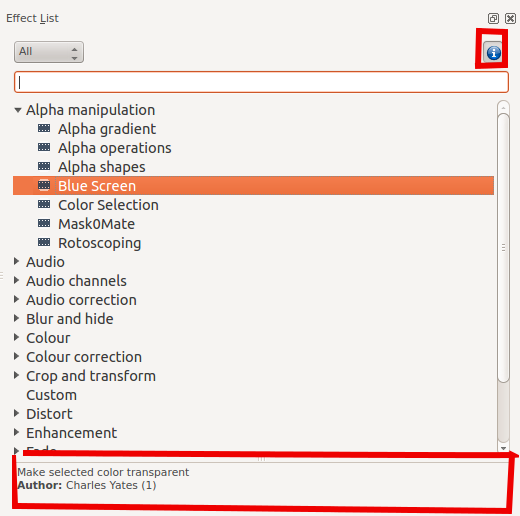
Effect List
Make the Effect List visible from the menu ()

To have a brief description of the effect display at the bottom of the list, click the ![]() button as highlighted in figure 1b.
button as highlighted in figure 1b.
To add an effect to a clip, simply drag it from the Effect List to the clip on the timeline.
Effect Stack and its Menu
The Effect Stack
Figure 2 shows the effect stack for a clip. The effect stack can be made visible from the menu Effect Stack

Click the eye icon shown at 2 to temporarily disable the effect and toggle the button to the state shown at 1. Click the empty eye icon shown at 1 to re-enable a disabled effect and toggle the button to the state shown at 2.
To remove an effect from a clip, click the X labeled 3 in the image below. The arrow labeled 1 minimizes the effect in the effect stack. And the arrow labeled 2 brings up the menu shown. The image shows the menu in ver 0.9.3 which has the additional Create Region menu option.
Reset Effect
This reverts all the settings in the effect back to their default values.
Save Effect
This allows you to save the current effect and all its settings. The saved effect will appear in the Effect List in the Custom category.
Create Group
This creates an Effects Group. An effects group is a place holder for multiple effects. You can then save the group of effects - they will the appear in the Effect List, in the Custom Section. You can then later apply the whole group of effects to other parts of the timeline.
To add effects to the group, first add the effect in question to a clip. Then drag that effect and drop it onto the effect group in the effect stack.
Create Region
New in ver >=0.9.3
The "Create Region" feature enables a user to apply an effect to a part of a clip only. It is a really powerful feature but currently the UI is not fully ready to get its full potential.
Basically, you add an effect to a clip - for example "Sepia". Then, you go in the effect's menu and select "Create Region". This will now open a file dialog.
In that dialog, you need to point to an MLT clip with alpha transparency. This is where Kdenlive is not 100% ready because there are many ways we could create such clips, using for example a threshold filter or rotoscoping. But as a start, let's say you can open any image with alpha transparency, or a title clip created with Kdenlive. Then, the "sepia" effect will only be applied on the non transparent areas of this "region" clip.
Using Keyframes in effects
Many effects use the concept of "Keyframes". Keyframes are user-defined points in your clip where you want an effect to start, stop or change. You can set the parameters for your effects to different values at different keyframes and Kdenlive will then gradually change the parameters between the two keyframes so that by the time the video has arrived at the next keyframe it will have adjusted the parameter to match that key frame. It interpolates between keyframes.
See QuickStart - Effects for an example on keyframing the RGB adjustment effect
Seek To Active Frame
Some keyframe controls have a seek to active frame button ![]() (labeled 1 in screenshot A below). When seek to active frame is toggled on and you click on one of the keyframes in the keyframe list, then Kdenlive will scroll the preview window to that keyframe. In the example of the screenshot, we have selected the keyframe at 9:20 in A and the clip position caret (highlighted in red box) shows the location of this keyframe. Clicking the keyframe at 10:00 in B shows how the clip position has moved.
(labeled 1 in screenshot A below). When seek to active frame is toggled on and you click on one of the keyframes in the keyframe list, then Kdenlive will scroll the preview window to that keyframe. In the example of the screenshot, we have selected the keyframe at 9:20 in A and the clip position caret (highlighted in red box) shows the location of this keyframe. Clicking the keyframe at 10:00 in B shows how the clip position has moved.

Effects Demos
You can find screenshots describing 33 of the video effects here
The following three YouTube videos display the results of a number of the video effects available in Kdenlive (Spanish captioning)
{{#evp:youtube|C6oeu2Yc64I}}
{{#evp:youtube|jrC4F_G64jA}}
{{#evp:youtube|XMoSgHHbA4k}}
Another YouTube video (English Captions)
{{#evp:youtube|capV7lUzbOw}}
See also this YouTube play list from Franz M.P.
Effects Categories
See also Effects and Transitions for an alphabetical list of effects and transitions.
You can find screenshots describing 33 of the video effects here.
The effects are divided into the following categories:
- Alpha manipulation
- Audio
- Audio channels
- Audio Correction
- Blur and hide
- Color
- Color Correction
- Crop and transform
- Custom
- Distort
- Enhancement
- Fade
- Fun
- Misc
- Motion
The available effects are defined by .xml files found in $KDEDIR/share/kde4/apps/kdenlive/effects (e.g. /usr/share/kde4/apps/kdenlive/effects).
These .xml files contain the default values for the effects parameters. So if you don't like the default values for the effects in kdenlive, you can modify the defaults by editing these .xml files.
FAQ:
Q: How to duplicate an effect to use similar settings somewhere else?
A: Select your effect in the timeline. In the Effect Stack widget choose , you find it available in the Effect List section.
A: Other solution: select a strip containing the effect, , then, where you want to apply it again, right-click and select instead of .
Q: How to apply an effect on several clips (all) at the same time?
A: You can select multiple clips with Shift + drag (left mouse button) around them. Then right-click and group clips (or Ctrl + G).

