Amarok/QuickStartGuide/Musiksamlingen
Musiksamlingen
Panelet Mediekilder
Panelet Mediekilder er stedet, hvor du kan gennemgå og fremvise hele din musiksamling. Dette inkluderer spor på din lokale harddisk såvel som på ekstern enheder og medier, som er sluttet til din computer, fx cd, USB-enheder, netværksdiske og internetkilder.
Opret en samling
Har du musikspor i mp3-, ogg- eller FLAC-format på din computer? Det første du skal gøre er at fortælle Amarok, hvor den kan finde disse filer, sådan at den kan begynde at danne din samling. I hovedmenuen vælger du .
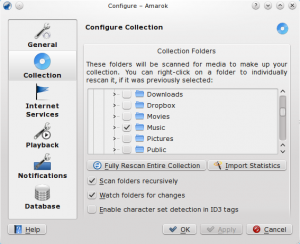
Ovenfor ser du en trævisning af din hjemmemappe. Klik i valgfeltet der hvor din musik ligger - det er som regel i ~/Musik. Klik så på . Det vil tage noget tid, så bliv ikke urolig, hvis Amarok virker langsommere i et stykke tid. Når scanningen er færdig, så er det bedst at afslutte Amarok ved at bruge menuen eller Ctrl+Q og derefter genstarte den. Nu skulle din samling blive vist i panelet til venstre. Den musik, som du lige tilføjede vises under Lokal musik.
Tilføj medieenheder til samlingen
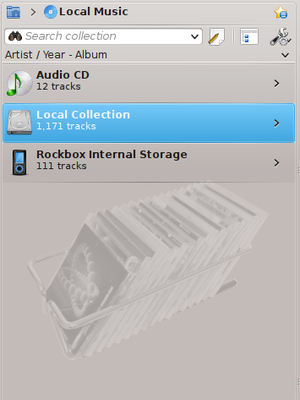
Nedenunder søgelinjen nær toppen af panelet Mediekilder ser du forskellige enheder eller indholdskategorier indenfor indholdsbrowseren. Hvis du indsætter en musik-cd i cd-drevet, så vil den dukke op i panelet Mediekilder sammen med medieafspillere, USB-nøgler og andre USB-enheder. Efter at en ekstern enhed er blevet monteret, skulle den automatisk dukke op i panelet Mediekilder, når blot den er blevet genkendt af din computer.
Nedenfor er et skærmbillede, som viser tre tilsluttede musikkilder: musik-cd, mp3-afspiller og Lokal samling.
Rip en CD til samlingen
Hvis du ikke har nogle musikfiler på din computer, så er det nemt at rippe dem (kopiere spor fra dine cd'er til din samling). Du skal blot indsætte en cd og så højreklikke på cd-enhedens banner i enhedsbrowseren for at afspille den eller kopiere den til din samling, hvilket vil rippe og tagge sporene (se billedet nedenfor). Hvis du kopierer musik fra en musik-cd til din lokale samling, så vil statuslinjen for neden i Amaroks vindue vise, at den er i færd med at kopiere. Ripningen kan tage adskillige minutter. Når ripningen er afsluttet forsvinder meddelelsen i statuslinjen og musikken dukker op i indholdsbrowseren for din lokale samling. Hvis den rippede musik ikke dukker op i panelet Mediekilder, så er det bedst at afslutte Amarok fra menuen eller ved at taste Ctrl+Q og så genstarte den. Nu skulle du se din samling i panelet til venstre. Skærmbilledet nedenfor viser, hvordan du flytter spor fra din musik-cd, iPod eller anden enhed til din samling ved hjælp af højrekliksmenuen.
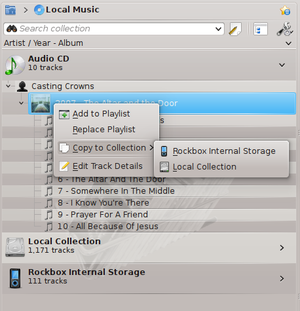
I kontekstmenuen får du også muligheden . Brug denne mulighed, hvis du har spor med tags, som skal redigeres. Dette får betydning når du ripper musik til .WAV-formatet, hvor du mister nogle af tagsene. Hvis meget af din samling skal tagges, så kan du overveje at bruge et specialprogram til tagging så som
Korrekt tagging er vigtig for at hjælpe Amarok med at vise dine spor under det rigtige album og i den korrekte orden. Lær mere om ripning and tagging.
Tilgang til andre medier
Du har måske spekuleret over, hvorfor panelet Mediekilder ikke kaldes Samling. Amarok giver dig adgang til mere musik, end hvad du har i din samling -- internetbutikker, lydbøger, podcasts, musikfiler gemt udenfor din samling og tidligere afspillede spillelister. Amaroks brødkrummenavigation er nøglen til alt dette. Startikonet for brødkrummenavigationen det blå hjemmemappeikon øverst til venstre i panelet Mediekilder. Dette ikon udvides og trækkes sammen mens du browser gennem panelet Mediekilder og gør det let for dig at bevæge dig rundt i din samling ved at klikke på den ønskede mappe i brødkrummelinjen.

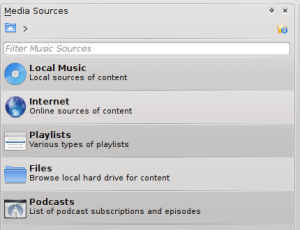
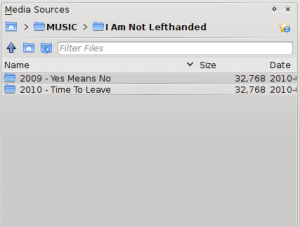
If you click the Amarok home folder you see the Media Sources pane on the left below, containing icons to available resources. If you click the Files icon (left image below, second item from the bottom), you will see something similar to the image on the right, below. Notice how the breadcrumb bar expands and how the content of the selected folder is shown in the Media Sources pane (right image below). Clicking the > symbols among the breadcrumbs allows you to view the folders available at that level of the folder structure. The Amarok file browser gives you access to your entire file system, even outside your Local Collection.
| Media Sources pane | Files Icon clicked |
|---|---|
 |
 |
The functions of the icons in the Amarok Home folder (left above) are:
| Icon | Name | Action |
| Lokal musik | Your Amarok collection | |
| Internet | Internet shops such as Magnatune, Jamendo and Last.fm. First configure your internet resources in: | |
| Playlists | Saved playlists -- see also Playlists. Also playlists on media devices | |
| Files | Your file system | |
| Podcasts | Access to Podcasts via RSS feed |
Clicking the Local Music icon above or on the Local Music folder in the Breadcrumbs bar returns you to your collection, showing you a list of all the available resources, artists, albums and tracks that you have previously defined as part of your collection. The Breadcrumbs bar indicates that you are viewing your Local Music.
Streams and Podcasts
There are two ways to listen to streams. If you have a favorite station, get the stream URL and add it: . You'll be able to find it again in Playlists, as a Saved Playlist. Otherwise, browse through the scripts available in our Script Manager (). There are some excellent collections available, which will show up in the Internet section of your Media pane.
Podcasts have their own section in the Media Pane, above. If you have an RSS or Atom feed URL, click the green and add it there. If you have an OPML file to import, that choice is available also. Use the context (right-click) menus to or mark an episode as New. If you are interested in browsing through a large collection of podcasts, check out the Podcast Directory available through the Script Manager, referred to above.
Using the Content Browser
The hard disk of your computer, audio CDs, external devices and the Internet are the basic resources for your collection. After your collection has been set up, it is likely that your collection will hold a large number of albums and tracks, much more than can be shown on a single window.
How to change the display of your collection, below:
Hiding or expanding information
The area of the Media Sources pane below the search bar is called the Content Browser. Three media sources are indicated in the image of a Content Browser below: CD, Local Collection and a Media Player:
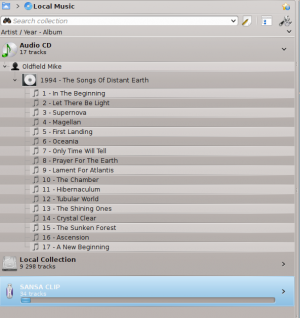
Clicking the banner for a device (the blue bar for the Sansa above) shows or hides the content of that device. The direction of the green arrow on the right indicates whether the contents for that device is hidden or shown. The content on a particular device can, in turn, be hidden or shown using the same principle, clicking on the appropriate artist or album. A - symbol on the left of an artist or an album indicates that the contents has been expanded. A + symbol indicates more contents for that category is available / currently hidden. In the image above, the information for Mike Oldfield - The Songs of Distant Earth CD has been expanded, showing the individual tracks. On the other hand, the albums and tracks in the Local Collection are hidden. By clicking these + or - symbols you also can expand or hide information.
Changing the order of tracks and albums
The order in which tracks are sorted in the Content Browser can be customised by using the Sort Options button at the top of the Media Sources pane:

The sort order is indicated on the top left of the Media Sources pane, just below the Search text box. The default order is Artist / Year - Album. The display order of the Content Browser can be temporarily switched between the user-defined sort order (described above) and a Merged view in which which artists are listed alphabetically, no matter on which media the music is stored. To toggle the Merged view click the arrow to the right of the sort order indication or click the Merge icon at the top right-hand of the Media Sources pane:

To search your collection, type your search term into the search bar at the top of the Local Music section. Not only can you search by artist, album or track name, but any part. You might create a nice playlist by searching for winter, for instance, or merely find a track when you only remember one word of the title. You can also search by rating, playcount, even filetype. See Amarok Insider Issue 14 for more details.
Deleting items from the collection
You can delete any item from you collection by right-clicking on it and choosing the bottom item . A confirmation dialog will appear, preventing the accidental deletion of any tracks. More than one item can be selected with Ctrl+click.

