Anleitungen / Gemeinsame Datenbank
Gemeinsame Datenbank
Es gibt verschiedene Desktop-Anwendungen für KDE, die sich mit irgendeiner Art Datenbank arbeiten. Die beliebtesten sind wohl Amarok, der Musik-Player, digiKam, der Foto-Manager, und Akonadi der Datenverwaltungsdienst für persönliche Daten.! N! Um deren Installation zu vereinfachen und deren System-Anforderungen zu begrenzen wird jedes dieser Programme mit einer eingenen (internen) Datenbank, in den meisten Fällen mit SQLite ausgeliefert. Durch die vielen separaten Datenbanken entsteht unnötiger Overhead, und es macht es schwieriger, Ihre Daten zu sichern.
Datenbank-Server
Der einzige Datenbank, die von all diesen Programmen unterstützt wird, ist MySQL: so werden wir diese nutzen. Sie ist auch sehr einfach zu konfigurieren, entweder durch die Kommandozeile oder mit Grafik-Tools.
Die Installation
Zunächst haben wir den MySQL-Server zu installieren. Linux-Anwender werden wahrscheinlich ein Paket aus ihrer Distribution installieren wollen, oder können andere MySQL-Server von ihrer Homepage bekommen. Anleitungen, wie man MySQL beim Booten starten kann, sind Distributions-spezifisch, aber da MySQL ein beliebtes Paket ist, sollten sie nicht schwer zu finden sein. Während der Installation wird der Installer Sie wahrscheinlich nach einem Root-Passwort fragen. Wählen Sie ein sicheres Kennwort dafür und merken Sie es sich, dieses Konto wird nicht durch die Desktop-Anwendungen, sondern nur für die Datenbankverwaltung verwendet werden.
Konfiguration
For the server configuration, this we will assume that your database server is not used over the network, contains no sensitive data, and that you trust your applications. If you plan to use this database for Akonadi data, it's best if you copy the configuration file from the Akonadi code repository, which can be downloaded at here. Make a copy of your existing /etc/mysql/my.cnf, then replace it with the downloaded file.
Creating the databases
The first thing we have to do once MySQL is installed and running is add a separate database for each program. I generally name them after the programs that use them. This can be done with either GUI administration tools, but since we only have to do it once it's probably faster to write a few commands:
$ mysql -u root -p
At the password prompt, type in the root password set when installing MySQL. Now we can start creating databases. For example, to create a database named 'amarok', type in this command:
mysql> create database amarok;
Amarok
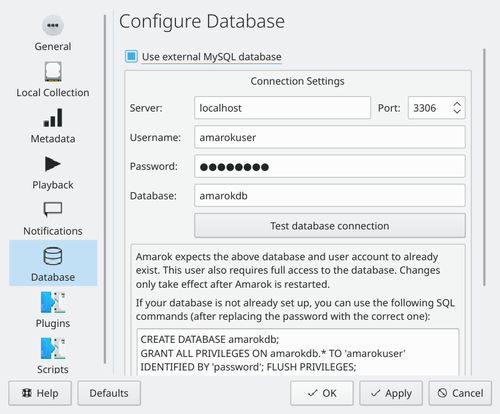
Amarok requires very little configuration, but it doesn't provide a way to migrate your old database. Go to and go to the tab.
Fill in localhost in the textfield, 3306 in , and amarok in .

digiKam
digiKam is somewhat special because it requires two databases: one for the images metadata, and one for thumbnails. Their names are not important, I chose to call them digikam and digikam_thumb:
mysql> create database digikam;
mysql> create database digikam_thumb;
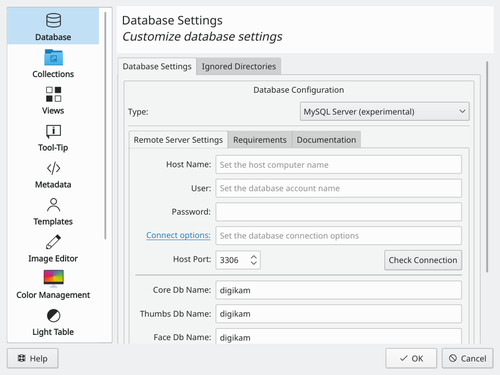
In digiKam, the process is very similar to that of Amarok. The settings are located in .

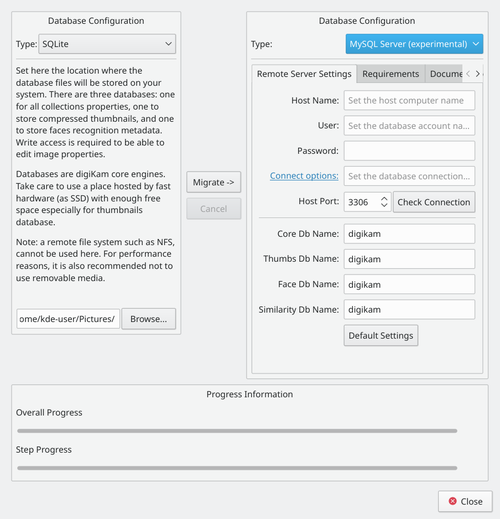
digiKam also comes with a handy database migration tool, available in . Fill in your previous database settings (you don't have to do anything if you haven't changed these options) on the left side and your new settings on the right side, then click .

Akonadi
First create a database for Akonadi:
mysql -u root -p
create database akonadi;
Akonadi is not supposed to be a user-facing tool, so there is no configuration GUI for it. However, you can edit
~/.config/akonadi/akonadiserverrc to have these contents:
[%General]
Driver=QMYSQL

[QMYSQL]
Name=akonadi
Host=localhost
StartServer=false
Options=
ServerPath=/usr/bin/mysqld
Save the file, then log out and log in back again.


