Digikam/Watermark/it
Aggiungi una filigrana alle foto con digiKam
Questo articolo è originariamente apparso su Scribbles and Snaps ed è stato riprodotto con il permesso di Dmitri Popov.
Sebbene ci siano molti modi per proteggere le tue foto da utilizzi non autorizzati, l'aggiunta della filigrana (watermarking) rimane ancora la tecnica più semplice e probabilmente la più efficace che ti aiuta ad identificarti come il creatore della foto e a rendere difficile l'utilizzo dei tuoi lavori senza permesso.
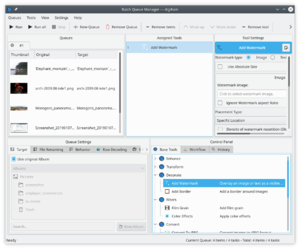
Sebbene digiKam supporta l'aggiunta della filigrana, questa caratteristica è nascosta così bene che potresti non esserti mai reso conto di dove sia. Questo perché la funzione di aggiunta della filigrana in digiKam è infilata nello strumento che puoi utilizzare per aggiungere la filigrana a più foto in una volta. Ecco come funziona in pratica. Scegli -> (o premi il tasto B key) per aprire lo strumento . Trascina le foto a cui vuoi aggiungere la filigrana da un album di digiKam al riquadro per aggiungerle alla coda attuale. Fai clic sulla scheda nel riquadro e fai doppio clic sullo strumento per aggiungerlo al riquadro .

digiKam can use text or images as watermarks, and you can choose the desired watermark type in the pane. If you want to use the type, make sure that you already have a graphics file handy. Specify then the available settings such as , , and . Next, select the target folder in the section of the pane. In the section, you can specify what the system should do if it detects a file with the same name as the processed one in the target folder. You can either choose to overwrite the existing file or rename the processed file before saving it. You can also use the options available in the section to specify a renaming rule to automatically rename the processed files.
Once you are satisfied with the settings, hit the button, and once digiKam’s finished, you’ll find the watermarked photos in the target folder.
