System Settings: Difference between revisions
No edit summary |
(Marked this version for translation) |
||
| Line 6: | Line 6: | ||
:{|class="vertical-centered" | :{|class="vertical-centered" | ||
|[[Image:Systemsettings.png|250px|thumb]] | |[[Image:Systemsettings.png|250px|thumb]] | ||
|<translate>Control center for KDE software and workspaces.</translate> | |<translate><!--T:1--> | ||
Control center for KDE software and workspaces.</translate> | |||
|} | |} | ||
<translate> | <translate> | ||
==Features== | ==Features== <!--T:2--> | ||
<!--T:3--> | |||
:*Control Center for global KDE platform settings | :*Control Center for global KDE platform settings | ||
:*Customize and manage your desktop in one convenient location | :*Customize and manage your desktop in one convenient location | ||
:*Search function helps narrow down probable settings | :*Search function helps narrow down probable settings | ||
==Search== | ==Search== <!--T:4--> | ||
<!--T:5--> | |||
'''System Settings''' has a search function to help in hunting down a setting. Simply type in a keyword in the Search field in the toolbar and System Settings will display modules that contain the keyword and hide those that don't. System Settings modules can also be reached through '''[[KRunner|KRunner]]'''.</translate> | '''System Settings''' has a search function to help in hunting down a setting. Simply type in a keyword in the Search field in the toolbar and System Settings will display modules that contain the keyword and hide those that don't. System Settings modules can also be reached through '''[[KRunner|KRunner]]'''.</translate> | ||
:{|class="tablecenter" | :{|class="tablecenter" | ||
|[[Image:Systemsettings-search.png|thumb|265px|<translate>Searching for "key".</translate>]] | |[[Image:Systemsettings-search.png|thumb|265px|<translate><!--T:6--> | ||
Searching for "key".</translate>]] | |||
|} | |} | ||
<translate> | <translate> | ||
==Categories== | ==Categories== <!--T:7--> | ||
===Common Appearance and Behavior=== | ===Common Appearance and Behavior=== <!--T:8--> | ||
</translate> | </translate> | ||
:{| | :{| | ||
|colspan="2"|<h4>[[Special:myLanguage/System Settings/Account Details|<translate>Account Details</translate>]]</h4> | |colspan="2"|<h4>[[Special:myLanguage/System Settings/Account Details|<translate><!--T:9--> | ||
Account Details</translate>]]</h4> | |||
|- | |- | ||
|[[Image:Preferences-desktop-user.png|48px|link=Special:myLanguage/System Settings/Account Details]]||<translate>Configure your user information, password and paths. You can also configure your Social Desktop providers.</translate> | |[[Image:Preferences-desktop-user.png|48px|link=Special:myLanguage/System Settings/Account Details]]||<translate><!--T:10--> | ||
Configure your user information, password and paths. You can also configure your Social Desktop providers.</translate> | |||
|- | |- | ||
|colspan="2"|<h4>[[Special:myLanguage/System Settings/Application Appearance|<translate>Application Appearance </translate>]]</h4> | |colspan="2"|<h4>[[Special:myLanguage/System Settings/Application Appearance|<translate><!--T:11--> | ||
Application Appearance </translate>]]</h4> | |||
|- | |- | ||
|[[Image:Preferences-desktop-theme.png|48px|link=Special:myLanguage/System Settings/Application Appearance]]||<translate>Configure your applications style, colors, icons, fonts and emoticons.</translate> | |[[Image:Preferences-desktop-theme.png|48px|link=Special:myLanguage/System Settings/Application Appearance]]||<translate><!--T:12--> | ||
Configure your applications style, colors, icons, fonts and emoticons.</translate> | |||
|} | |} | ||
<translate> | <translate> | ||
===Hardware===</translate> | ===Hardware=== <!--T:13--></translate> | ||
:{| | :{| | ||
|colspan="2"|<h4>[[Special:myLanguage/System Settings/Input Devices|<translate>Input Devices</translate>]]</h4> | |colspan="2"|<h4>[[Special:myLanguage/System Settings/Input Devices|<translate><!--T:14--> | ||
Input Devices</translate>]]</h4> | |||
|- | |- | ||
|[[Image:Preferences-desktop-peripherals.png|48px|link=Special:myLanguage/System Settings/Input Devices]]||<translate>Configure your keyboard, mouse and joystick.</translate> | |[[Image:Preferences-desktop-peripherals.png|48px|link=Special:myLanguage/System Settings/Input Devices]]||<translate><!--T:15--> | ||
Configure your keyboard, mouse and joystick.</translate> | |||
|} | |} | ||
<translate> | <translate> | ||
===System Administration===</translate> | ===System Administration=== <!--T:16--></translate> | ||
:{| | :{| | ||
|colspan="2"|<h4>[[Special:myLanguage/System Settings/Login Screen|<translate>Login Screen</translate>]]</h4> | |colspan="2"|<h4>[[Special:myLanguage/System Settings/Login Screen|<translate><!--T:17--> | ||
Login Screen</translate>]]</h4> | |||
|- | |- | ||
|[[Image:Preferences-system-login.png|48px|link=Special:myLanguage/System Settings/Login Screen]]||<translate>Configure the login manager (KDM)</translate>. | |[[Image:Preferences-system-login.png|48px|link=Special:myLanguage/System Settings/Login Screen]]||<translate><!--T:18--> | ||
Configure the login manager (KDM)</translate>. | |||
|- | |- | ||
|colspan="2"|<h4>[[Special:myLanguage/System Settings/Startup and Shutdown|<translate>Startup and Shutdown</translate>]]</h4> | |colspan="2"|<h4>[[Special:myLanguage/System Settings/Startup and Shutdown|<translate><!--T:19--> | ||
Startup and Shutdown</translate>]]</h4> | |||
|- | |- | ||
|[[Image:Preferences-other.png|48px|link=Special:myLanguage/System Settings/Startup and Shutdown]]||<translate>Configure your system behavior when starting up or shutting down.</translate> | |[[Image:Preferences-other.png|48px|link=Special:myLanguage/System Settings/Startup and Shutdown]]||<translate><!--T:20--> | ||
Configure your system behavior when starting up or shutting down.</translate> | |||
|} | |} | ||
<translate> | <translate> | ||
==Mouse Gestures== | ==Mouse Gestures== <!--T:21--> | ||
<!--T:22--> | |||
:''KDE SC version 4.4.4'' | :''KDE SC version 4.4.4'' | ||
<!--T:23--> | |||
The place where you start is "<menuchoice>System Settings -> Input Actions</menuchoice>" | The place where you start is "<menuchoice>System Settings -> Input Actions</menuchoice>" | ||
===Enabling mouse gestures=== | ===Enabling mouse gestures=== <!--T:24--> | ||
<!--T:25--> | |||
In the bottom left corner of the window there is a <menuchoice>Settings</menuchoice> button. Make sure that the <menuchoice>Gestures</menuchoice> checkbox is checked. Set the timout as you see fit. The mouse button might be different for you, I chose 3 for using the right mouse button. If you want input actions to be enabled automatically, check the "Start the input Actions daemon on login" above. | In the bottom left corner of the window there is a <menuchoice>Settings</menuchoice> button. Make sure that the <menuchoice>Gestures</menuchoice> checkbox is checked. Set the timout as you see fit. The mouse button might be different for you, I chose 3 for using the right mouse button. If you want input actions to be enabled automatically, check the "Start the input Actions daemon on login" above. | ||
===Creating the Mouse gestures actions group=== | ===Creating the Mouse gestures actions group=== <!--T:26--> | ||
<!--T:27--> | |||
Right click on the left pane (in an empty area under the list of action groups) and choose <menuchoice>New Group</menuchoice>, rename that group to "Mouse Gestures" and check the checkbox attached to its name. | Right click on the left pane (in an empty area under the list of action groups) and choose <menuchoice>New Group</menuchoice>, rename that group to "Mouse Gestures" and check the checkbox attached to its name. | ||
===Creating a new mouse gesture=== | ===Creating a new mouse gesture=== <!--T:28--> | ||
<!--T:29--> | |||
From now on I will assume that the new group is called "Mouse Gestures". | From now on I will assume that the new group is called "Mouse Gestures". | ||
Right click on <menuchoice>Mouse Gestures</menuchoice> and choose <menuchoice>New -> Mouse Gesture Action</menuchoice> | Right click on <menuchoice>Mouse Gestures</menuchoice> and choose <menuchoice>New -> Mouse Gesture Action</menuchoice> | ||
| Line 80: | Line 99: | ||
using "Command/URL" or "D-Bus Command" you will need to create a gesture and bind an action to it. | using "Command/URL" or "D-Bus Command" you will need to create a gesture and bind an action to it. | ||
====To create the gesture==== | ====To create the gesture==== <!--T:30--> | ||
<!--T:31--> | |||
Click on your <menuchoice>New Action</menuchoice> and select the <menuchoice>Trigger</menuchoice> tab. | Click on your <menuchoice>New Action</menuchoice> and select the <menuchoice>Trigger</menuchoice> tab. | ||
in the bottom of the screen there is an <menuchoice>Edit</menuchoice> button (click it). In the box that just opened draw your gesture using the ''left'' mouse button. | in the bottom of the screen there is an <menuchoice>Edit</menuchoice> button (click it). In the box that just opened draw your gesture using the ''left'' mouse button. | ||
====To bind an action==== | ====To bind an action==== <!--T:32--> | ||
<!--T:33--> | |||
if you chose <menuchoice>Command/URL</menuchoice> simply enter that command/url under the <menuchoice>Action</menuchoice> tab at the <menuchoice>Command/URL</menuchoice> field. | if you chose <menuchoice>Command/URL</menuchoice> simply enter that command/url under the <menuchoice>Action</menuchoice> tab at the <menuchoice>Command/URL</menuchoice> field. | ||
===Examples using Command/URL=== | ===Examples using Command/URL=== <!--T:34--> | ||
====Close window==== | ====Close window==== <!--T:35--> | ||
<!--T:36--> | |||
This command will let you close the next window you mouse click on. | This command will let you close the next window you mouse click on. | ||
Note: wmctrl may not support your Window Manager. | Note: wmctrl may not support your Window Manager. | ||
<!--T:37--> | |||
{{Input|1=Command/URL: wmctrl -c :SELECT:}} | {{Input|1=Command/URL: wmctrl -c :SELECT:}} | ||
<!--T:38--> | |||
to close the active window | to close the active window | ||
<!--T:39--> | |||
{{Input|1=Command/URL: wmctrl -c :ACTIVE:}} | {{Input|1=Command/URL: wmctrl -c :ACTIVE:}} | ||
===Examples using D-Bus=== | ===Examples using D-Bus=== <!--T:40--> | ||
<!--T:41--> | |||
If you chose D-Bus, here are few examples. | If you chose D-Bus, here are few examples. | ||
<!--T:42--> | |||
Finding out what to fill where, is done with the help of the "Launch D-Bus Browser", using that browser you can find what method you wish to call in what application object. Using D-Bus we need to fill some fields, the field name will be regular and the content ''italic''. | Finding out what to fill where, is done with the help of the "Launch D-Bus Browser", using that browser you can find what method you wish to call in what application object. Using D-Bus we need to fill some fields, the field name will be regular and the content ''italic''. | ||
====Runner==== | ====Runner==== <!--T:43--> | ||
<!--T:44--> | |||
This will display the '''Runner''' dialog. | This will display the '''Runner''' dialog. | ||
<!--T:45--> | |||
Remote Application: ''org.kde.krunner'' | Remote Application: ''org.kde.krunner'' | ||
<!--T:46--> | |||
Remote Object: ''/App'' | Remote Object: ''/App'' | ||
<!--T:47--> | |||
Function: ''org.kde.krunner.App.display'' | Function: ''org.kde.krunner.App.display'' | ||
====Audacious next/previous/pause/play/stop/repeat track==== | ====Audacious next/previous/pause/play/stop/repeat track==== <!--T:48--> | ||
<!--T:49--> | |||
Remote Application: ''org.mpris.audacious'' | Remote Application: ''org.mpris.audacious'' | ||
<!--T:50--> | |||
Remote Object: ''/Player'' | Remote Object: ''/Player'' | ||
<!--T:51--> | |||
Function: ''org.freedesktop.MediaPlayer.'''Next''''' (replace Next with Prev/Pause/Stop/Play/Repeat) | Function: ''org.freedesktop.MediaPlayer.'''Next''''' (replace Next with Prev/Pause/Stop/Play/Repeat) | ||
====Audacious PlayPause track==== | ====Audacious PlayPause track==== <!--T:52--> | ||
<!--T:53--> | |||
If not playing will play, if playing will pause. | If not playing will play, if playing will pause. | ||
<!--T:54--> | |||
Remote Application: ''org.mpris.audacious'' | Remote Application: ''org.mpris.audacious'' | ||
<!--T:55--> | |||
Remote Object: ''/org/atheme/audacious'' | Remote Object: ''/org/atheme/audacious'' | ||
<!--T:56--> | |||
Function: ''org.atheme.audacious.PlayPause'' | Function: ''org.atheme.audacious.PlayPause'' | ||
====Klipper manually invoke action menu==== | ====Klipper manually invoke action menu==== <!--T:57--> | ||
<!--T:58--> | |||
display the actions pop-up. | display the actions pop-up. | ||
(I am using that to search and translate words) | (I am using that to search and translate words) | ||
<!--T:59--> | |||
Remote Application: ''org.kde.klipper'' | Remote Application: ''org.kde.klipper'' | ||
<!--T:60--> | |||
Remote Object: ''/klipper'' | Remote Object: ''/klipper'' | ||
<!--T:61--> | |||
Function: ''org.kde.klipper.klipper.showKlipperManuallyInvokeActionMenu''</translate> | Function: ''org.kde.klipper.klipper.showKlipperManuallyInvokeActionMenu''</translate> | ||
<translate> | <translate> | ||
<!--T:62--> | |||
[[Category:Desktop]] | [[Category:Desktop]] | ||
[[Category:System]] | [[Category:System]] | ||
</translate> | </translate> | ||
Revision as of 11:30, 7 September 2010
Template:I18n/Language Navigation Bar
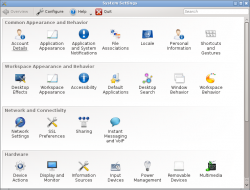
Control center for KDE software and workspaces.

Features
- Control Center for global KDE platform settings
- Customize and manage your desktop in one convenient location
- Search function helps narrow down probable settings
Search
System Settings has a search function to help in hunting down a setting. Simply type in a keyword in the Search field in the toolbar and System Settings will display modules that contain the keyword and hide those that don't. System Settings modules can also be reached through KRunner.
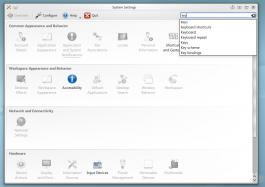
Searching for "key".

Categories
Common Appearance and Behavior
Account Details

Configure your user information, password and paths. You can also configure your Social Desktop providers. Application Appearance

Configure your applications style, colors, icons, fonts and emoticons.
Hardware
Input Devices

Configure your keyboard, mouse and joystick.
System Administration
Login Screen

Configure the login manager (KDM). Startup and Shutdown

Configure your system behavior when starting up or shutting down.
Mouse Gestures
- KDE SC version 4.4.4
The place where you start is ""
Enabling mouse gestures
In the bottom left corner of the window there is a button. Make sure that the checkbox is checked. Set the timout as you see fit. The mouse button might be different for you, I chose 3 for using the right mouse button. If you want input actions to be enabled automatically, check the "Start the input Actions daemon on login" above.
Creating the Mouse gestures actions group
Right click on the left pane (in an empty area under the list of action groups) and choose , rename that group to "Mouse Gestures" and check the checkbox attached to its name.
Creating a new mouse gesture
From now on I will assume that the new group is called "Mouse Gestures". Right click on and choose (here there are three options but I didn't manage to work with "Send Keyboard Input") using "Command/URL" or "D-Bus Command" you will need to create a gesture and bind an action to it.
To create the gesture
Click on your and select the tab. in the bottom of the screen there is an button (click it). In the box that just opened draw your gesture using the left mouse button.
To bind an action
if you chose simply enter that command/url under the tab at the field.
Examples using Command/URL
Close window
This command will let you close the next window you mouse click on. Note: wmctrl may not support your Window Manager.
Command/URL: wmctrl -c :SELECT:
to close the active window
Command/URL: wmctrl -c :ACTIVE:
Examples using D-Bus
If you chose D-Bus, here are few examples.
Finding out what to fill where, is done with the help of the "Launch D-Bus Browser", using that browser you can find what method you wish to call in what application object. Using D-Bus we need to fill some fields, the field name will be regular and the content italic.
Runner
This will display the Runner dialog.
Remote Application: org.kde.krunner
Remote Object: /App
Function: org.kde.krunner.App.display
Audacious next/previous/pause/play/stop/repeat track
Remote Application: org.mpris.audacious
Remote Object: /Player
Function: org.freedesktop.MediaPlayer.Next (replace Next with Prev/Pause/Stop/Play/Repeat)
Audacious PlayPause track
If not playing will play, if playing will pause.
Remote Application: org.mpris.audacious
Remote Object: /org/atheme/audacious
Function: org.atheme.audacious.PlayPause
display the actions pop-up. (I am using that to search and translate words)
Remote Application: org.kde.klipper
Remote Object: /klipper
Function: org.kde.klipper.klipper.showKlipperManuallyInvokeActionMenu