DigiKam/Leuchttisch
Durchsieben der Fotos mit dem Leuchttisch von digiKam
Veröffentlicht: 2011/02/02 | Author: Dmitri Popov
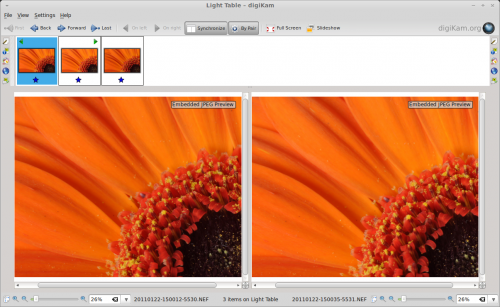
If you have a handful of storage cards in your photo bag, there is no need to worry about how many photos you can take before your digital camera runs out of memory. This means that you can easily take dozens of shots of the same subject trying different angles, composition, and lighting. But this also makes the task of picking the best photo from the batch a bit of a challenge. Fortunately, digiKam provides a simple yet efficient tool that can help you to compare and analyze multiple photos side by side and pick the one you like most. The name of this wonderful tool is Light Table, and you can evoke it by choosing from the main toolbar.

This opens an empty Light Table window, and you can add two or more photos by dragging them onto the thumbnail pane (called thumbbar in digiKam) of the window. Alternatively, you can select the photos in an album and use the Ctrl + L keyboard shortcut or the command to add the selected photos to a new Light Table window. You can then add more photos to the current Light Table window by selecting them in an album and choosing the command or using the Ctrl + Shift + L keyboard shortcut.
Using Light Table is rather straightforward. If you have added only a pair of photos to the Light Table window, they will be displayed side by side, making it easier for you to examine and compare photos. Press the button, and Light Table will keep both photos in sync. So when you zoom in and out or drag one photo, these actions are automatically applied to the other photo, too. You can reorder the photos in the Light Table window using the and buttons. And if you have more than two photos in the Light Table window, you can view them by pairs by clicking the button.
Find more tutorials like this by clicking on the Photography link below.
