KWord/1.5/Manual/FrameProps
Setting the Properties for a Frame
Mike McBride
For each frame in your document, you can determine:
- how KWord handles full text frames
- how text wraps around or through overlapping frames
- the exact size of the frame
- establish margins within a frame.
- set a background color and pattern for the frame.
All of these options can be altered using a set of dialog boxes, or by using a previously defined framestyle.
A framestyle is a predefined set of frameset formatting options which is given a name. Once a frameset has been assigned a framestyle, any changes made to the framestyle will be reflected in all framesets which are assigned that framestyle.
- You may be noticing that framestyles function in a way similar to text styles. The main difference, is framestyles control the look of the frame, and textstyles control the look of paragraphs within the frame.
Using the frame settings dialogs
All of these settings can be determined in the Frame Properties dialog box.
In order to adjust the properties of any frame, you must first select the frame you want to change.
Simply click once on the frame border of the frame you want to edit. (Or by holding down the Ctrl key and clicking inside the frame with the left mouse button.)
You edit the properties of a frameset using a set of dialogs which you can open one of two ways:
- Select Frames->Frame/Frameset Properties from the menubar.
- Place the mouse pointer on the border of the frame, and click once with the right mouse button. A small menu will appear. Select Frame/Frameset Properties....
The Properties dialog consists of one dialog box, with six index tabs labeled Options, Text Run Around, Connect Text Frames, Geometry, Background and Borders.
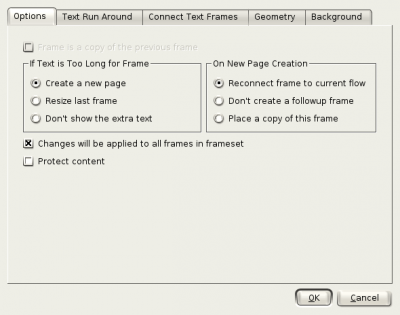
The tab labeled Options is used to determine how KWord behaves when there is too much text to fit within the current bounds of the frame.
KWord has three solutions to this situation:
Create a new page
- When a frame becomes full, KWord automatically creates a new page. On this new page, it may create a new frame, of the same size and position, if you choose.
Resize last frame
- When a frame becomes full, KWord automatically extends the bottom border of the text frame to accommodate the new text. It will continue to expand as new text is added. Conversely, it will shrink again if text is removed from the frame.
Don't show the extra text
- KWord does not create a new frame or change the current frame in any way. You will need to manually resize the current frame, or add a new frame to the frame set.
Simply make your selection in the section labeled If Text is Too Long for Frame.
In the section entitled On New Page Creation, you have three options available. You must select one.
Reconnect frame to current flow
- Create a new frame, the same size and shape on a new page, and make it the last frame in the frameset.
Do not create a followup frame
- Creates a new page, but not a new frame.
Place a copy of this frame
- Creates a new page, with a new frame the same size, shape and position on the page. Additionally, KWord copies the contents of the frame from the previous page.
- This is useful for title frames, headers and footer frames. Each page will have an automatic copy of this information on any new pages.
If you place a mark in the check box labeled Changes will be applied to all frames in frameset, then any changes made in the frame properties dialog box will automatically be applied to all frames within the frameset.
If you place a mark in the check box labeled Protect content, KWord will not allow any changes to the text within the frame, or the formatting of the text within the frameset.
- You can still reshape or even delete the frame, but the content within the frame is locked. To lock the location and size of the frame, see the Geometry tab.
To make changes to the text, you need to remove the mark from Protect content.
Text Flow around frames
To adjust how text flows around overlapping frames, click the tab labeled Text Run Around.
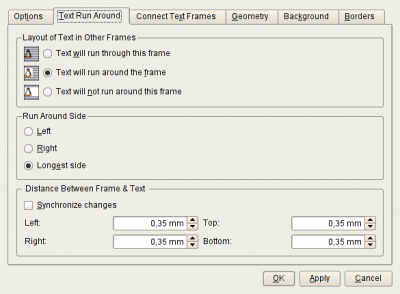
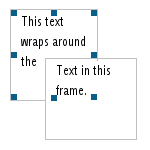
When you overlay two text frames, and text from both frames is competing for the same space on the page, KWord can (at your option), make sure that text from two frames does not overlap.
As you can see from the options in the dialog box, there are three possible choices.
Text will run through this frame
- By selecting this option, KWord will ignore this frame when it displays the text in overlapping frames.
Text will run around the frame
- By selecting this option, KWord will wrap the text of overlapping frames around this frame.
- If this option is selected, you can determine which side the text runs around in the section labeled Run Around Side. Simply choose Left, Right, or Longest side.
Text will not run around this frame
- By selecting this option, KWord will not wrap any text around the edges of this frame, but instead, will skip down below this frame before continuing to display text in overlapping frames.
You can also determine how close your frames appear by setting the Distance Between Frame & Text in the spin boxes provided. If you place a mark in the checkbox labeled Synchronize changes KWord will make all distances equal. Move a frame to a new frameset
You can change which frameset the current frame belongs to by selecting the Connect Text Frames tab.
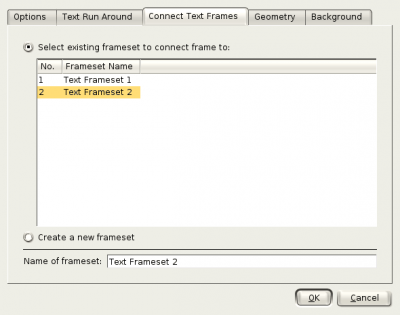
This dialog gives you the option to create a new frameset for the current frame or move the selected frame to a current frameset.
Select Select existing frameset to connect frame to:, to add the current frame to a previously created frameset. Choose one of the framesets listed in the table below to specify which frameset.
To create a new frameset, select Create a new frameset: and type the name of the new frameset in the text box labeled Name of frameset. KWord will create a new frameset with the current frame as the only frame in the frameset (for now).
- It is helpful to name your framesets with descriptive names. Name the frameset with a description of the contents so that you can quickly refer to it again later.
Frame size and position
You can adjust the size and position of your frame by clicking on the tab labeled 'Geometry.
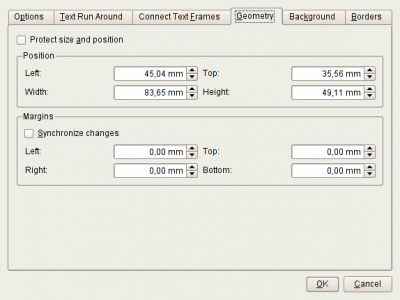
This dialog box allows you to specify exactly where the frame goes and how large it is.
If you put a mark in the check box labeled Protect size and position, the frame size and position will be fixed at their current location. You will not be able to move the frame on the page until this box is unchecked.
Determine Size and Position
You can locate your frame on the page by first entering the Left: and Top:' measurements. This determines where the top left corner of the frame will be. All measurements are from the top left corner of the page.
You can also determine the exact size of the frame by entering its Height: and Width: in the text boxes provided. These two measurements are relative to the top left corner of the frame you specified above. not to the size of the page.
Determine Margins in the Frame
Using the boxes labeled Left:, Right:, Top: and Bottom:, you can establish margins within the frame. This should not be confused with margins for the page, which are defined in the page properties dialog box.
- If the Synchronize changes check box has a mark in it, KWord will take any changes you make to one margin, and automatically apply them to the other 3 margins.
- In other words, if this check box is selected, and you enter a margin of 1 cm in any of the 4 margin boxes, all 4 frame margins will now become 1 cm in size.
- If this option is off, each text box can be given a different value.
Frame Background
You can adjust the background color of the text frame by selecting the Background tab.
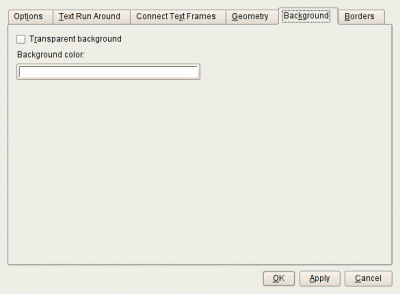
Select the color of the background by clicking on the button labeled Background color:. The color is selected using the Color selection dialog.
Frame Borders
You can change the borders of the text frame by selecting the Borders tab.
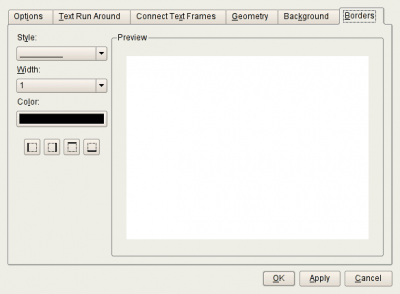
Select the Style: and Width: of the borders with the two drop down boxes on the left side of the dialog.
Select the color of the borders by clicking on the button labeled Color:. The color is selected using the Color selection dialog.
Use the four icons (Border Left, Border Right, Border Top and Border Bottom) below the Color button to determine on which side of the frame you want to have a border.
A Preview of the selected settings is shown on the right side of the dialog.
Click OK to accept all of your changes and to close the dialog box.
Click Apply to accept all of your changes without closing the dialog box.
Click Cancel to forget all of your changes.
Using frame styles
Formatting a frame with a framestyle
To format a frame using a predefined framestyle simply:
Select the frame(s) by holding down Ctrl and clicking within the frame with the left mouse button.
Select Frames->Framestyle from the menubar. A submenu will appear, listing all the currently defined framestyles. Select the name of the framestyle you want and all selected frames will automatically be formatting using the options of that framestyle.
Editing a framestyle
To change the options of a framestyle, you will need to use the framestyle manager.
Select Frames->Frame Style Manager... from the menubar. A dialog box will appear.
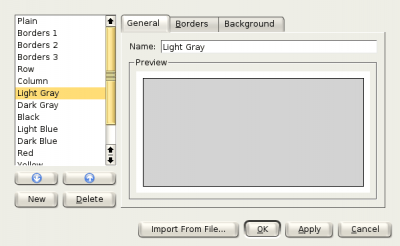
All of the currently defined framestyles are listed in the listbox on the left. The currently selected framestyle is highlighted, and the name of the currently selected framestyle is listed in the text box labeled Name. (In this example, the currently selected framestyle is Light Gray.)
Select the framestyle you want to change by clicking on the name of the framestyle in the listbox on the left.
There are three tabs in on the right side of the dialog box: General, Borders and Background
In the General tab, you can change the name of the liststyle by typing the new name in the text box labeled Name. You can also see a preview of what your frame will look like in the preview box.
The Borders tab works the same as the tab of the same name when formatting a paragraph. For more specific information click here.
The Background tab operates identically to the same tab when formatting a frame. Click here for more specific instructions.
Once all changes have been made, click OK to save your changes. All of the affected framesets will be changed to reflect the new options.
Creating a new framestyle
To create a new framestyle, select Frames->Frame Style Manager... from the menubar. A dialog box will appear.

Select a framestyle from the list at the left which most closely matches your new desired framestyle by clicking on the name with the left mouse button. The selected framestyle will be used as a template for the new framestyle.
Click on the New button. KWord will generate a new framestyle, which is a copy of the previously selected framestyle.
Choose a name for your new framestyle, and type it in the text box labeled Name.
You can now change your frame border and background options. For details, see Editing a framestyle.
When you are finished creating your framestyle, click OK, and your framestyle is saved.
- Framestyles are specific for each document. A framestyle created in one document can not be used in another document unless you import the framestyle from that document.
Deleting a framestyle
To delete frames, select Frames->Frame Style Manager... from the menubar. A dialog box will appear.

Select the framestyle you want to delete by clicking once with the left mouse button in the list on the left.
Click on the Delete button.
- KWord will not allow you to delete the Plain framestyle.
Changing the order of the framestyles in the list
To change the order that the framestyles are listed, select Frames->Frame Style Manager... from the menubar. A dialog box will appear.

The order the framestyles are listed in the menu is determined by the order of the framestyles in the list on the left.
Select the framestyle you want to move from the list at the left by clicking once with the left mouse button.
Now click on the up and down arrows located at the bottom of the list of framestyles. This will move the selected framestyle up or down in the list of framestyles.
When you are satisfied with the order of the list, select OK.
Importing a framestyle from another KWord file
To import a framestyle from another KWord file, select Frames->Frame Style Manager... from the menubar. A dialog box will appear.

Click the button labeled Import From File... to open the file selection dialog. Choose your file, and click OK.
A new dialog box will appear listing all available framestyles for importing.
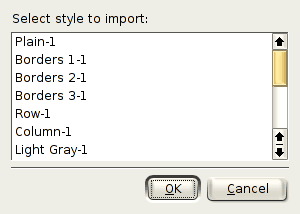
- If KWord encounters a duplicate framestyle name in the selected file, it will append a number to the end of the framestyle name to identify the imported style.
- As an example, if you import the Plain framestyle from another KWord file, KWord will change the name to Plain-1.
Select all the framestyles you want to import. Then click OK.
The framestyles will now appear at the bottom of your list of framestyles. Click OK to save the framestyles to the new document.
| Prev | Contents | Next |
| Working with Frames | Formatting Paragraphs |

