Adding an entry to the Create New menu: Difference between revisions
mNo edit summary |
formatting tweeks |
||
| (2 intermediate revisions by one other user not shown) | |||
| Line 2: | Line 2: | ||
<translate> | <translate> | ||
<!--T:1--> | |||
{|class="tablecenter vertical-centered" | {|class="tablecenter vertical-centered" | ||
|[[Image:CustomCreateNewMenuEntry.png|300px]] | |[[Image:CustomCreateNewMenuEntry.png|300px]] | ||
|Tutorial that describes how to add an entry to the | |Tutorial that describes how to add an entry to the <menuchoice>Create New</menuchoice> menu of file browsers such as [[Special:myLanguage/Dolphin|Dolphin]] or [[Special:myLanguage/Konqueror|Konqueror]] | ||
|} | |} | ||
The entries of the | <!--T:2--> | ||
The entries of the <menuchoice>Create New</menuchoice> menu are called ''templates''. They are defined either system-wide, in {{Path|/usr/share/templates}}, or only for the current user, in {{Path|~/.kde4/share/templates}}. In this tutorial we are going to add a new template to {{Path|~/.kde4/share/templates}}. | |||
== Defining the metadata == | == Defining the metadata == <!--T:3--> | ||
<!--T:4--> | |||
Create a {{Path|templates}} folder in {{Path|~/.kde4/share}} if such a folder does not exist already, and enter the {{Path|templates}} folder. | Create a {{Path|templates}} folder in {{Path|~/.kde4/share}} if such a folder does not exist already, and enter the {{Path|templates}} folder. | ||
<!--T:5--> | |||
In this folder, create a new file with {{Path|.desktop}} as file extension. For example: {{Path|custom-file.desktop}}. | In this folder, create a new file with {{Path|.desktop}} as file extension. For example: {{Path|custom-file.desktop}}. | ||
<!--T:6--> | |||
Open this new file and paste the following content inside it: | Open this new file and paste the following content inside it: | ||
<!--T:7--> | |||
<source lang="ini"> | <source lang="ini"> | ||
[Desktop Entry] | [Desktop Entry] | ||
| Line 26: | Line 32: | ||
</source> | </source> | ||
<!--T:8--> | |||
Fill these fields as follows: | Fill these fields as follows: | ||
* '''Name''' is the text that appears in the | * '''Name''' is the text that appears in the <menuchoice>Create New</menuchoice> menu. | ||
*: [[Image:CustomCreateNewMenuEntry.png]] | *: [[Image:CustomCreateNewMenuEntry.png]] | ||
*: "Custom Entry" is the value of the '''Name''' field. | *: "Custom Entry" is the value of the '''Name''' field. | ||
* '''Comment''' is the label for the new name of files of this type. When you select your custom entry in the | <!--T:9--> | ||
* '''Comment''' is the label for the new name of files of this type. When you select your custom entry in the <menuchoice>Create New</menuchoice> menu, a dialog shows up asking you for the name of your new file, and this text is the label of the field where you enter this new name. | |||
*: [[Image:CustomCreateNewMenuEntryComment.png]] | *: [[Image:CustomCreateNewMenuEntryComment.png]] | ||
*: "New custom entry:" is the value of the '''Comment''' field. | *: "New custom entry:" is the value of the '''Comment''' field. | ||
<!--T:10--> | |||
* '''URL''' is the path to a file containing the initial content that new files of this type have. These files with the initial content are usually located within the hidden {{Path|.source}} folder of the {{Path|templates}} folder, so use a relative path that starts with {{Path|.source/}}, such as {{Path|.source/custom-entry.txt}}. | * '''URL''' is the path to a file containing the initial content that new files of this type have. These files with the initial content are usually located within the hidden {{Path|.source}} folder of the {{Path|templates}} folder, so use a relative path that starts with {{Path|.source/}}, such as {{Path|.source/custom-entry.txt}}. | ||
* '''Icon''' is the code of the icon that appears in the | <!--T:11--> | ||
* '''Icon''' is the code of the icon that appears in the <menuchoice>Create New</menuchoice> menu for your custom entry. The code is the filename of the icon to use. You can browse MIME type icon files at {{Path|/usr/share/icons/<theme>/<size>/mimetypes/}}. For example, to use {{Path|/usr/share/icons/<theme>/<size>/mimetypes/application-vnd.oasis.opendocument.text.png}}, fill '''Icon''' with "application-vnd.oasis.opendocument.text". | |||
<!--T:12--> | |||
This is an example of a filled {{Path|.desktop}} file: | This is an example of a filled {{Path|.desktop}} file: | ||
<!--T:13--> | |||
<source lang="ini"> | <source lang="ini"> | ||
[Desktop Entry] | [Desktop Entry] | ||
| Line 50: | Line 62: | ||
</source> | </source> | ||
=== Translating the Name and Comment === | === Translating the Name and Comment === <!--T:14--> | ||
<!--T:15--> | |||
The '''Name''' and '''Comment''' fields can be translated to any language. To provide a translation, include a new field in your {{Path|.desktop}} file with the form "Field[language code]=Value" for each language that you want to support. For example: | The '''Name''' and '''Comment''' fields can be translated to any language. To provide a translation, include a new field in your {{Path|.desktop}} file with the form "Field[language code]=Value" for each language that you want to support. For example: | ||
<!--T:16--> | |||
<source lang="ini"> | <source lang="ini"> | ||
[Desktop Entry] | [Desktop Entry] | ||
| Line 61: | Line 75: | ||
</source> | </source> | ||
== Defining the content == | == Defining the content == <!--T:17--> | ||
<!--T:18--> | |||
Create a {{Path|.source}} folder in {{Path|~/.kde4/share/templates}} if such a folder does not exist already, and enter the hidden {{Path|.source}} folder. | Create a {{Path|.source}} folder in {{Path|~/.kde4/share/templates}} if such a folder does not exist already, and enter the hidden {{Path|.source}} folder. | ||
<!--T:19--> | |||
Create a new file with the same filename that you defined in the '''URL''' field of the metadata of your new entry, and fill the file with the default content that you want for new files created with your new entry. | Create a new file with the same filename that you defined in the '''URL''' field of the metadata of your new entry, and fill the file with the default content that you want for new files created with your new entry. | ||
<!--T:20--> | |||
[[Category:Tutorials]] | [[Category:Tutorials]] | ||
</translate> | </translate> | ||
Latest revision as of 05:28, 20 October 2014

|
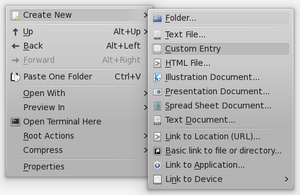
Tutorial that describes how to add an entry to the menu of file browsers such as Dolphin or Konqueror |
The entries of the menu are called templates. They are defined either system-wide, in /usr/share/templates, or only for the current user, in ~/.kde4/share/templates. In this tutorial we are going to add a new template to ~/.kde4/share/templates.
Defining the metadata
Create a templates folder in ~/.kde4/share if such a folder does not exist already, and enter the templates folder.
In this folder, create a new file with .desktop as file extension. For example: custom-file.desktop.
Open this new file and paste the following content inside it:
[Desktop Entry]
Name=
Comment=
Type=Link
URL=
Icon=
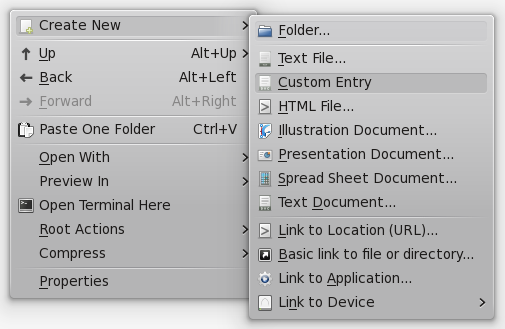
Fill these fields as follows:
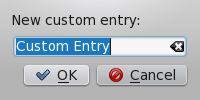
- Comment is the label for the new name of files of this type. When you select your custom entry in the menu, a dialog shows up asking you for the name of your new file, and this text is the label of the field where you enter this new name.
- URL is the path to a file containing the initial content that new files of this type have. These files with the initial content are usually located within the hidden .source folder of the templates folder, so use a relative path that starts with .source/, such as .source/custom-entry.txt.
- Icon is the code of the icon that appears in the menu for your custom entry. The code is the filename of the icon to use. You can browse MIME type icon files at /usr/share/icons/<theme>/<size>/mimetypes/. For example, to use /usr/share/icons/<theme>/<size>/mimetypes/application-vnd.oasis.opendocument.text.png, fill Icon with "application-vnd.oasis.opendocument.text".
This is an example of a filled .desktop file:
[Desktop Entry]
Name=Custom Entry
Comment=New custom entry:
Type=Link
URL=.source/custom-entry.txt
Icon=application-vnd.oasis.opendocument.text
Translating the Name and Comment
The Name and Comment fields can be translated to any language. To provide a translation, include a new field in your .desktop file with the form "Field[language code]=Value" for each language that you want to support. For example:
[Desktop Entry]
Name=Custom Entry
Name[ca]=Entrada personalitzada
Name[gl]=Entrada personalizada
Defining the content
Create a .source folder in ~/.kde4/share/templates if such a folder does not exist already, and enter the hidden .source folder.
Create a new file with the same filename that you defined in the URL field of the metadata of your new entry, and fill the file with the default content that you want for new files created with your new entry.


