Digikam/LightTable/uk: Difference between revisions
Created page with "Якщо у вашому рюкзаку цілі поклади карток пам’яті, вам не потрібно перейматися тим, скільки знім..." |
Created page with "У відповідь на вибір цього пункту меню буде відкрито додаткове вікно, куди ви зможете додати пере..." |
||
| Line 7: | Line 7: | ||
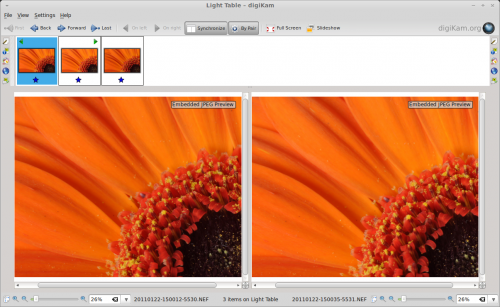
[[File:Digikam_lighttable.png|center|thumb|500px]] | [[File:Digikam_lighttable.png|center|thumb|500px]] | ||
У відповідь на вибір цього пункту меню буде відкрито додаткове вікно, куди ви зможете додати перетягуванням дві або декілька фотографій з панелі мініатюр digiKam. Крім того, ви можете просто позначити фотографії у альбомі і натиснути комбінацію клавіш <keycap>Ctrl + L</keycap> або скористатися пунктом меню <menuchoice>Зображення -> Покласти на стіл з підсвічуванням</menuchoice>, щоб додати позначені фотографії у нове вікно «Стола з підсвічуванням». Після відкриття вікна ви зможете додати у нього фотографії позначенням їх пунктів у вікні альбому з наступним вибором пункту меню <menuchoice>Зображення -> Додати на стіл з підсвічуванням</menuchoice> або натисканням комбінації клавіш <keycap>Ctrl + Shift + L</keycap>. | |||
Using Light Table is rather straightforward. If you have added only a pair of photos to the Light Table window, they will be displayed side by side, making it easier for you to examine and compare photos. Press the <menuchoice>Synchronize</menuchoice> button, and Light Table will keep both photos in sync. So when you zoom in and out or drag one photo, these actions are automatically applied to the other photo, too. You can reorder the photos in the Light Table window using the <menuchoice>On left</menuchoice> and <menuchoice>On right</menuchoice> buttons. And if you have more than two photos in the Light Table window, you can view them by pairs by clicking the <menuchoice>By Pair</menuchoice> button. | Using Light Table is rather straightforward. If you have added only a pair of photos to the Light Table window, they will be displayed side by side, making it easier for you to examine and compare photos. Press the <menuchoice>Synchronize</menuchoice> button, and Light Table will keep both photos in sync. So when you zoom in and out or drag one photo, these actions are automatically applied to the other photo, too. You can reorder the photos in the Light Table window using the <menuchoice>On left</menuchoice> and <menuchoice>On right</menuchoice> buttons. And if you have more than two photos in the Light Table window, you can view them by pairs by clicking the <menuchoice>By Pair</menuchoice> button. | ||
Revision as of 18:19, 14 February 2011
Просіювання фотографій за допомогою інструменту «Стіл з підсвічуванням» digiKam
Надіслано: 2 лютого 2011 року | Автор: Дмітрій Попов (Dmitri Popov)
Якщо у вашому рюкзаку цілі поклади карток пам’яті, вам не потрібно перейматися тим, скільки знімків ви зможете зробити до вичерпання місця на картці пам’яті вашого цифрового фотоапарата. Це означає, ви можете робити десятки знімків одного об’єкта, намагаючись підібрати потрібний кут, композицію та умови освітлення. Але значна кількість знімків робить складнішим процес вибору потрібного знімка з набору. На щастя, у digiKam передбачено простий, але ефективний інструмент, який може допомогти вам у порівнянні та аналізі набору фотографій: ви зможете бачити знімки поруч один з одним і вибирати з них найкращий. Називається цей чудовий інструмент Стіл з підсвічуванням, ви можете відкрити його вікно за допомогою пункту меню головного вікна програми.

У відповідь на вибір цього пункту меню буде відкрито додаткове вікно, куди ви зможете додати перетягуванням дві або декілька фотографій з панелі мініатюр digiKam. Крім того, ви можете просто позначити фотографії у альбомі і натиснути комбінацію клавіш Ctrl + L або скористатися пунктом меню , щоб додати позначені фотографії у нове вікно «Стола з підсвічуванням». Після відкриття вікна ви зможете додати у нього фотографії позначенням їх пунктів у вікні альбому з наступним вибором пункту меню або натисканням комбінації клавіш Ctrl + Shift + L.
Using Light Table is rather straightforward. If you have added only a pair of photos to the Light Table window, they will be displayed side by side, making it easier for you to examine and compare photos. Press the button, and Light Table will keep both photos in sync. So when you zoom in and out or drag one photo, these actions are automatically applied to the other photo, too. You can reorder the photos in the Light Table window using the and buttons. And if you have more than two photos in the Light Table window, you can view them by pairs by clicking the button.
Find more tutorials like this by clicking on the Photography link below.
