Tutorials/Shared Database/da: Difference between revisions
Importing a new version from external source |
Importing a new version from external source |
||
| Line 11: | Line 11: | ||
==== Installation ==== | ==== Installation ==== | ||
Først skal vi installere serveren mysql. Linux-brugere vil nok foretrække at installere en pakke fra deres distribution; andre kan hente den fra [https://www.mysql.com/ MySQL's hjemmeside]. Instruktioner om, hvordan man starter MySQL under maskinopstart er distributionsafhængig, men da MySQL er en populær pakke, så skulle de ikke være svære at finde. Under installationen vil du nok blive bedt om at angive en root-adgangskode. Vælg en sikker adgangskode og husk den; denne konto skal ikke bruges at skrivebordsprogrammerne, kun til databaseadministration. | |||
==== Configuration ==== | ==== Configuration ==== | ||
Revision as of 17:55, 16 September 2011
Delt database
Flere af KDE's skrivebordsprogrammer bruger en eller anden slags database. De mest populære er nok musikafspilleren Amarok, fotomanageren digiKam' og Amarok, som håndterer personlige informationer. For at forenkle installationen og begrænse programmernes afhængigheder udgives hvert af disse programmer med sin egen database, i de fleste tilfælde ved brug af SQLite. De mange særskilte databaser skaber unødvendige gentagelser og gør det vanskeligt at lave backup af dine data.
Databaseserver
Den eneste database, som understøttes af alle disse programmer er MySQL, så den vilvi bruge. Den er også meget let at konfigurere, enten på kommandolinjen eller med grafiske værktøjer.
Installation
Først skal vi installere serveren mysql. Linux-brugere vil nok foretrække at installere en pakke fra deres distribution; andre kan hente den fra MySQL's hjemmeside. Instruktioner om, hvordan man starter MySQL under maskinopstart er distributionsafhængig, men da MySQL er en populær pakke, så skulle de ikke være svære at finde. Under installationen vil du nok blive bedt om at angive en root-adgangskode. Vælg en sikker adgangskode og husk den; denne konto skal ikke bruges at skrivebordsprogrammerne, kun til databaseadministration.
Configuration
For the server configuration, this we will assume that your database server is not used over the network, contains no sensitive data, and that you trust your applications. If you plan to use this database for Akonadi data, it's best if you copy the configuration file from the Akonadi code repository, which can be downloaded at here. Make a copy of your existing /etc/mysql/my.cnf, then replace it with the downloaded file.
Creating the databases
The first thing we have to do once MySQL is installed and running is add a separate database for each program. I generally name them after the programs that use them. This can be done with either GUI administration tools, but since we only have to do it once it's probably faster to write a few commands:
$ mysql -u root -p
At the password prompt, type in the root password set when installing MySQL. Now we can start creating databases. For example, to create a database named 'amarok', type in this command:
mysql> create database amarok;
Amarok
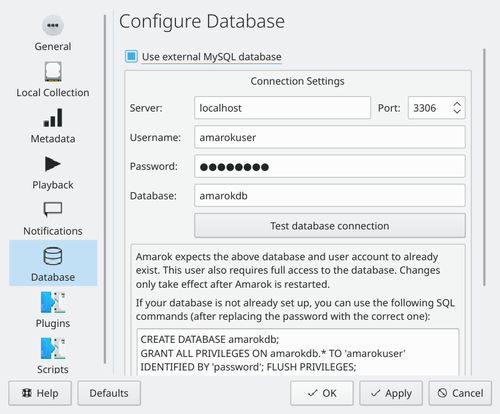
Amarok requires very little configuration, but it doesn't provide a way to migrate your old database. Go to and go to the tab.
Fill in localhost as the server address, 3306 as the port, and amarok as the database name.

digiKam
digiKam is somewhat special because it requires two databases: one for the images metadata, and one for thumbnails. Their names are not important, I chose to call them digikam and digikam_thumb:
mysql> create database digikam;
mysql> create database digikam_thumb;
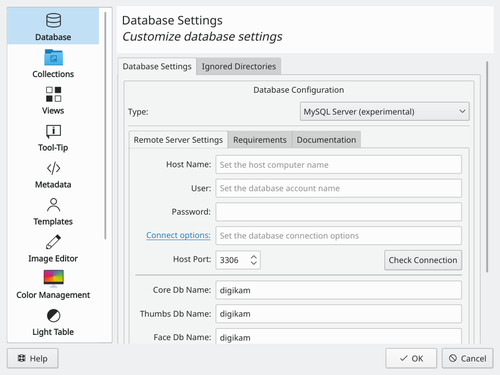
In digiKam, the process is very similar to that of Amarok. The settings are located in .

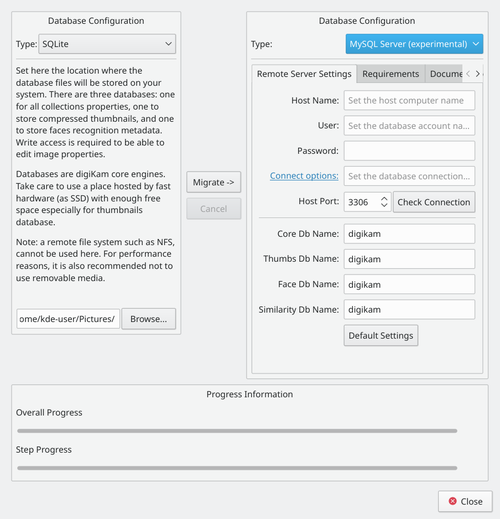
digiKam also comes with a handy database migration tool, available in . Fill in your previous database settings (you don't have to do anything if you haven't changed these options) on the left side and your new settings on the right side, then click .

Akonadi
First create a database for akonadi:
mysql -u root -p
create database akonadi;
Akonadi is not supposed to be a user-facing tool, so there is no configuration GUI for it. However, you can edit
~/.config/akonadi/akonadiserverrc to have these contents:
[%General]
Driver=QMYSQL

[QMYSQL]
Name=akonadi
Host=localhost
StartServer=false
Options=
ServerPath=/usr/bin/mysqld
Save the file, then log out and log in back again.


