KWord/1.5/Manual/Formatting: Difference between revisions
No edit summary |
Thiagosueto (talk | contribs) Propose deletion |
||
| Line 1: | Line 1: | ||
{{Proposed_deletion|reason=KWord has been superseded by Calligra Words.}} | |||
=Detailed Guides: Document Layout= | =Detailed Guides: Document Layout= | ||
This section of the guide is designed to help the user with the format and layout of their documents. The section will begin with information on changing the size and shape of the page and the margins, and work progressively through smaller and smaller blocks of text (frames, then paragraphs, then characters). At each level, all of the format and layout options will be explained. | This section of the guide is designed to help the user with the format and layout of their documents. The section will begin with information on changing the size and shape of the page and the margins, and work progressively through smaller and smaller blocks of text (frames, then paragraphs, then characters). At each level, all of the format and layout options will be explained. | ||
Latest revision as of 17:31, 26 February 2024
Detailed Guides: Document Layout
This section of the guide is designed to help the user with the format and layout of their documents. The section will begin with information on changing the size and shape of the page and the margins, and work progressively through smaller and smaller blocks of text (frames, then paragraphs, then characters). At each level, all of the format and layout options will be explained.
After discussing the formatting of individual characters, the manual will elaborate on styles (to provide consistent formatting through the document), lists, multi-column documents, tables and finally the use of headers and footers in a document.
The final part will show you how to save a document as a template for future documents.
Formatting the Page
Mike McBride
Before delving into the specifics of formatting a page in KWord, remember that KWord has two separate types of documents: Text Oriented and Page Layout. Please review The difference between Text Oriented and Page Layout Documents, if the differences are still unclear.
This section of the manual is divided into two sub-parts, one for Text Oriented, the other for Page Layout.
Formatting the Page (Text Oriented Document)
When you are working with a Text Oriented Document, you control the size and shape of the main frame by setting the paper size and the margins.
Formatting the page is usually done by selecting: Format->Page Layout... from the menubar.
- You can also go straight to the Page Layout options by selecting the main frame of the document and then double clicking on either of the rulers.
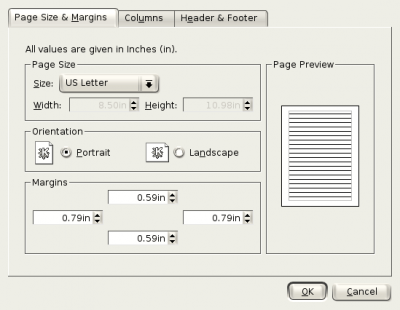
A dialog box will appear with three tabs, labeled Page Size & Margins, Columns and Header & and Footer.
The Page Size & Margins tab is for altering the paper size, and changing the margins.

First you will notice, that a preview box appears on the right half of this dialog. This will approximate the final look of your document. It is updated with each change, and should be used as a guide for your changes.
On the left, the dialog displays the current unit of measurement. This unit of measurement is the same unit of measurement you use for your document rulers. (In this example, we are using inches.) To change the units, follow the instructions in the section entitled Using Rulers.
The dialog section labeled Page Size is used to specify the paper size for the document.
KWord includes many predefined paper sizes. Select the appropriate paper size with the drop down box labeled Size.
In addition to standard paper sizes, there are two selections that deserve special mention.
Screen
- This format is used to generate a document where each page has an aspect ratio (shape) which matches the aspect ratios of computer monitors. This might be useful for documents which will never be printed, but will appear only on a computer screen.
Custom
- You can select this option to specify a unique paper size.
- Once selected, two text entry boxes (labeled Width: and Height:) become active. Enter the height and width of your desired paper size in these text boxes.
Below the page size, are two radio boxes in the section labeled Orientation you can select either Portrait or Landscape layout for your document.
Below the page orientation, is the Margins subsection, which consists of 4 spin boxes.
The Margins define the white-space surrounding the text in your main frame. You can enter any number from 0 to the maximum size of the page in these boxes. The units are the same for all four boxes, and is the same as the measurement listed at the top of the dialog.
Clicking on the Columns tab allows you to change the number of columns on each page. Details on multi-column documents can be found here.
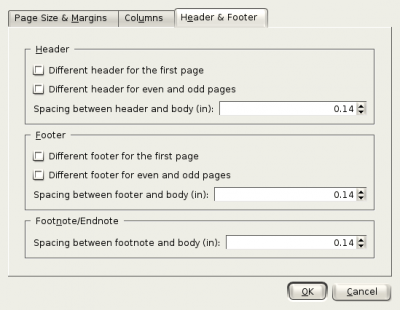
Clicking on the Header & Footer tab allows the user to specify header and footer information.

This dialog can be broken into two major sections.
If you are not familiar with Headers and Footers yet, you should first read the section entitled Headers/Footers.
Headers
This section lets you determine the placement of headers, and which pages have which headers on them.
If you place a mark in front of Different header for the first page, you will be able to specify a different format for the header on the first page.
If you place a mark in front of Different header for even and odd pages, the even pages will use one header, the odd pages use another header.
- You can use this to ensure the page numbers are always on the outside of the page, or to list the title of the document on odd pages and the chapter number on the even pages.
In the spin box labeled Spacing between header and body:, you can specify how much empty space should be placed between the bottom of the header, and the top of the main frame.
Footers
This section lets you determine the placement of footers, and which pages have which footers on them.
If you place a mark in front of Different footer for the first page, you will be able to specify a different format for the footer on the first page.
If you place a mark in front of Different footer for even and odd pages, the even pages will use one footer, the odd pages use another footer.
In the spin box labeled Spacing between footer and body:, you can specify how much empty space should be placed between the top of the footer, and the bottom of the main frame.
Footnote/Endnote
The bottom spin box is labeled Spacing between footnote and body:. As the label suggests, you can use this text box to specify the distance between the bottom edge of the main frame, and the top edge of the footnotes. For more information on footnotes, see the section entitled [[KWord/1.5/Manual/Footnotes_and_Endnotes|Footnotes and Endnotes.
When you are satisfied with the changes you are ready to make, click OK.
If you click Cancel, all your changes will be ignored.
Formatting the Page (Page Layout Document)
When you are working with a Page Layout Document, you control the size and shape of all the frames individually.
Formatting the page is usually done by selecting: Format->Page Layout... from the menubar.
- You can also go straight to the Page Layout options by double clicking on either of the rulers.
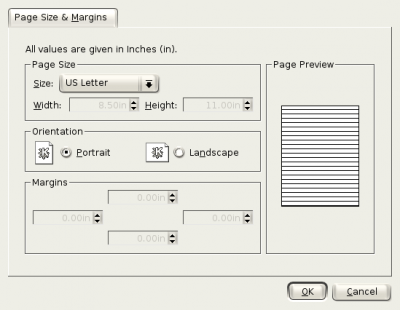
A dialog box will appear.
The Page Size & Margins tab is for altering the paper size, and changing the margins.

First you will notice, that a preview box appears on the right half of this dialog. This will approximate the final look of your document. It is updated with each change, and should be used as a guide for your changes.
On the left, the dialog displays the current unit of measurement. This unit of measurement is the same unit of measurement you use for your document rulers. (In this example, we are using inches.) To change the units, follow the instructions in the section entitled Using Rulers.
The dialog section labeled Page Size is used to specify the paper size for the document.
KWord includes many predefined paper sizes. Select the appropriate paper size with the drop down box labeled Size.
In addition to standard paper sizes, there are two selections that deserve special mention.
Screen
- This format is used to generate a document where each page has an aspect ratio (shape) which matches the aspect ratios of computer monitors. This might be useful for documents which will never be printed, but will appear only on a computer screen.
Custom
- You can select this option to specify a unique paper size.
- Once selected, two text entry boxes (labeled Width: and Height:) become active. Enter the height and width of your desired paper size in these text boxes.
Next to the paper format, in the section labeled Orientation you can select either Portrait or Landscape layout for your document.
Below the page format options, is the Margins subsection, which consists of 4 entry boxes. All options in this subsection are disabled in Page Oriented documents.
| Prev | Contents | Next |
| Autocompletion | Working with Frames |

