Kmail/Backup-funktioner
Backup-funktioner
KDE's e-mail-program KMail har forskellige backup-funktioner.
Arkivering
Eller vælg i kontekstmenuen, som dukker op ved klik med højre museknap. Dette vil åbne en dialog, som lader dig oprette et enkelt arkiv af den aktuelt markerede mappe. Arkivets filnavn vil bestå af præfikset Archive_, stien til den markerede mappe i KMails mappeliste, datoen i formatet år-måned-dag og den valgte filendelse, fx Archive_Local Folder_inbox_2013-09-03.tar.bz2.
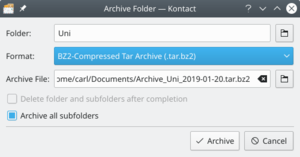
Tekstfeltet Mappe: viser den aktuelt markerede mappe; hvis du vil ændre hvilken mappen, der skal arkiveres, så klik på mappeikonet.
Drop-ned-menuen lader dig vælge et format (valgmulighederne er: zip, tar, tar.ab2 og tar.gz),
Hvis du ønsker at ændre standardnavnet eller placeringen, så klik på mappeikonet for enden af feltet .
Sæt flueben ved hvis du vil slette at det du lige har arkiveret.
Som standard arkiveres alle undermapper. Fjern fluebenet ved hvis du kun ønsker at arkivere det øverste niveau.
Dette er et stærkt værktøj, som kan bruges til at hjælpe med at automatisere backup af dine e-mails. Arkivets filnavn vil bestå af præfikset Archive, stien til den valgte mappe i KMails mappeliste, datoen i formatet år-månde-dag og den valgte filendelse, fx Archive_Local Folder_inbox_2013-09-03.tar.bz2.
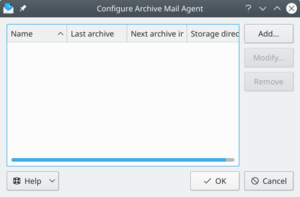
Vælg først den mappe du ønsker at arkivere ved at klikke på knappen .
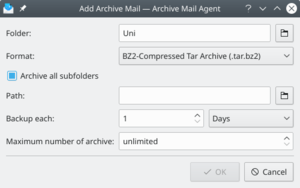
Vælg det format du ønsker at gemme det i, fx .tar.bz2 i drop-ned-listen.
Som standard er aktiveret. Fjern fluebenet, hvis du køn ønsker at arkivere det øverste mappen-niveau.
Du kan skrive, hvor du ønsker at gemme arkivet eller klikke knappen File:Icon-open-document.png (Åbn fildialog). for at vælge mappen.
Vælg, hvor ofte du ønsker at lave backup i inputfeltet og drop-ned-listen .
- Hvis du har begrænset diskplads, så skal du kon angive et maksimalt antal af arkiver.
- Hvis du har tilføjet eller ændret en arkiveringsjob, så vil det blive udført automatisk når du lukker dialogen.
- If you have already added mail archive jobs the Configure Archive Mail Agent dialog will list and allow to modify them.
You can use the check box at the left of each entry in the list to enable or disable archiving of this job.
Using the context menu launched with a right mouse button click on an archive job you can open the folder containing the archives or start the archive job immediately.
This feature allows you to archive single emails to a specified folder.
For instance, you need to archive all of those pesky bill receipts in one place. Folder Archive Agent can easily accommodate those needs.
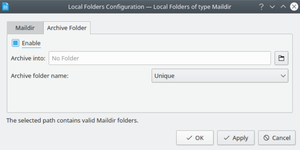
This dialog will have a tab for each of your configured accounts including Local Folders and you will need to configure all accounts that you wish to use this feature with.
The first option allows you to enable/disable the folder archive agent. It is disabled by default, to enable check the Enable check box.
You can set the location of your Archive folder by clicking the folder icon next to Folder: and selecting the folder you wish to use.
For example, you could create a folder called “bill receipts” by clicking the New Subfolder... and typing bill receipts in the dialog. You may choose a folder location anywhere, e.g... a folder in your “Local Folders” or on your IMAP server.
You have several choices on how the emails will be archived:
- Unique folder - Uses the selected folder sorted by date.
- Folder by months - Creates new folders inside the selected folder by months.
- Folder by years - Creates new folders inside the selected folder by years.
Now when you receive a bill receipt, right mouse button the email and select Archive from the menu. The email will be archived into your configured archive folder for easy viewing later on.
Exporting
Or pimsettingexporter can be run as a standalone application by running pimsettingexporter in the application launcher.
This feature exports settings and local mail to a compressed file.
Backing up is an essential practice for all users. PIM Setting Exporter is a great tool for backing up or moving all of your settings and email to a new installation. You also use PIM Setting Exporter to import previous backups.
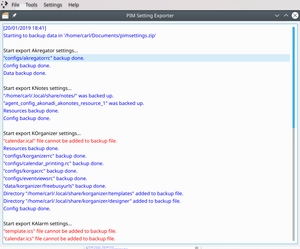
To perform a backup, select , it will prompt you to close all kdepim applications.
Once you have closed them, click to continue, or to cancel.
You will be prompted to create a backup name, enter the name into the File textbox, e.g. mymailsettings.
The default file type it saves as is .zip, if you want a different type, deselect Automatically select filename extension and append the extension to the end of your file name.
The next screen will allow you to select what you wish to backup, by default everything is selected.
The final screen shows the log of the backup up process. You can close the window once you have reviewed the log and verified your backup was successful.
To restore your backup, select within pimsettingexporter.


