Kdenlive/Εγχειρίδιο/Γρήγορη εκκίνηση
Γρήγορη εκκίνηση
Δημιουργία νέου έργου
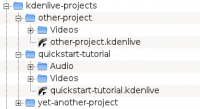
Το πρώτο βήμα είναι να φτιάξετε έναν νέο (άδειο) φάκελο για το καινούριο έργο. Ας τον πούμε εκκίνηση-εκμάθηση/ για αυτό το μάθημα. Έπειτα βρείτε κάποια δείγματα από βίντεο ή κατεβάστε αυτά εδώ: File:Kdenlive-tutorial-videos-2011-avi.zip (7 MB) [1] και εξάγετέ τα στον υποφάκελο εκκίνηση-εκμάθηση/βίντεο/ μέσα στον φάκελο του έργου.
Η εικόνα στα αριστερά δείχνει την προτεινόμενη δομή καταλόγου: Κάθε έργο έχει το δικό του κατάλογο, με τα αρχεία βίντεο στον υποκατάλογο βίντεο, τα αρχεία ήχου στον ήχος κτλ. (διαβάστε περισσότερα)
(το μάθημα από εδώ και πέρα υποθέτει ότι χρησιμοποιείτε τα δείγματα βίντεο που παρέχονται, αλλά δουλεύει με οποιαδήποτε)
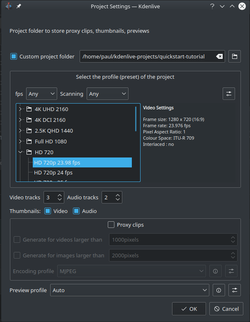
Επιλέξτε τον φάκελο έργου που δημιουργήσατε (εκκίνηση-εκμάθηση/) και επιλέξτε το κατάλληλο προφίλ έργου. Τα αρχεία που σας δόθηκαν είναι 720p, 23.98 fps.[2] Αν χρησιμοποιείτε δικά σας αρχεία και δεν ξέρετε ποιο προφίλ να επιλέξετε, το Kdenlive θα προτείνει ένα κατάλληλο προφίλ μόλις προστεθεί το πρώτο κλιπ.[3] , οπότε μπορείτε να αφήσετε το πεδίο σε ότι σας δίνει.
Εάν θέλετε, μπορείτε να αλλάξετε στο σκοτεινό θέμα: π.χ. Breeze-Dark
Προσθήκη κλιπ
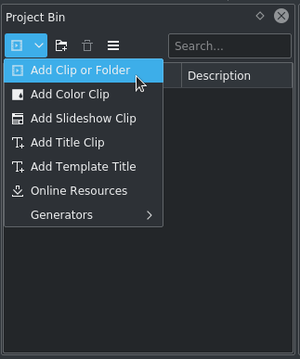
Τώρα που το έργο είναι έτοιμο, ας αρχίσουμε να προσθέτουμε μερικά κλιπ. (πχ αυτά που κατεβάσατε). Πηγαίνετε στο εικονίδιο «Καλάθι έργου», ένα κλικ στο εικονίδιο ![]() ανοίγει απευθείας τον διάλογο, ένα κλικ στο μικρό βέλος δείχνει τη λίστα των επιπλέον τύπων κλιπ που μπορούν να προστεθούν. Κλιπ βίντεο, ήχου, εικόνες και άλλα έργα του Kdenlive μπορούν να προστεθούν από τον διάλογο .
ανοίγει απευθείας τον διάλογο, ένα κλικ στο μικρό βέλος δείχνει τη λίστα των επιπλέον τύπων κλιπ που μπορούν να προστεθούν. Κλιπ βίντεο, ήχου, εικόνες και άλλα έργα του Kdenlive μπορούν να προστεθούν από τον διάλογο .
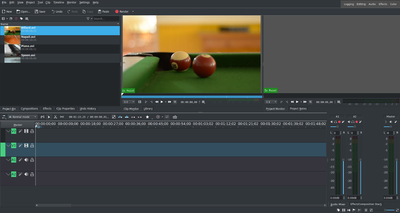
Αφού φορτώσει τα κλιπ, το Kdenlive θα μοιάζει κάπως όπως στην εικόνα. Επάνω αριστερά υπάρχει το ήδη γνωστό δέντρο του έργου. Δεξιά του είναι οι οθόνες του βίντεο. Η οθόνη κλιπ δείχνει το βίντεο των αυθεντικών κλιπ, η οθόνη του έργου δείχνει πως θα φαίνεται το βίντεο εξαγωγής με εφαρμοσμένα όλα τα εφέ, τις μεταβάσεις κτλ. Το τρίτο, επίσης πολύ σημαντικό, στοιχείο είναι η γραμμή του χρόνου (κάτω από τις οθόνες): σε αυτό το μέρος γίνεται η επεξεργασία των κλιπ. Υπάρχουν δύο διαφορετικοί τύποι από κομμάτια, τα κομμάτια Βίντεο και τα κομμάτια Ήχου. Τα κομμάτια βίντεο και τα κομμάτια ήχου μπορούν να περιέχουν οποιοδήποτε είδος κλιπ, απλά όταν ρίχνετε ένα κλιπ βίντεου στην γραμμή του κομματιού του ήχου, θα χρησιμοποιηθεί μόνο ο ήχος.
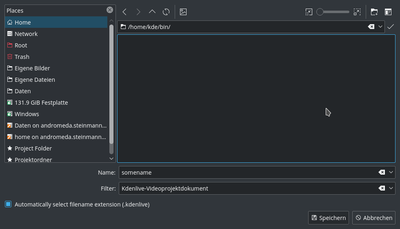
Let’s save the work via . This saves our project, i.e. where we placed the clips on the timeline, which effects we applied, and so on. It can not be played.[4] The process of creating the final video is called Rendering.
Timeline
See also Timeline section of the manual
Now comes the actual editing. Project clips are combined to the final result on the timeline. They get there by drag and drop: Drag some Napoli (assuming you are using the files provided above, as in the rest of this quick start tutorial; If not, please make sure your screen is waterproof, and perhaps tomatoproof) from the project tree, and drop it onto the first track in the timeline. In this case track V2.
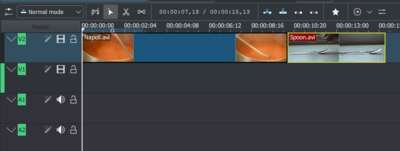
Since some cutlery is needed as well, grab the spoon clip and drop it on the first track as well (track V2). Then drag the Napoli to the beginning of the timeline (otherwise the rendered video would start with some seconds of plain black), and the Spoon right after the Napoli, such that it looks like in the image on the left. (Where I have zoomed in with Ctrl + Wheel.)

The result can already be previewed by pressing Space (or the button in the project monitor). You will see the Napoli directly followed by a Spoon. If the timeline cursor is not at the beginning, the project monitor will start playing somewhere in the middle; you can move it by dragging it either on the timeline ruler or in the project monitor. If you prefer keyboard shortcuts, Ctrl + Home does the same for the monitor that is activated. (Select the if it is not selected yet before using the shortcut.)

Since after eating comes playing, there is a Billiards clip. Add it to the timeline as well (track V1). For the first 1.5 seconds nothing happens in the clip, so it should perhaps be cut to avoid the video becoming boring. An easy way[5] for this is to move the timeline cursor to the desired position (i.e. the position where you want to cut the video), then drag the left border of the clip when the resize marker appears. It will snap in at the timeline cursor when you move close enough.
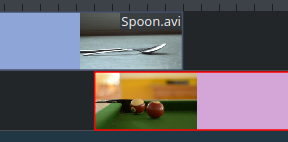
To add a transition between eating (the Spoon) and playing billiards, the two clips need to overlap. To be precise: the second clip should be above or below the first one and end some frames after the second one begins. Zooming in until the ticks for single frames appear helps here; it also makes it easy to always have the same transition duration, five frames in this case.
You can zoom in by either using the at the bottom of the Kdenlive window, or with Ctrl + Mousewheel. Kdenlive will zoom to the timeline cursor, so first set it to the position which you want to see enlarged, then zoom in.
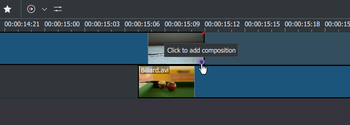
Now that the clips overlap, the transition can be added. This is done either by right-clicking on the upper clip and choosing and choose or, easier, by hovering the mouse over the lower right corner of the Spoon clip until the pointing-finger pointer is shown and the message "Click to add composition" appears. The latter, by default, adds a wipe transition, which is in this case the best idea anyway since the Spoon is not required for playing.
The wipe transitions fades the first clip into the second one. See also Transition section of the manual.

Let’s now add the last clip, the Piano, and again apply a wipe transition. When adding it on the first track of the timeline (track V2), you need to click on the new clip’s lower left edge to add the transition to the previous clip.
Εφέ
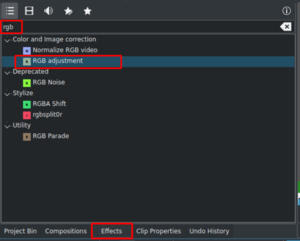
The Piano can be colourized by adding an effect to it. Click on the effect view (if effect view is not visible enable the view: ). Type rgb in the search field then double-click the effect.
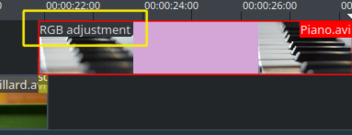
Once the effect has been added, click on an empty part in the timeline and you see its name on the timeline clip. It will also be shown in the widget.
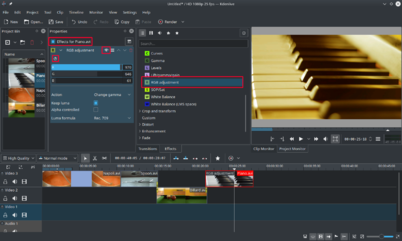
To get a warm yellow-orange tone on the image, fitting the comfortable evening, blue needs to be reduced and red and green improved.
The values in the Effect/Composition Stack widget can be changed by using the slider (middle mouse button resets it to the default value), or by entering a value directly by double-clicking the number to the right of the slider.
The Effect/Composition Stack widget always refers to the timeline clip that is currently selected. Each effect can be temporarily disabled by clicking the eye icon, or all effects for that clip can be disabled using the check box at the top of the Effect/Composition Stack widget (the settings are saved though), this is e.g. useful for effects that require a lot of computing power, so they can be disabled when editing and enabled again for rendering.
For some effects, like the one used there, it is possible to add keyframes. The framed watch icon indicates this. Keyframes are used for changing effect parameters over time. In our clip this allows us to fade the piano’s colour from a warm evening colour to a cold night colour.
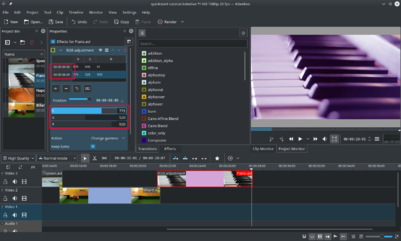
After clicking the icon (the clock icon framed in the previous image), the Properties widget will re-arrange. By default there will be two keyframes, one at the beginning of the timeline clip and one at the end. Move the timeline cursor to the end of the timeline clip, such that the project monitor actually shows the new colours when changing the parameters of the keyframe at the end.
Make sure the last keyframe is selected in the Properties list. Then you are ready to flood the piano with a deep blue.
Moving the timeline cursor to the beginning of the project and playing it (with Space, or the button in the ), the piano should now change the colour as desired.
Keyframing was the hardest part of this tutorial. If you managed to do it, you will master Kdenlive easily!
See also Effects section of the manual.
Μουσική

Αφού τα κλιπ δεν έχουν καθόλου ήχο, ας ψάξουμε για ένα ωραίο κομμάτι μουσικής τοπικά στην συλλογή σας ή από ιστοσελίδες όπως η Jamendo. Το κλιπ ήχου πρέπει, αφού προστεθεί, να το τραβήξετε σε ένα κομμάτι ήχου στην γραμμή του χρόνου.
Το ηχητικό κλιπ μπορεί να αλλάξει μέγεθος με τον ίδιο τρόπο που αλλάζουν τα κλιπ εικόνας. Ο δρομέας θα γραπωθεί αυτόματα στο τέλος του έργου. Για να προσθέσετε ένα εφέ σβησίματος στο τέλος του ηχητικού (εκτός αν βρήκατε ένα αρχείο με ακριβώς το σωστό μήκος) αιωρηθείτε στην επάνω δεξιά ή αριστερή άκρη του κλιπ της γραμμής του χρόνου και τραβήξτε το κόκκινο σκιασμένο τρίγωνο στη θέση όπου πρέπει να ξεκινήσει το σβήσιμο. [6]
Rendering
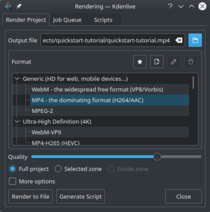
A few minutes left, and the project is finished! Click the Render button (or go to , or press Ctrl + Enter) to get the dialog shown on the left. Select the desired output file for our new video with all effects and transitions, choose MP4 (works nearly everywhere), select the output file location and press the button.
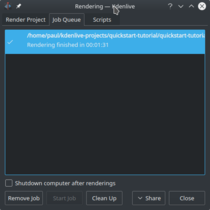
After some seconds rendering will be finished, and your first Kdenlive project completed. Congratulations!
Complete manual
Further documentation for the current version of Kdenlive can be found in the full manual.
References and notes
- ↑ Αν προτιμάτε Theora (πιθανότατα όχι, μιας και το βίντεο Ogg συνήθως δημιουργεί προβλήματα), μπορείτε να κατεβάσετε εναλλακτικά το kdenlive-tutorial-videos-2011-ogv.tar.bz2.
- ↑ 720 είναι το ύψος της εικόνας, p σημαίνει προοδευτική σάρωση και ο αριθμός fps δίνει τα καρέ ανά δευτερόλεπτο.
- ↑ Οι παρεχόμενες ρυθμίσεις του Kdenlive στο Διάφορα έχουν επιλεγμένο το «Έλεγχος αν το πρώτο κλιπ που προστέθηκε ταιριάζει με το προφίλ του έργου»
- ↑ To be correct, it can be played using
melt yourproject.kdenlive, but this is not the way you would want to present your final video since it is (most likely) too slow. Additionally, it only works if melt is installed. - ↑ Writing it this way suggests that there are several ways of cutting a clip. This is in fact true.
- ↑ Αυτό το σκιασμένο τρίγωνο είναι συντόμευση για την πρόσθεση του εφέ . Και οι δύο μέθοδοι οδηγούν στο ίδιο αποτέλεσμα.

