Kdenlive/Kılavuz/Hızlı Başlangıç
Quick Start
Yeni bir proje oluşturmak
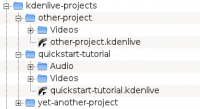
Yeni projemiz için yapılacak ilk adım yeni bir (boş) klasör oluşturmaktır. Klasörü bu öğreticide quickstart-tutorial/ olarak adlandıracağım. Ardından birkaç örnek video alın veya buradan indirin: kdenlive-tutorial-videos-2011-avi.tar.bz2 (7 MB)[1] ve proje klasörü içindeki alt klasöre çıkarın: Örn. quickstart-tutorial/Videos/.
Soldaki resim, önerilen dizin yapısını göstermekte: Her proje Videos dizinindeki video dosyalarını ve Audio dizini içerisindeki ses dosyaları gibi kendi dizinlerine sahip. (devamını oku)
(Bu öğretici, sağlanan örnek videoları kullandığınızı varsayacaktır, ancak herhangi bir videoyla da çalışmaktadır.)
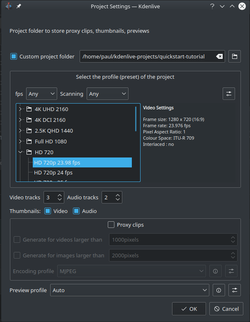
Open Kdenlive and create a new project ().
Önceden oluşturulmuş proje klasörünü seçin (quickstart-tutorial/) ve uygun bir proje dosyası belirtin. Yukarıda önerilen videolar 720p, 23.98 fps'dir.[2] Eğer kendi dosyalarınızı kullanıyor ve hangi değerleri kullanacağınızı bilmiyorsanız, Kdenlive ilk klip eklendiğinde [3] uygun bir seçenek önerecektir. Bu nedenle değeri olduğu gibi bırakabilirsiniz.
Klip ekleme
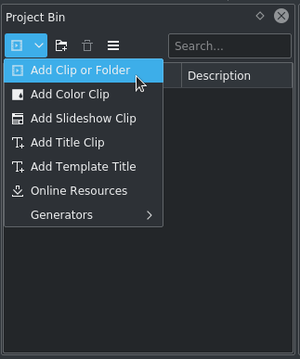
Now that the project is ready, let’s start adding some clips (i.e. the ones you downloaded). This works via the Project Bin widget; a click on the icon ![]() directly opens the file dialog, a click on the small arrow shows a list of additional clip types that can be added as well. Video clips, audio clips, images, and other Kdenlive projects can be added via the default dialog.
directly opens the file dialog, a click on the small arrow shows a list of additional clip types that can be added as well. Video clips, audio clips, images, and other Kdenlive projects can be added via the default dialog.
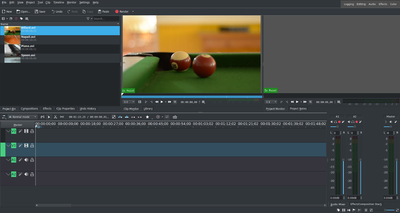
After loading the clips, Kdenlive will look similar to this. On the top left there is the already known project tree. Right of it are the monitors that show video; The clip monitor displays video from the original clips, the project monitor shows how the output video will look, with all effects, transitions, etc. applied. The third, also very important, item is the timeline (below the monitors): This is the place where the video clips will be edited. There are two different types of tracks, Video and Audio. Video tracks can contain any kind of clip, audio tracks as well – but when dropping a video file to the audio track, only the audio will be used.
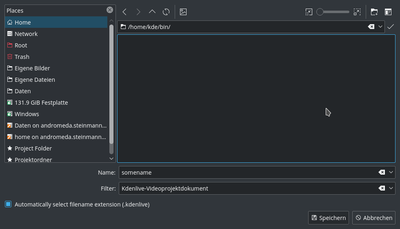
Let’s save the work via . This saves our project, i.e. where we placed the clips on the timeline, which effects we applied, and so on. It can not be played.[4] The process of creating the final video is called Rendering.
Zaman Tüneli
Ayrıca kılavuzun Zaman Tüneli bölümüne de bakınız.
Now comes the actual editing. Project clips are combined to the final result on the timeline. They get there by drag and drop: Drag some Napoli (assuming you are using the files provided above, as in the rest of this quick start tutorial; If not, please make sure your screen is waterproof, and perhaps tomatoproof) from the project tree, and drop it onto the first track in the timeline.
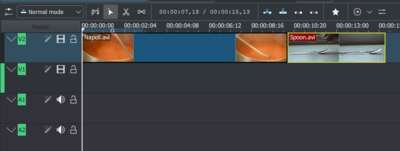
Since some cutlery is needed as well, grab the spoon clip and drop it on the first track as well. Then drag the Napoli to the beginning of the timeline (otherwise the rendered video would start with some seconds of plain black), and the Spoon right after the Napoli, such that it looks like in the image on the left. (Where I have zoomed in with Ctrl + Wheel.)

Sonuç hemen Boşluk tuşuna (veya proje ekranındaki düğmesine) basılarak görülebilir. Napoli'nin Kaşık videosunun ardından hemen takip edildiğini göreceksiniz. Eğer zaman tüneli imleci başlangıçta değilse, proje ekranı ortada bir yerden oynatmaya başlayacak. Zaman tüneli cetvelini veya proje ekranındaki kaydırıcıyı kullanarak hareket ettirebilirsiniz. Eğer klavye kısayollarını tercih ederseniz, Ctrl + Home tuşu, etkinleştirilen ekran ile aynı işlemi yapacaktır (Kısayolu kullanmadan önce seçili değilse nı seçin.)

Since after eating comes playing, there is a Billiards clip. Add it to the timeline as well. For the first 1.5 seconds nothing happens in the clip, so it should perhaps be cut to avoid the video becoming boring. An easy way[5] for this is to move the timeline cursor to the desired position (i.e. the position where you want to cut the video), then drag the left border of the clip when the resize marker appears. It will snap in at the timeline cursor when you move close enough.
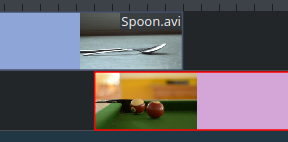
To add a transition between eating (the Spoon) and playing billiards, the two clips need to overlap. To be precise: the second clip should be above or below the first one and end some frames after the second one begins. Zooming in until the ticks for single frames appear helps here; it also makes it easy to always have the same transition duration, five frames in this case.
Yakınlaştırmayı Kdenlive penceresinin altındaki nı veya Ctrl + Fare tekerleği kullanarak yapabilirsiniz. Kdenlive, zaman tüneli imlecine yakınlaşacağı veya uzaklaşacağından, ilk olarak genişletilmesini istediğiniz konuma taşıyın ve yakınlaştırın.
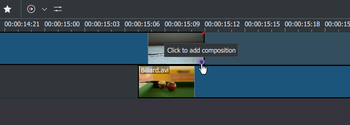
Now that the clips overlap, the transition can be added. This is done either by right-clicking on the upper clip and choosing or, easier, by hovering the mouse over the lower right corner of the Spoon clip until the pointing-finger pointer is shown and the message "Click to add transition" appears. The latter, by default, adds a dissolve transition, which is in this case the best idea anyway since the Spoon is not required for playing.
Çözünme geçişleri, ilk klipten ikinci klibe belirginlik sağlar. Ayrıca Kılavuzun geçiş bölümüne de bakın.

Let’s now add the last clip, the Piano, and again apply a dissolve transition. When adding it on the first track of the timeline, you need to click on the new clip’s lower left edge to add the transition to the previous clip.
Efektler
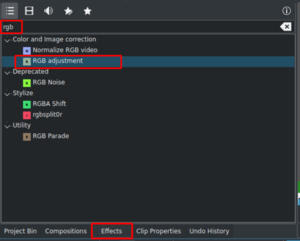
The Piano can be colourized by adding an effect to it. Select the piano clip, then double-click the effect in the . If it is not visible, you can get it via .
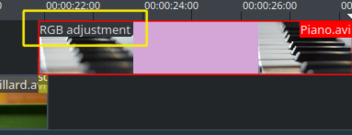
Once the effect has been added, its name will be added to the timeline clip. It will also be shown in the widget.
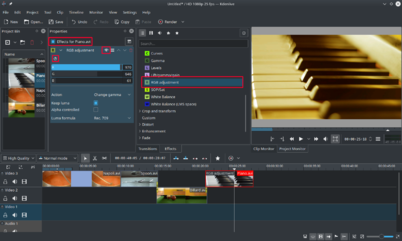
To get a warm yellow-orange tone on the image, fitting the comfortable evening, blue needs to be reduced and red and green improved.
The values in the Properties widget can be changed by using the slider (middle mouse button resets it to the default value), or by entering a value directly by double-clicking the number to the right of the slider.
The Properties widget always refers to the timeline clip that is currently selected. Each effect can be temporarily disabled by clicking the eye icon, or all effects for that clip can be disabled using the check box at the top of the Properties widget (the settings are saved though), this is e.g. useful for effects that require a lot of computing power, so they can be disabled when editing and enabled again for rendering.
Burada kullanılan gibi bazı efektler için anahtarkare eklemek mümkündür. Çerçeveli izleme simgesi, bunu belirtir. Anahtarkareler, zamna içerisinde efekt parametrelerini değiştirmek için kullanılırlar. Klibimizde, bu piano'nun rengini, ılık akşam renginden, soğuk gece rengine değiştirmede yardımcı olacak.
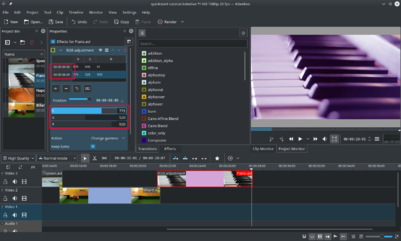
After clicking the icon (the clock icon framed in the previous image), the Properties widget will re-arrange. By default there will be two keyframes, one at the beginning of the timeline clip and one at the end. Move the timeline cursor to the end of the timeline clip, such that the project monitor actually shows the new colours when changing the parameters of the keyframe at the end.
Make sure the last keyframe is selected in the Properties list. Then you are ready to flood the piano with a deep blue.
Zaman tüneli imlecini projenin başına taşıyıp oynattığınızda (Boşluk tuşu veya içerisindeki düğmesi ile) piyano rengi istediğiniz gibi değişiyor olmalı.
Anahtarkareleştirme, bu öğreticinin en zor bölümüydi. Eğer yapabildiyseniz, Kdenlive ile uzmanlaşmanız çok kolay olacak!
Ayrıca Kılavuzun efektler bölümüne de bakın.
Müzik

Since the clips do not provide any audio, let’s search for some nice piece of music, from your local collection or on web pages like Jamendo. The audio clip should, after adding it, be dragged to an audio track on the timeline.
The audio clip can be resized on the timeline the same way as video clips are. The cursor will snap in at the end of the project automatically. To add a fade out effect at the end of the audio clip (except if you found a file with exactly the right length) you can hover the top right (or left) edge of the timeline clip and drag the red shaded triangle to the position where fading out should start.[6]
Hazırlama
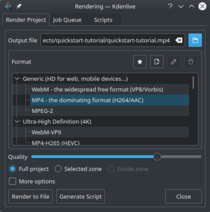
A few minutes left, and the project is finished! Click the Render button (or go to , or press Ctrl + Enter) to get the dialog shown on the left. Select the desired output file for our new video with all effects and transitions, choose MP4 (works nearly everywhere), select the output file location and press the button.
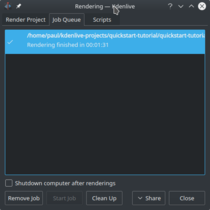
After some seconds rendering will be finished, and your first Kdenlive project completed. Congratulations!
Complete manual
Further documentation for the current version of Kdenlive can be found in the full manual.
Referans ve notlar
- ↑ Eğer Theora'yı tercih ederseniz (genellikle Ogg Video problem yarattığı için muhtemelen istemeyeceğiniz tür), alternatif olarak kdenlive-tutorial-videos-2011-ogv.tar.bz2.
- ↑ 720 videonun yüksekliği iken p, interlaced video (taramalı video)'ya tam zıt olarak progressive scan (aşamalı tarama) ifade etmektedir. Yine fps değeri, saniyedeki kare sayısını belirtmektedir.
- ↑ Sağlanan Kdenlive Ayarları altındaki Çeşt. kısmında İlk eklenen klibin proje profili ile eşleştiğini kontrol et seçili ise
- ↑ To be correct, it can be played using
melt yourproject.kdenlive, but this is not the way you would want to present your final video since it is (most likely) too slow. Additionally, it only works if melt is installed. - ↑ Writing it this way suggests that there are several ways of cutting a clip. This is in fact true.
- ↑ This shaded triangle is a shorthand for adding the effect . Both ways lead to the same result.
