Digikam/LightTable/ca: Difference between revisions
No edit summary |
(Created page with "Això obre una finestra taula de llum buida, i hi podeu afegir dues o més fotos arrossegant-les des del plafó de miniatures (anomenat barra de miniatures en digiKam) de la fine...") |
||
| Line 8: | Line 8: | ||
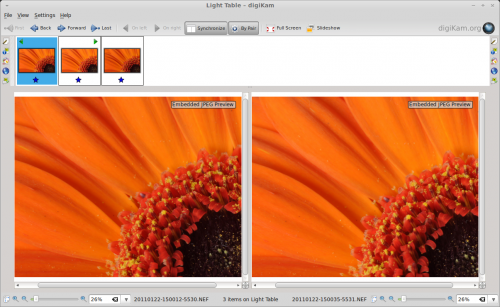
[[File:Digikam_lighttable.png|center|thumb|500px|Copyright Dmitri Popov]] | [[File:Digikam_lighttable.png|center|thumb|500px|Copyright Dmitri Popov]] | ||
Això obre una finestra taula de llum buida, i hi podeu afegir dues o més fotos arrossegant-les des del plafó de miniatures (anomenat barra de miniatures en digiKam) de la finestra. Alternativament, podeu seleccionar les fotos en un àlbum i utilitzar la drecera de teclat <keycap>Ctrl + L</keycap> o de l'ordre <menuchoice>Imatge -> Col·loca sobre la taula de llum</menuchoice> per afegir les fotos seleccionades a una nova finestra taula de llum. A continuació, n'hi podreu afegir més seleccionant-les des d'un àlbum i escollint l'ordre <menuchoice>Imatge -> Afegeix a la taula de llum</menuchoice> o utilitzant la drecera de teclat <keycap>Ctrl + Majús. + L</keycap>. | |||
Using Light Table is rather straightforward. If you have added only a pair of photos to the Light Table window, they will be displayed side by side, making it easier for you to examine and compare photos. Press the <menuchoice>Synchronize</menuchoice> button, and Light Table will keep both photos in sync. So when you zoom in and out or drag one photo, these actions are automatically applied to the other photo, too. You can reorder the photos in the Light Table window using the <menuchoice>On left</menuchoice> and <menuchoice>On right</menuchoice> buttons. And if you have more than two photos in the Light Table window, you can view them by pairs by clicking the <menuchoice>By Pair</menuchoice> button. | Using Light Table is rather straightforward. If you have added only a pair of photos to the Light Table window, they will be displayed side by side, making it easier for you to examine and compare photos. Press the <menuchoice>Synchronize</menuchoice> button, and Light Table will keep both photos in sync. So when you zoom in and out or drag one photo, these actions are automatically applied to the other photo, too. You can reorder the photos in the Light Table window using the <menuchoice>On left</menuchoice> and <menuchoice>On right</menuchoice> buttons. And if you have more than two photos in the Light Table window, you can view them by pairs by clicking the <menuchoice>By Pair</menuchoice> button. | ||
Revision as of 11:58, 27 March 2012
Filtrar les fotos amb l'eina Taula de llum del digiKam
Transcrit des de l'article d'en Dmitri Popov, l'11 de febrer de 2011 Publicat el 2 de febrer de 2011 | Autor: Dmitri Popov
Si teniu un grapat de targetes d'emmagatzematge en la borsa de fotos, no hi ha necessitat de preocupar-vos per la quantitat de fotos que podeu prendre abans que la càmera digital es quedi sense memòria. Això significa que podeu prendre fàcilment desenes de fotos de la mateixa matèria des de diferents àngles, composició i il·luminació. Però això també farà que la tasca de triar la millor foto del lot sigui tot un desafiament. Afortunadament, digiKam proporciona una eina simple però eficaç que us pot ajudar a comparar i analitzar diverses fotos una al costat de l'altra i triar la que més us agradi. El nom d'aquesta meravellosa eina és Taula de llum, i la podeu invocar escollint des de la barra d'eines principal.

Això obre una finestra taula de llum buida, i hi podeu afegir dues o més fotos arrossegant-les des del plafó de miniatures (anomenat barra de miniatures en digiKam) de la finestra. Alternativament, podeu seleccionar les fotos en un àlbum i utilitzar la drecera de teclat Ctrl + L o de l'ordre per afegir les fotos seleccionades a una nova finestra taula de llum. A continuació, n'hi podreu afegir més seleccionant-les des d'un àlbum i escollint l'ordre o utilitzant la drecera de teclat Ctrl + Majús. + L.
Using Light Table is rather straightforward. If you have added only a pair of photos to the Light Table window, they will be displayed side by side, making it easier for you to examine and compare photos. Press the button, and Light Table will keep both photos in sync. So when you zoom in and out or drag one photo, these actions are automatically applied to the other photo, too. You can reorder the photos in the Light Table window using the and buttons. And if you have more than two photos in the Light Table window, you can view them by pairs by clicking the button.
Find more tutorials like this by clicking on the Photography link below.
