Kdenlive/Kılavuz/Hızlı Başlangıç
Quick Start
Yeni bir proje oluşturmak
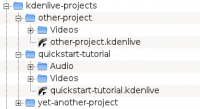
Yeni projemiz için yapılacak ilk adım yeni bir (boş) klasör oluşturmaktır. Klasörü bu öğreticide quickstart-tutorial/ olarak adlandıracağım. Ardından birkaç örnek video alın veya buradan indirin: kdenlive-tutorial-videos-2011-avi.tar.bz2 (7 MB)[1] ve proje klasörü içindeki alt klasöre çıkarın: Örn. quickstart-tutorial/Videos/.
Soldaki resim, önerilen dizin yapısını göstermekte: Her proje Videos dizinindeki video dosyalarını ve Audio dizini içerisindeki ses dosyaları gibi kendi dizinlerine sahip. (devamını oku)
(Bu öğretici, sağlanan örnek videoları kullandığınızı varsayacaktır, ancak herhangi bir videoyla da çalışmaktadır.)
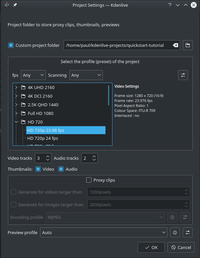
Kdenlive'ı açın ve yeni bir proje oluşturun ().
Önceden oluşturulmuş proje klasörünü seçin (quickstart-tutorial/) ve uygun bir proje dosyası belirtin. Yukarıda önerilen videolar 720p, 23.98 fps'dir.[2] Eğer kendi dosyalarınızı kullanıyor ve hangi değerleri kullanacağınızı bilmiyorsanız, Kdenlive ilk klip eklendiğinde [3] uygun bir seçenek önerecektir. Bu nedenle değeri olduğu gibi bırakabilirsiniz.
Klip ekleme
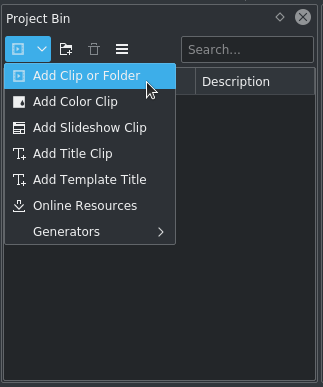
Artık projeniz hazır, artık birkaç klip eklemekle başlayalım (örn. indirdikleriniz). Bu Proje Ağacı gereci ile yapılabilir. simgesine ![]() tıklamak, doğrudan dosya iletişim kutusunu açar. Küçük oka tıklamak da eklenecek diğer klip türlerinin listesini gösterir. Video klipleri, ses klipleri, resimler ve diğer Kdenlive projeleri, öntanımlı iletişim kutusu yardımıyla eklenebilir.
tıklamak, doğrudan dosya iletişim kutusunu açar. Küçük oka tıklamak da eklenecek diğer klip türlerinin listesini gösterir. Video klipleri, ses klipleri, resimler ve diğer Kdenlive projeleri, öntanımlı iletişim kutusu yardımıyla eklenebilir.
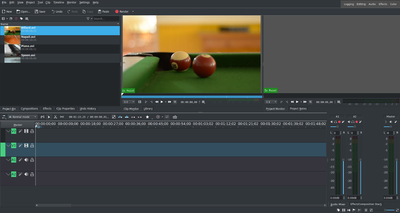
Klipler yüklendikten sonra, Kdenlive buna benzer şekilde görünecektir. Sol üstte, daha önceden bildiğiniz proje ağacı bulunuyor. Sağında ise videoyu gösteren ekranlar var: Klip ekranı, videoyu orijinal kliplerden gösterirken; proje ekranı, tüm efektler, geçişler vb. eklendikten sonra çıkış videosunun nasıl olacağını gösterir. Üçüncüsü ve daha önemli olan bir öge zaman tünelidir (ekranların altında). Bu alan video kliplerinin düzenleneceği alandır. İki çeşit tür görünüyor, Video ve Ses. Video izleri, her tür klip içerebilirler, ses klipleri de. Ancak bir video dosyası ses izine sürüklenirse sadece sesi kullanılacaktır.
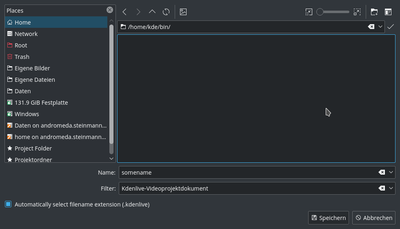
Şimdi yaptığımız işi ile kaydedelim. Bu işlem projemiz ile birlikte, zaman tüneline eklediğimiz kliplerin yerini, uygulanan efektler ve bir çok değişikliği kaydedecektir. Ancak oynatılamaz.[4] Sonuç videosu oluşturma işlemi Hazırlama işlemidir.
Zaman Tüneli
Ayrıca kılavuzun Zaman Tüneli bölümüne de bakınız.
Şimdi asıl düzenleme geliyor. Proje klipleri zaman tünelinde birleştirilip en son sonuç elde edilir. Sürükleme ve bırakma ile götürülürler: Napoli'yi (öğreticinin diğer kısımları gibi yukarıdaki dosyaları kullandığınız varsayılmakta; eğer kullanmıyorsanız ekranınızın su geçirmez ve belki domates geçirmez olduğundan emin olun) sürükleyin ve zaman tünelindeki ilk izin üzerine bırakın.
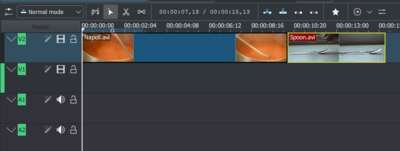
Since some cutlery is needed as well, drop the spoon on the first track as well. Then drag the Napoli to the beginning of the timeline (otherwise the rendered video would start with some seconds of plain black), and the Spoon right after the Napoli, such that it looks like in the image on the left. (Where I have zoomed in with Ctrl + Wheel.)

The result can already be previewed by pressing Space (or the button in the project monitor). You will see the Napoli directly followed by a Spoon. If the timeline cursor is not at the beginning, the project monitor will start playing somewhere in the middle; you can move it by dragging it either on the timeline ruler or in the project monitor. If you prefer keyboard shortcuts, Ctrl + Home does the same for the monitor that is activated. (Select the if it is not selected yet before using the shortcut.)

Since after eating comes playing, there is a Billard clip. Add it to the timeline as well. The first 1.5 seconds nothing happens in the clip, so it should perhaps be cut to avoid the video becoming boring. An easy way[5] for this is to move the timeline cursor to the desired position (i.e. the position where you want to cut the video), then drag the left border of the clip when the resize marker appears. It will snap in at the timeline cursor when you move close enough.
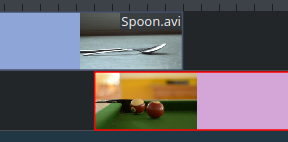
To add a transition between eating (the Spoon) and playing billard, the two clips need to overlap. To be precise: the second clip should be above or below the first one and end some frames after the second one begins. Zooming in until the ticks for single frames appear helps here; it also makes it easy to always have the same transition duration, like five frames in this case.
You can zoom in by either using the at the bottom of the Kdenlive window, or with Ctrl + Mousewheel. Kdenlive will zoom to the timeline cursor, so first set it to the position which you want to see enlarged, then zoom in.
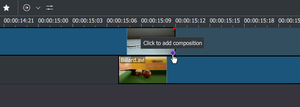
Now that the clips overlap, the transition can be added. This is done either by right-clicking on the upper clip and choosing or, easier, by clicking the green triangle that appears when you hover the mouse over the lower right corner of the Spoon clip. The latter, by default, adds a dissolve transition, which is in this case the best idea anyway since the Spoon is not required for playing anyway.
The dissolve transitions fades the first clip into the second one. See also Transition section of the manual.

Let’s add the last clip, the Piano, now, and again apply a dissolve transition. When adding it on the first track of the timeline, you need to click on the new clip’s lower left edge to add the transition to the previous clip.
Effects
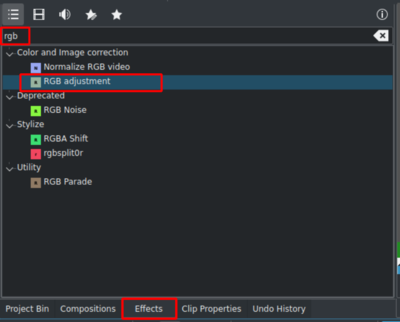
The Piano can be colourized by adding an effect to it. Select the piano clip, then double-click the effect in the . If it is not visible, you can get it via .
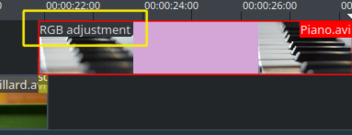
Once the effect has been added, its name will be added to the timeline clip. It will also be shown in the widget.
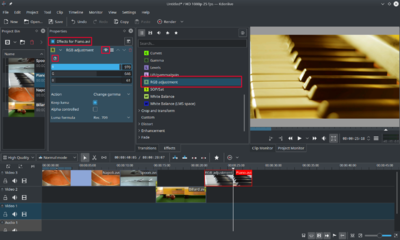
To get a warm yellow-orange tone on the image, fitting the comfortable evening, blue needs to be reduced and red and green improved.
The values in the effect stack widget can be changed by using the slider (middle mouse button resets it to the default value), or by entering a value directly by double-clicking the number right to the slider.
Effects can also be added with the icon (framed in the image on the left) in the ; It always refers to the timeline clip that is currently selected. By unchecking the checkbox they are temporarily disabled (the settings remain though), this is e.g. useful for effects that require a lot of computing power, so they can be disabled when editing and enabled again for rendering.
For some effects, like the one used there, it is possible to add keyframes. The framed watch icon indicates this. Keyframes are used for changing effect parameters over time. In our clip this allows us to fade the piano’s colour from a warm evening colour to a cold night colour.
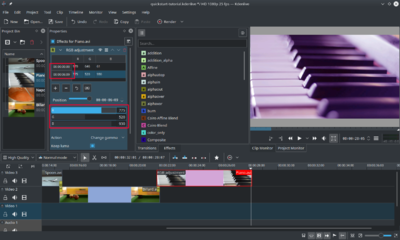
After clicking the icon (the clock icon framed in the previous image), the Effect Stack widget will re-arrange. By default there will be two keyframes, one at the beginning of the timeline clip and one at the end. Move the timeline cursor to the end of the timeline clip, such that the project monitor actually shows the new colours when changing the parameters of the keyframe at the end.
Make sure the last keyframe is selected in the Effect Stack’s list. Then you are ready to flood the piano with a deep blue.
Moving the timeline cursor to the beginning of the project and playing it (with Space, or the button in the ), the piano should now change the colour as desired.
Keyframing was the hardest part of this tutorial. If you managed to do it, you will master Kdenilve easily!
See also Effects section of the manual.
Music

Since the clips do not provide any audio, let’s search for some nice piece of music, on your local collection or on web pages like Jamendo. The audio clip should, after adding it, go to an audio track on the timeline.
The audio clip can be resized on the timeline the same way as video clips are. The cursor will snap in at the end of the project automatically. To add a fade out effect at the end of the audio clip (except if you found a file with exactly the right length) you can hover the top right (or left) edge of the timeline clip and drag the green disc to the position where fading out should start.[6]
Rendering
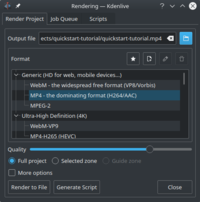
A few minutes left, and the project is finished! Click the Render button (or go to , or press Ctrl + Enter) to get the dialog shown on the left. Select the desired output file for our new video with all effects and transitions, choose MPEG4 (works nearly everywhere) and a bitrate of 2000k (the higher the bitrate, the larger the output file and the better the quality – but since the bitrate for the input clips was 2000k already, using a higher one would not improve quality and is therefore unnecessary), and press the button.
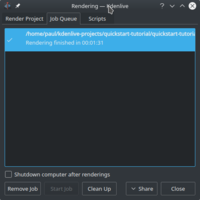
After some seconds rendering will be finished, and your first Kdenlive project completed. Congratulations!
References and notes
- ↑ Eğer Theora'yı tercih ederseniz (genellikle Ogg Video problem yarattığı için muhtemelen istemeyeceğiniz tür), alternatif olarak kdenlive-tutorial-videos-2011-ogv.tar.bz2.
- ↑ 720 videonun yüksekliği iken p, interlaced video (taramalı video)'ya tam zıt olarak progressive scan (aşamalı tarama) ifade etmektedir. Yine fps değeri, saniyedeki kare sayısını belirtmektedir.
- ↑ Sağlanan Kdenlive Ayarları altındaki Çeşt. kısmında İlk eklenen klibin proje profili ile eşleştiğini kontrol et seçili ise
- ↑ Düzeltmek için açıklayalım: Eğer
melt projeniz.kdenlivekullanılarak oynatılabilir ancak (çoğu zaman) çok yavaş olacağı için çıkışta görmek istediğiniz sonuç videosu değildir. Ayrıca, sadece melt yüklü ise çalışır. - ↑ Writing it this way suggests that there are several ways of cutting a clip. This is in fact true.
- ↑ This green disc is a shorthand for adding the effect . Both ways lead to the same result.
