Klipper/zh-tw: Difference between revisions
m (Created page with "==外部鏈接== * http://linux-blog.org/make-klipper-work-for-you/") |
(Updating to match new version of source page) |
||
| (4 intermediate revisions by 2 users not shown) | |||
| Line 6: | Line 6: | ||
傳統的剪貼簿的設想是你能複制一段文本以便能把它粘貼到其他地方。但如果你複製了一段內容,那之前複製的內容就會丟失。 '''Klipper''' 一舉解決了這個問題。你剛複制的項目仍然是粘貼的默認內容,但是其他會存儲在一個緩存裡,所以你可以用不同的命令選擇粘貼你的選中內容。甚至儲存在緩存裡的項目數量都能設置!點擊托盤或是面簿上的圖標,你會看到可能的選中內容,以及一些選項。讓我們看一些設定選項。 | 傳統的剪貼簿的設想是你能複制一段文本以便能把它粘貼到其他地方。但如果你複製了一段內容,那之前複製的內容就會丟失。 '''Klipper''' 一舉解決了這個問題。你剛複制的項目仍然是粘貼的默認內容,但是其他會存儲在一個緩存裡,所以你可以用不同的命令選擇粘貼你的選中內容。甚至儲存在緩存裡的項目數量都能設置!點擊托盤或是面簿上的圖標,你會看到可能的選中內容,以及一些選項。讓我們看一些設定選項。 | ||
{{Note|Within Plasma there are two different buffers. One is the ''clipboard'' and the other is the ''selection''. The ''clipboard'' buffer is filled when you press <keycap>Ctrl + X</keycap> or <keycap>Ctrl + C</keycap> and pasted by using <keycap>Ctrl + V</keycap>. The ''selection'' buffer is filled by simply marking some text and pasted by pressing the middle mouse button. Having said that it is important to know that Klipper can be configured to hold both buffers.}} | |||
<div class="mw-translate-fuzzy"> | |||
{|class="vertical-centered" | {|class="vertical-centered" | ||
|[[Image:Klipper-conf.png|thumb|250px]]|| ||可能在<menuchoice>常規</menuchoice>頁面對你最重要的2項是是否你想要剪貼簿啟動時為空還是在多會話中保留他的內容,和是否<menuchoice>同步</menuchoice>剪貼簿和選中內容。他們的意思並不直接明顯,但是在手冊裡有清楚的解釋。你的確需要明白這個,如果選擇錯了會很鬱悶的。 | |[[Image:Klipper-conf.png|thumb|250px]]|| ||可能在<menuchoice>常規</menuchoice>頁面對你最重要的2項是是否你想要剪貼簿啟動時為空還是在多會話中保留他的內容,和是否<menuchoice>同步</menuchoice>剪貼簿和選中內容。他們的意思並不直接明顯,但是在手冊裡有清楚的解釋。你的確需要明白這個,如果選擇錯了會很鬱悶的。 | ||
|} | |} | ||
</div> | |||
<div class="mw-translate-fuzzy"> | |||
{|class="vertical-centered" | {|class="vertical-centered" | ||
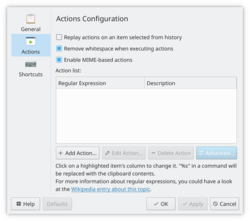
|[[Image:Klipper-actions.png|thumb|250px]]|| ||如果你在寫腳本或是從事編程工作,這部分是給你準備的。基於正則表達式的動作可以在這裡設置。 | |[[Image:Klipper-actions.png|thumb|250px]]|| ||如果你在寫腳本或是從事編程工作,這部分是給你準備的。基於正則表達式的動作可以在這裡設置。 | ||
|} | |} | ||
</div> | |||
{|class="vertical-centered" | {|class="vertical-centered" | ||
| Line 18: | Line 25: | ||
|} | |} | ||
<div class="mw-translate-fuzzy"> | |||
幫助菜單裡已經有提供''手冊''。 | 幫助菜單裡已經有提供''手冊''。 | ||
</div> | |||
<div class="mw-translate-fuzzy"> | |||
==教學== | ==教學== | ||
* [[Special:myLanguage/Klipper/How_to_search_in_phone_books_using_Klipper|如何使用 Klipper 搜索電話簿]] | * [[Special:myLanguage/Klipper/How_to_search_in_phone_books_using_Klipper|如何使用 Klipper 搜索電話簿]] | ||
</div> | |||
<div class="mw-translate-fuzzy"> | |||
==外部鏈接== | ==外部鏈接== | ||
* http://linux-blog.org/make-klipper-work-for-you/ | * http://linux-blog.org/make-klipper-work-for-you/ | ||
</div> | |||
Klipper can be accessed from the command line using ''xclip'' . To copy to the ctl+C/V buffer use ''xclip -selection clipboard'' | |||
[[Category: | [[Category:工具/zh-tw]] | ||
[[Category: | [[Category:系統/zh-tw]] | ||
Latest revision as of 06:42, 11 November 2022
 |
Klipper 剪貼板工具 |
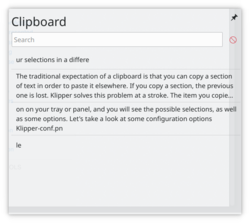
傳統的剪貼簿的設想是你能複制一段文本以便能把它粘貼到其他地方。但如果你複製了一段內容,那之前複製的內容就會丟失。 Klipper 一舉解決了這個問題。你剛複制的項目仍然是粘貼的默認內容,但是其他會存儲在一個緩存裡,所以你可以用不同的命令選擇粘貼你的選中內容。甚至儲存在緩存裡的項目數量都能設置!點擊托盤或是面簿上的圖標,你會看到可能的選中內容,以及一些選項。讓我們看一些設定選項。
 |
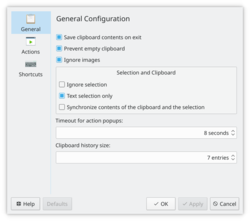
可能在頁面對你最重要的2項是是否你想要剪貼簿啟動時為空還是在多會話中保留他的內容,和是否剪貼簿和選中內容。他們的意思並不直接明顯,但是在手冊裡有清楚的解釋。你的確需要明白這個,如果選擇錯了會很鬱悶的。 |
 |
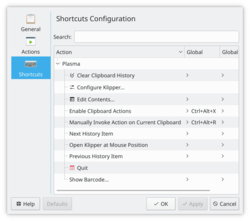
這裡你能自定義現有的捷徑。現在還不能添加額外新的捷徑。 |
幫助菜單裡已經有提供手冊。
Klipper can be accessed from the command line using xclip . To copy to the ctl+C/V buffer use xclip -selection clipboard


