Klipper/ca: Difference between revisions
Created page with "== Enllaços externs ==
* http://linux-blog.org/make-klipper-work-for-you/" |
Updating to match new version of source page |
||
| (14 intermediate revisions by 2 users not shown) | |||
| Line 4: | Line 4: | ||
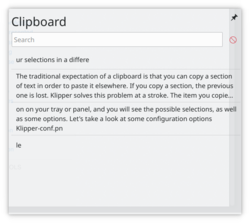
|[[Image:Klipper2.png|250px]]|| ||'''Klipper és el vostre porta-retalls amb esteroides.''' | |[[Image:Klipper2.png|250px]]|| ||'''Klipper és el vostre porta-retalls amb esteroides.''' | ||
|} | |} | ||
El que s'espera d'un porta-retalls tradicional és que pugueu copiar una secció de text per enganxar-la després en un altre lloc. Si copieu alguna cosa, després es perd. '''Klipper''' soluciona aquest problema d'una plomada. L'element que copieu en últim lloc seguirà sent per omissió l'utilitzat en enganxar, però la resta s'emmagatzemen en la memòria cau, de manera que podeu triar enganxar les vostres seleccions en un ordre diferent. Fins i tot podeu configurar el nombre d'elements emmagatzemats en la memòria cau! Feu clic a la icona de la safata o del plafó, i veureu les seleccions disponibles, així com altres opcions. Fem un cop d'ull a algunes opcions de configuració. | |||
{{Note|Within Plasma there are two different buffers. One is the ''clipboard'' and the other is the ''selection''. The ''clipboard'' buffer is filled when you press <keycap>Ctrl + X</keycap> or <keycap>Ctrl + C</keycap> and pasted by using <keycap>Ctrl + V</keycap>. The ''selection'' buffer is filled by simply marking some text and pasted by pressing the middle mouse button. Having said that it is important to know that Klipper can be configured to hold both buffers.}} | |||
<div class="mw-translate-fuzzy"> | |||
{|class="vertical-centered" | {|class="vertical-centered" | ||
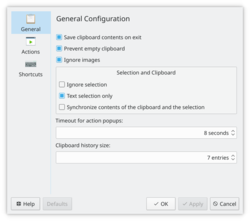
|[[Image:Klipper-conf.png|thumb|250px]]|| || | |[[Image:Klipper-conf.png|thumb|250px]]|| ||És possible que els dos elements més importants per a l'ús restin sobre la pestanya <menuchoice>General</menuchoice> si voleu que el porta-retalls comenci buit o que conservi el seu contingut a través de les sessions, i si s'ha de <menuchoice>sincronitzar</menuchoice> el contingut del porta-retalls i la selecció. El significat d'això no és immediatament obvi, però una explicació clara és en el manual. Definitivament, cal entendre-ho, ja que una tria inadequada serà frustrant. | ||
|} | |} | ||
</div> | |||
<div class="mw-translate-fuzzy"> | |||
{|class="vertical-centered" | {|class="vertical-centered" | ||
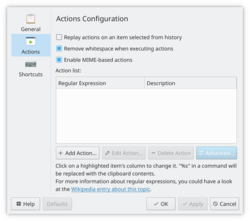
|[[Image:Klipper-actions.png|thumb|250px]]|| || | |[[Image:Klipper-actions.png|thumb|250px]]|| ||Si escriviu scripts o treballeu en programació, aquesta secció és per a tu. Les accions basades en expressions regulars es poden configurar aquí. | ||
|} | |} | ||
</div> | |||
{|class="vertical-centered" | {|class="vertical-centered" | ||
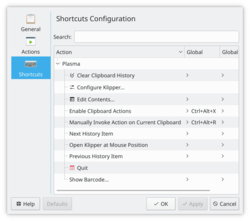
|[[Image:Klipper-shortcuts.png|thumb|250px]]|| || | |[[Image:Klipper-shortcuts.png|thumb|250px]]|| ||Aquí podeu personalitzar les dreceres existents. De moment no és possible afegir dreceres addicionals. | ||
|} | |} | ||
<div class="mw-translate-fuzzy"> | |||
El ''Manual'' està disponible des d'un element al menú Ajuda. | |||
</div> | |||
== Guia d'aprenentatge == | == Guia d'aprenentatge == | ||
* [[Special:myLanguage/Klipper/How_to_search_in_phone_books_using_Klipper|Com cercar en | * [[Special:myLanguage/Klipper/How_to_search_in_phone_books_using_Klipper|Com cercar en les guies telefòniques utilitzant Klipper]] | ||
* [[Special:myLanguage/Klipper/Pastebins|Klipper pot enviar els vostres clips directament a paste-bin]] | |||
<div class="mw-translate-fuzzy"> | |||
== Enllaços externs == | == Enllaços externs == | ||
* http://linux-blog.org/make-klipper-work-for-you/ | * http://linux-blog.org/make-klipper-work-for-you/ | ||
</div> | |||
Klipper can be accessed from the command line using ''xclip'' . To copy to the ctl+C/V buffer use ''xclip -selection clipboard'' | |||
[[Category: | [[Category:Utilitats/ca]] | ||
[[Category: | [[Category:Sistema/ca]] | ||
Latest revision as of 06:44, 11 November 2022
 |
Klipper és el vostre porta-retalls amb esteroides. |
El que s'espera d'un porta-retalls tradicional és que pugueu copiar una secció de text per enganxar-la després en un altre lloc. Si copieu alguna cosa, després es perd. Klipper soluciona aquest problema d'una plomada. L'element que copieu en últim lloc seguirà sent per omissió l'utilitzat en enganxar, però la resta s'emmagatzemen en la memòria cau, de manera que podeu triar enganxar les vostres seleccions en un ordre diferent. Fins i tot podeu configurar el nombre d'elements emmagatzemats en la memòria cau! Feu clic a la icona de la safata o del plafó, i veureu les seleccions disponibles, així com altres opcions. Fem un cop d'ull a algunes opcions de configuració.
 |
Si escriviu scripts o treballeu en programació, aquesta secció és per a tu. Les accions basades en expressions regulars es poden configurar aquí. |
 |
Aquí podeu personalitzar les dreceres existents. De moment no és possible afegir dreceres addicionals. |
El Manual està disponible des d'un element al menú Ajuda.
Guia d'aprenentatge
- Com cercar en les guies telefòniques utilitzant Klipper
- Klipper pot enviar els vostres clips directament a paste-bin
Enllaços externs
Klipper can be accessed from the command line using xclip . To copy to the ctl+C/V buffer use xclip -selection clipboard


