Browser Configuration/Opera: Difference between revisions
m Added language navigation bar |
This version of the Opera web browser does not exist anymore. |
||
| (12 intermediate revisions by 4 users not shown) | |||
| Line 1: | Line 1: | ||
{{ | {{Proposed_deletion|reason=This version of the Opera web browser does not exist anymore.}} | ||
<languages /> | |||
<translate> | |||
<!--T:1--> | |||
This tutorial explains how to configure '''Opera''' so that it will blend with your '''Plasma''' applications. To do this, we'll need to install the ''Opera Oxygen Project skin'', set '''Opera''' to use your chosen Plasma Desktop scheme, and change '''Opera's''' default fonts to the ones which KDE uses. | |||
This tutorial | <!--T:2--> | ||
{{Note|1=This tutorial is written for Opera 10 or later. Make sure that you're using Plasma's default icon theme, Oxygen, since the Opera Oxygen Project skin uses icons from Oxygen.}} | |||
== Step 1: Installing the Skin == <!--T:3--> | |||
<!--T:4--> | |||
Open '''Opera''' and navigate to the following link: | |||
<!--T:5--> | |||
[http://my.opera.com/community/customize/skins/info/?id=8141 http://my.opera.com/community/customize/skins/info/?id=8141] | |||
<!--T:6--> | |||
Click <menuchoice>Download Skin</menuchoice> to install the <menuchoice>Opera Oxygen Project</menuchoice> skin. | |||
<!--T:19--> | |||
{{Tip|1=In more recent versions of Opera, You don't need to proceed to steps two or three! This has been observed in Opera 10.63.}} | |||
== Step 2: Applying the Skin & Changing the Color Scheme == <!--T:7--> | |||
<!--T:8--> | |||
Go to <menuchoice>Tools -> Appearance</menuchoice>. | |||
<!--T:9--> | |||
In the ''Skins'' box, you will see a list of all the skins that are currently installed. Click on <menuchoice>opera_oxygen_project_[version]</menuchoice> to apply the Opera Oxygen Project skin to '''Opera'''. | |||
<!--T:10--> | |||
Click on the menu box next to ''Color Scheme'' and select <menuchoice>System Color Scheme</menuchoice> to let '''Opera''' use KDE's color scheme. | |||
== Step 3: Changing the Font == <!--T:11--> | |||
<!--T:12--> | |||
Go to <menuchoice>Tools -> Preferences</menuchoice>. Click on the <menuchoice>Web Pages</menuchoice> tab. | |||
<!--T:13--> | |||
'''Opera''' has two default fonts - the normal font and the monospace font. You can change these default fonts by clicking on them. Change the normal font to ''DejaVu Sans'' and change the monospace font to ''DejaVu Sans Mono''. | |||
<!--T:14--> | |||
That's it! Now '''Opera''' will look and feel just like your '''Plasma''' applications. | |||
<!--T:15--> | |||
[[Image:Opera-kde4.png|center|300px]] | |||
== Source == <!--T:16--> | |||
<!--T:17--> | |||
This tutorial is based on Patrick Trettenbrein's blog entry entitled “How to make Opera 9.5 look native in KDE 4” (which no longer exists). Additional updates have been made as '''Opera''' has been updated. | |||
<!--T:18--> | |||
[[Category:Tutorials]] | |||
[[Category:Internet]] | |||
[[Category:Configuration]] | |||
</translate> | |||
Latest revision as of 17:17, 13 September 2023
This tutorial explains how to configure Opera so that it will blend with your Plasma applications. To do this, we'll need to install the Opera Oxygen Project skin, set Opera to use your chosen Plasma Desktop scheme, and change Opera's default fonts to the ones which KDE uses.
Step 1: Installing the Skin
Open Opera and navigate to the following link:
http://my.opera.com/community/customize/skins/info/?id=8141
Click to install the skin.
Step 2: Applying the Skin & Changing the Color Scheme
Go to .
In the Skins box, you will see a list of all the skins that are currently installed. Click on to apply the Opera Oxygen Project skin to Opera.
Click on the menu box next to Color Scheme and select to let Opera use KDE's color scheme.
Step 3: Changing the Font
Go to . Click on the tab.
Opera has two default fonts - the normal font and the monospace font. You can change these default fonts by clicking on them. Change the normal font to DejaVu Sans and change the monospace font to DejaVu Sans Mono.
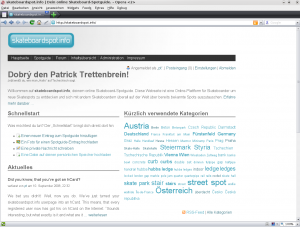
That's it! Now Opera will look and feel just like your Plasma applications.

Source
This tutorial is based on Patrick Trettenbrein's blog entry entitled “How to make Opera 9.5 look native in KDE 4” (which no longer exists). Additional updates have been made as Opera has been updated.


